CAVI
Setup Module
- Unable to delete scripting alt from the Setup tree (Jira CWMS-909). It is not possible to delete a scripting alternative from the Setup tree using the right-click menu. The delete option does not provide a confirmation dialog and the delete action never occurs. All other options appear to work without issue from right-click menu. Workaround is to leave the script installed until delete feature is fixed in future version, and use the rename feature to indicate script alternatives to be deleted. Also, the edit feature allows the selected script to be re-defined, so an unwanted entry can just be re-purposed to a useful script alternative.
Extract Editor
The ability to extract directly from Cumulus and CWMS Data API (CDA) have been added for CWMS 3.3.0. Tutorials are available to set up both Cumulus and CDA extract groups.
Team Watershed
- Watershed Setup tree not updating after watershed sync (Jira CWMS-910). When performing a watershed sync on a teaming watershed stored on a network share, after the sync is finished, the watershed setup tree is not updating with changes and removing the color label. Close and reopen of watershed seems to update node color. This action only occurs when performing a sync on a specific node, example MFP. If user selects the watershed and performs a sync, the entire watershed is reloaded at end. If user performs a sync from the specific model node, there is no refresh. Workaround is to re-open watershed, or simply be aware that sync color code in Watershed Setup module may not be correct.
- Using a network drive to store your master watershed, the "Out of date with master" dialog is not generating. You need to go the "watershed" → "Team" → "Sync with Master Watershed" to update with master. The model tree in the setup module will still be color coordinated to let the user know if the local copy of the watershed is out of date with the master.
- For initially wanting to download a team forecast, you need to open a local forecast first. Then once the watershed has been opened and closed, there should be an option in the "Team" option to download the team forecast.
- In testing, remote employees had some issues with RAS updates getting downloaded when uploaded via an entire forecast upload but worked when pushed just the RAS portion of the alternative.
- There seems to be inconsistency with the download complete dialog and what is being noted as copied, deleted, skipped or error files.
CAVI Desktop Dashboard
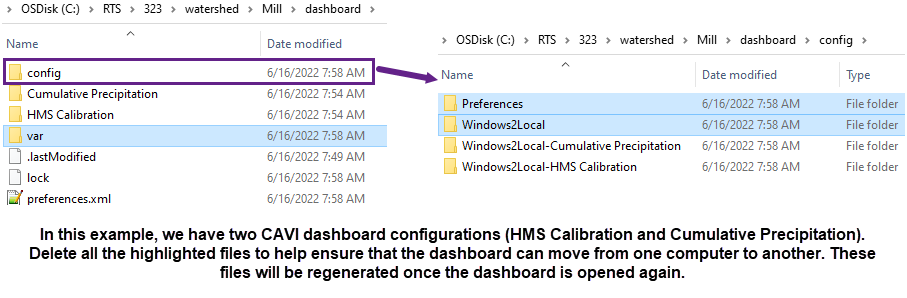
- The portability of the CAVI desktop dashboard is not a seamless process yet. . If you plan on moving a watershed from one computer to another, here are some steps to help work around this issue (this does pertain to Team Watersheds as well):
The screen shot below shows an example within the config folder of the dashboard and the dashboard folder itself. In this watershed, there are two custom Dashboard Configurations called “HMS Calibration” and “Cumulative Precipitation”.
The “Preferences” and “Windows2Local” folders should be deleted
The two folders that have “HMS Calibration” and “Cumulative Precipitation” in the name should be kept.
Finally, the “var” folder that is directly within the dashboard folder should be deleted.
All the files deleted from the above steps should be regenerated when the new user opens the dashboard and should retain the dashboard configurations.
- "Save Configuration As" action within the dashboard will result in a java.lang.StringIndexOutOfBoundsException error.
Model Linking Editor
- How model linking in the CAVI is managed has been improved in CWMS 3.3.0. The CAVI now stores the model linking in a .linkages file for each forecast run in the cavi > modelLinking folder (for both forecasts and in the base watershed). Previously all model linkages were stored in the individual plugins (HMS, ResSim, RAS, and FIA).
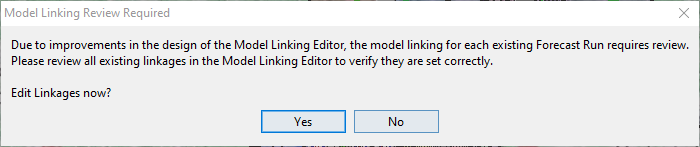
- When a user first opens a watershed in CWMS 3.3.0, the popup below will appear prompting the user to review the model linking for each forecast run in the Model Linking Editor. Selecting Yes will open the Model Linking Editor where the user can review each forecast to ensure the correct linkages are selected. Clicking Apply and saving the watershed will save the .linkages file for the reviewed Forecast Runs to the cavi>modelLinking folder.
- Now in CWMS 3.3.0 when the Model Linking Editor is opened for a forecast run it asks the CAVI for the model linking for the selected Model Alternative. If the CAVI does not have any linkages for the Model Alternative in the Forecast Run it will go to the plugin and then ask it for the Model Linking for the Model Alternative. Whatever is received back from the plugin will be the initial linkages for that Model Alternative in the Forecast Run.
- If the CAVI already has linkages for the Model Alternative or the ForecastRun, the CAVI will still ask the plugin for the Data Locations for the Model Alternative, merging the existing linkages it has with the Data Locations from the plugin to make sure any additions or deletions that were made in the native application are applied to ensure the list of Data Locations is still correct.
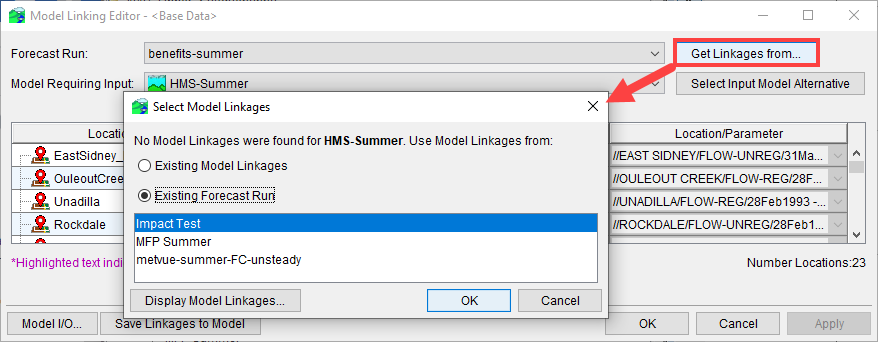
- For a new Forecast Run, the user can choose to inherit or copy the linkages for the selected Model Alternative from another Forecast Run or define them all again, starting with what comes back from the plugin/native app. The new "select Model Linkages" option shown below allows the user to select existing linkages from existing forecast runs, saving setup time.
- Users can now use a single model alternative in multiple Forecast Runs that have different programs earlier in the Program Order. For example it is now possible to have a single ResSim Alternative included in two different Forecast Runs. Forecast Run A could have MFP and then ResSim, while Forecast Run B could have MetVue and then the same ResSim alternative.
Currently Known Issue
After initial setup/confirmation of the Model Linking Editor in CWMS 3.3.0, opening the Model Linking Editor in the Setup Tab at a later date may prompt the user with the message seen below:
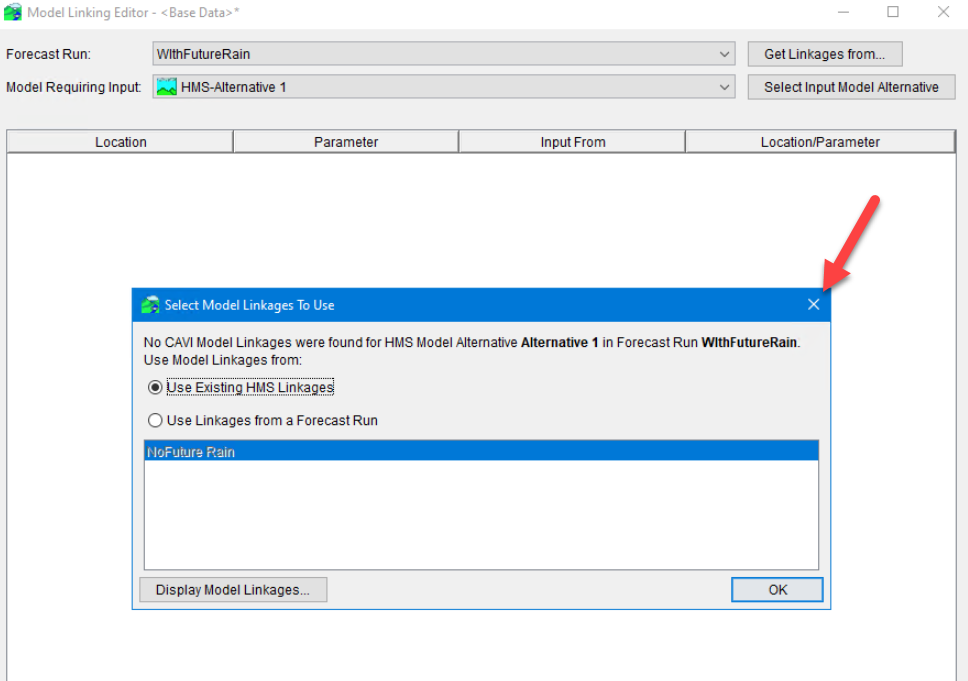
Selecting one of the options and clicking "Ok" will modify the existing linkages. However the current workaround is to simply click the "x" highlighted in the image above with the red arrow. The linkages that were already established will then be loaded into the model linking editor.
After the initial Modeling Linking Editor is completed for 3.3.0, the model linking will not be impacted unless the editor is opened again.
Program Order
- No longer need to have "Advanced Options" selected to have multiple program orders
Time Series Icons
- For associated data sets that point towards the active forecast.dss file, these should only have Icon Types of None in the Acquisition and Visualization Modules as they may not display properly. It is encouraged to only use data sets from the active forecast.dss in the Modeling Module.
- Time Series Icons now support data source from CWMS-Data-API
Time Zone
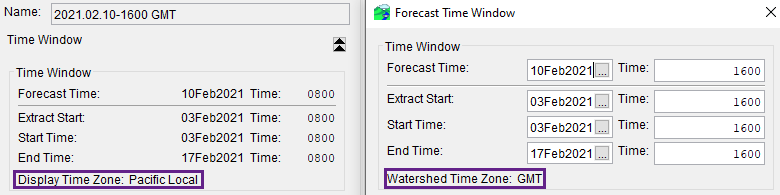
- The CAVI displayed time zone might differ from the data's time zone. The time zone chosen in the View|Displayed Time Zone will only impact the data displayed within the CAVI. The watershed itself may have a different time zone than the displayed time zone in the CAVI.
- This allows for the forecast time window while editing the time window to be in a different time zone compared to what is shown as the time window in the CAVI
- This allows for the forecast time window while editing the time window to be in a different time zone compared to what is shown as the time window in the CAVI
- The CWMS suite of software does not have an associated time zone but are assumed to be in the same time zone as the watershed (which again can differ from the displayed time zone in the CAVI).
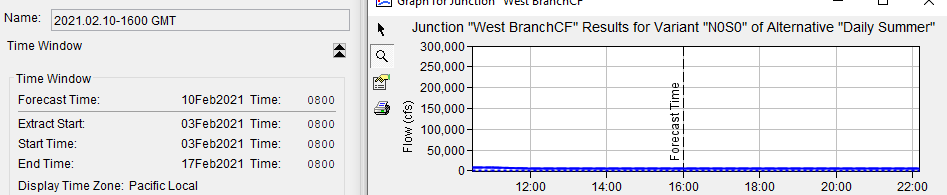
Notice how the display is in Pacific and has the forecast time being 0800 while the HMS graph is showing 1600 (both of these are for 10Feb2021). This helps show that the HMS model's data is assumed watershed time zone (which in this case is GMT).
Data Status Summary
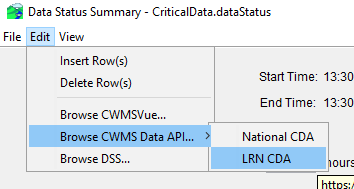
- Data Status Summary now supports CWMS Data API
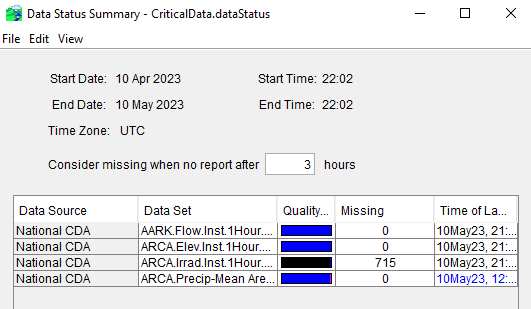
Add a Login connection to the CWMS Data API in the Login dialog and the option will appear in the Browse menu in Data Status Summary. The login will also be available for Time Series Icons.