Create an HEC-HMS Alternative
An HEC-HMS alternative consists of a basin model, loss parameter, transform parameter, baseflow zone configurations, and a set of parameter adjustments for each zone. Within an HEC-HMS alternative, you can adjust parameters in the HEC-HMS basin model to try to match observed flows at the time of forecast. You can also control blending of model results to observed flows where they are available. If the HEC-HMS project contains more than one basin model (for summer and winter conditions, for instance), you can build HEC-HMS alternatives around each of them.
Import HEC-HMS Model Alternative
To import HEC-HMS model alternatives:
- From the HEC-RTS main window, click the Setup tab, from the watershed tree, from the Model folder, right-click on HMS, from the shortcut menu, click Import (Figure 1), a Select Project File browser will open.

- From the Select Project File browser, navigate to and select the HEC-HMS project file (.hms) you wish to import. Click *Select, and the import process will begin.
- If you are importing an HEC-HMS model alternative created in a previous version of HEC-HMS, then the Convert HEC-HMS Project dialog (Figure 2) displays prompting you to convert the project. Click Convert Project, and the Convert HEC-HMS Project dialog closes.

- Once the import is complete the Message Pane will display "HMS: NOTE 16161: Import finished". Be sure to save your watershed.
HMS Loss and Baseflow Zone Configurations
After you import the HEC-HMS model alternatives, you must create zone configurations for loss parameter, transform parameter, and baseflow parameter adjustments. A zone configuration is a set of zones, and a zone is a set of elements (subbasins or reaches) in the watershed. You should group elements into zones based on similarity of hydrologic properties and the availability of observed flows against which to calibrate zone parameters. For example, you might group the subbasins in a headwaters area above a reservoir together into a zone. At forecast time, the baseflow and loss parameters for the subbasins in that zone will be adjusted together so that the hydrograph calculated by HEC-HMS for the inflow to the reservoir fits the observed inflows to the reservoir as well as possible.
Create a Zone Configuration
To create a zone configuration:
- From the HEC-RTS main window, click the Setup tab, from the watershed tree, from the Model folder, expand HMS. Right-click on an HEC-HMS model alternative. From the shortcut menu, click Zone Configurations. The Zone Configuration Manager opens.
- To create a new zone configuration, from the Zone Configuration Manager, click New. The Create a New Zone Configuration dialog opens.
- From the Create A New Zone Configuration dialog, enter a name into the Name box and description into the Description box.
- From the Element Type list, select either Subbasins or Reaches. Click Create, the Create A New Zone Configuration dialog closes and the new zone configuration is added to the list of current zone configurations.
- Close the Zone Configuration Manager and Save your watershed.
Create Zones
For each loss or baseflow zone configuration, you will need to create at least one loss/baseflow zone. You should base the zones on similarity of hydrologic properties and the availability of observed flows to calibrate zone parameters against.
To create a zone:
- From the HEC-RTS main window, click the Setup tab, from the watershed tree, from the Model folder, expand HMS. Right-click on an HEC-HMS model alternative. From the shortcut menu, click Zone Configurations. The Zone Configuration Manager opens.
- From the Current zone configurations box, select a zone configuration. Click Zones, the Zones dialog opens.
- From the Zones dialog, click New, the Create A New Zone dialog opens. Enter a name into the Name field (required) and description into the Description field (optional).
- Click Create, the Create A New Zone dialog will close. The name of zone you created displays in the Current zones for selected zone configuration list on the Zones dialog. Close the Zones dialog and Save your watershed.
Add Elements to a Loss Parameter
Once loss parameter zones have been created, you can assign elements to the zones.
To assign elements to zones:
- From the HEC-RTS main window, click the Setup tab, from the watershed tree, from the Model folder, expand HMS. Right-click on an HEC-HMS model alternative. From the shortcut menu, click Zone Configurations. The Zone Configuration Manager opens.
- From the Current zone configurations box, select a zone configuration. Click Elements, the Elements dialog opens. From the Zones list, select the zone that you want to add elements to.
- Select the elements (subbasins or reaches) you want to add to the zone from the elements (subbasins or reaches) listed in the Unassigned Subbasins list. Select one subbasin by clicking on that subbasin; select ranges of subbasins by shift-clicking; select discontinuous groups of subbasins by control-clicking.
- Click Add and the selected element names display in the box under the Zones list. You can also move a subbasin into a zone by double-clicking on the element in the Unassigned Subbasins list.
- You can move elements out of a zone by selecting an element in the box under the Zones list and then clicking Remove or by double-clicking on that element.
- Close the Elements dialog, close the Zone Configuration Manager and Save your watershed.
Forecast for an HEC-HMS Alternative
From the Forecast Alternative editor (Figure 3), you can select the zone configuration for the loss rate, transform, baseflow and routing configuration parameters.

To set the forecast configuration and zone configuration parameters:
- From the HEC-RTS main window, click the Setup tab, from the watershed tree, from the Model folder, expand HMS. Right-click on an HEC-HMS model alternative. From the shortcut menu, click Forecast Configuration. The Forecast Alternative editor (Figure 3) opens.
- Enter a description in the Description field. Enter date and time values in for the Start Date, Forecast Date, and End Date. From the Time Interval list, select a time interval
- From the Loss Rate Config, Transform Config, Baseflow Config, and Routing Config lists, select the appropriate zone configuration.
- Click OK, and the Forecast Alternative editor closes (Figure 3). Save your watershed.
Adjust Parameters Using the Combined Parameter Editor
The Combined Parameter Editor (Figure 4) allows you to adjust loss rate, transform, and baseflow parameters to calibrate your HEC-HMS model to the forecasted event. It also controls blending (the substitution of observed flows for calculated flows in the model) for the HEC-HMS model. An HEC-HMS alternative consists of an HEC-HMS basin model, which sets initial values for parameters, and a set of adjustments to those initial parameter values. The methods for the parameters are based on what was specified in the HEC-HMS model.

To adjust combined parameters:
- From the HEC-RTS main window, click the Setup tab, from the watershed tree, from the Model folder, expand HMS. Right-click on an HEC-HMS model alternative. From the shortcut menu, click Combined Parameter Editor. The Combined Parameter editor (Figure 4) opens.
- Click on the Blending tab, adjust the loss rate, transform, and baseflow parameters as needed. Click Apply, the Combined Parameter editor will close, save your HEC-RTS study.
Loss Parameters
To adjust loss parameters, from the Combined Parameter editor (Figure 5), click on the Deficit Constant Loss tab (name is dependent on the loss method selected). For example, in Figure 5, the loss method used was Deficit and Constant.
The upper panel shows a list of the loss zones in the watershed and the zone-average values for the initial soil-moisture deficit, the maximum deficit, and the constant loss rates in the HEC-HMS alternative. In the upper panel, for each parameter, there is a Zone Average column and an Adjustment column. The leftmost column displays the area-weighted average value of the parameter over the subbasins in the zone as read from the HEC-HMS basin model. To override a zone value, enter the new value in the Adjustment column.
In the lower panel of the editor are the parameters for the individual subbasins in the zone. For each parameter there are two columns, the Base Value and Final Value. To edit a loss parameter, select the override box next to the zone subbasin. The Final Value cell becomes editable and you can enter your new value. The list in the lower panel will contain the subbasins in that zone.
Baseflow Parameters
To edit the baseflow parameters, click on the Baseflow tab (Figure 4) of the Combined Parameter editor. For this example, the baseflow method used was Bounded Recession. The baseflow panel uses the same parameter adjustment method as the loss tab to adjust the baseflow at the time of forecast (this is not the initial baseflow, but the initial baseflow minus the recession that occurs between the lookback time and the time of forecast) and the recession ratio.
Transform Parameters Tab
To edit the transform parameters, select the Transform tab (Figure 4) on the Combined Parameter Editor. For this example, the transform method used was ModClark. The transform panel uses the same parameter adjustment method as the loss tab to adjust the transform at the time of forecast.
Blending Tab
To edit blending parameters, select the Blending tab on the Combined Parameter editor (Figure 4). This contains a list of all locations in the HEC-HMS model where observed flows are available for blending. You can select blending methods (Step or Taper), set the taper interval, or turn blending off at each location.
Slider Adjustments
From the Combined Parameter editor (Figure 4), click Slider Adjustments, the Forecast Parameters And Blending dialog (Figure 6) will open. This allows you to adjust zonal, subbasin, and reach element parameters for calibration.

Adjust Parameters Using Slider Adjustments
Sliders in HEC-HMS (Figure 7) allow you to adjust loss rate, transform, baseflow, and routing parameters easily. You adjust these parameters so that the simulated watershed response matches observed values (for example stream gages and reservoir stages) more closely during the lookback period of the event. An HEC-HMS alternative HEC-RTS consists of an HEC-HMS basin model, which sets initial values for parameters, a set of adjustments to those initial parameter values, and a metrological model that defines the precipitation input. The methods associated with the basin model parameters are based on what was specified in the HEC-HMS model alternative. The following sections describe setting up and using slider adjustments. Sliders depict a range of values, increments, or factors on a line and a selector that you can drag across the line to select a value, increment, or factor to adjust the parameter by. Sliders allow for quick, small adjustments of parameters and allow HEC-HMS to recompute runoff for a subset of basin elements instead of the entire watershed. This allows for faster computation when adjustments are made.

Configuring Slider Adjustments
Before you can use slider adjustments, you must first configure slider adjustments. This is a two-step process: First, you must specify by zone and/or subbasin/reach which parameters you would like to adjust. Second, you must set the adjustment type (how the sliders will adjust the parameters) and limits (the maximum and minimum adjustments) of each slider.
Slider Adjustment Specification
To specify the parameters, you would like to adjust:
- From the HEC-RTS main window, from the main toolbar, click
 . The HEC-HMS software application will display.
 - In the Watershed Explorer in HEC-HMS (set of tabs on the lower left), click the Compute tab (Figure 8).

- From the Compute tab, expand the Forecast Alternatives folder (Figure 8), and right-click on a forecast alternative for which you wish to configure slider adjustments.
- From the shortcut menu (Figure 8), click Forecast Slider Adjustments, the Forecast Slider Adjustments dialog (Figure 9) will open.

- On each tab of the Forecast Slider Adjustments dialog (Figure 9), the zone or subbasin/reach and the associated parameters are listed. The tabs in this dialog are named with the loss rate, transform, baseflow, and routing methods used in the basin. (To be able to edit each type of parameter, the Loss Rate Config, Transform Config, Baseflow Config, and Routing Config zones must be defined in the HEC-HMS forecast alternative.)
- Click Select, the Select Forecast Slider Adjustments dialog (Figure 10) will open.

- Select the tab with the parameters you wish to adjust. For example, in Figure 10, click the loss tab (Deficit Constant Loss) to select loss rate parameters for adjustment.
- To select zonal adjustment sliders, in the Parameters for Zones panel (Figure 10), select a zone in the Zones box. This will populate the available parameters in Parameters box that can be assigned to sliders.
- In the Parameters box (Figure 10), select one or more items you wish to adjust using sliders (you can choose multiple parameters by using the CTRL or SHIFT keys), click Select. The items selected in the Parameters box on the Select Forecast Slider Adjustments dialog (Figure 10) no longer display. The items now display on the Forecast Slider Adjustments dialog (Figure 9).
- Repeat Steps 8 and 9 to select all desired zonal adjustment sliders.
- Next, to select subbasin or reach adjustment sliders (for adjusting parameters for individual elements instead of zones), from the Parameters for subbasin overrides panel (Figure 10), select a subbasin or reach in the Subbasins box. This will populate the available Parameters box that can be assigned to sliders.
- In the Parameters box (Figure 10), select one or more items you wish to adjust using sliders (you can choose multiple parameters using the CTRL or SHIFT keys), click Select. The items selected in the Parameters box on the Select Forecast Slider Adjustments dialog (Figure 10) no longer display. The items now display on the Forecast Slider Adjustments dialog (Figure 9).
- Repeat Steps 11 and 12 to select all desired subbasin/reach adjustment sliders.
- Repeat Steps 6 through 12 for each of the parameters you wish to adjust (loss rate, transform, baseflow, and routing methods). When you have finished selecting slider adjustments, from the Select Forecast Slider Adjustments dialog (Figure 10), click Close. The Select Forecast Slider Adjustments dialog will close.
- Review your selections in the Forecast Slider Adjustments dialog (Figure 9). If you have selected one in error, you can remove it by selecting it in the Parameters column and clicking Remove. When you are satisfied with your selections, from the Forecast Slider Adjustments dialog, click Close. The Forecast Slider Adjustments dialog will close.
Slider Settings
In HEC-HMS parameters have minimum and maximum allowable values. These values are used to initialize the limits of the sliders. To setup the type of adjustment and limits of each slider:
- From the HEC-RTS main window, from the main toolbar, click . The HEC-HMS software application will display.
- In the Watershed Explorer in HEC-HMS (set of tabs on the lower left), click the Compute tab (Figure 8).
- From the Compute tab, expand the Forecast Alternatives folder (Figure 8), and right-click on a forecast alternative for which you wish to configure slider adjustments.
- From the shortcut menu (Figure 8), click Forecast Slider Settings, the Forecast Slider Adjustments dialog (Figure 11) will open.
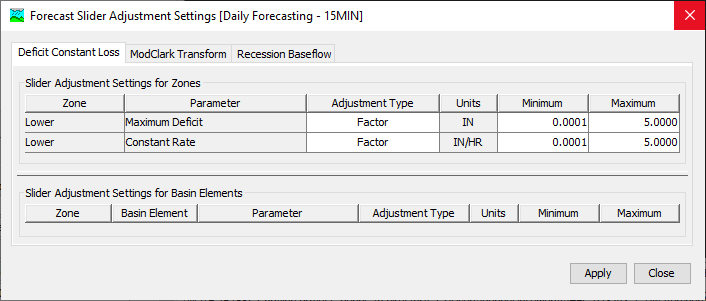
- Each tab has two tables. The upper table shows zonal parameters, and the lower table shows parameters for individual elements. The Zone and Subbasin/Reach columns list the zone and subbasin/reach name. The Parameter column lists the parameter name of the slider. The Adjustment Type column lists the adjustment type. The Units column lists the units for the adjustment. The last two columns list the Minimum and Maximum values for the parameter adjustment.
To be able to configure loss rate, transform, baseflow, and routing slider settings, they must first be configured as detailed in the following section.
- Specify an adjustment type using the dropdown in the Adjustment Type column (Figure 12). An Adjustment Type can be a new Value, an Increment to be added or subtracted from the parameter value, or a Factor to be applied to the parameter value. By default, the zonal adjustment type is Factor, and the subbasin/reach adjustment type is Value. If the adjustment type is Factor, the unit's entry will be blank.

- Specify the minimum and maximum values for each parameter. These columns are populated by default. However, for practical use of the slider adjustments, the limits should be set to a smaller range.
- Review your selections in the Forecast Slider Adjustments Settings dialog (Figure 11). When you are satisfied, click Apply, and then click Close. The Forecast Slider Adjustments Settings dialog will close, save the HEC-HMS project.
Adjusting Parameters Using the Sliders
From the HEC-RTS main window, click the Setup tab, from the watershed tree, from the Model folder, expand HMS. Right-click on an HEC-HMS model alternative. From the shortcut menu, click Combined Parameter Editor. The Combined Parameter editor (Figure 4 will open, click Slider Adjustments. The Forecast Parameters And Blending dialog will open with slider adjustments displayed (Figure 7).
The dialog (Figure 7) consists of multiple tabs, each containing sliders by zone. (Again, the tabs in this dialog are named with the loss rate, transform, baseflow, and routing methods used in the basin.) The zone is selected using the dropdown menu located just under the tabs. The upper part of the dialog shows parameter adjustments for the selected zone. The lower part of the dialog shows parameter adjustments for the individual subbasin or reach within the selected zone (if configured).
Parameter values can be adjusted by moving a slider or by entering a value in the text box to the right of the slider. If a value is entered in the text box, it should be consistent with the adjustment type. A factor must begin with an asterisk (*), an increment must begin with a plus (+) or a minus (-), and a value adjustment needs no initial symbol. The slider will move to the value entered in the text box. If the value in the text box is outside the slider's range, the slider is disabled.
In the upper right of the dialog (Figure 7) there is a check box labeled Compute with each slider change. If this box is checked, any change in a slider will cause the parameter adjustment to be applied, and the forecast alternative will be computed.
If the box is not checked, the parameter adjustment will not be applied until Apply is clicked, and the results will not be updated until the forecast alternative is computed. If you prefer, you can configure HEC-HMS to compute automatically after clicking Apply. In the HEC-HMS software, select Program Settings from the Tools menu. In the General tab, check the box next to Compute after apply in editors, and click OK. This setting applies to both the slider adjustments and combined parameter editor.
Clicking Reset will reset the parameter adjustments to their value when the dialog was opened. Close closes the dialog.
Right-clicking a slider (in HEC-RTS) brings up a menu with two options. The first option Reset to Original Value will reset the parameter adjustment to the original value when the dialog was opened. The second option Modify Slider Limits opens the Forecast Slider Adjustments Settings dialog, so the Adjustment Type and slider Minimum and Maximum limits can be changed.
Edit an HEC-HMS Alternative
To edit an HEC-HMS model alternative:
- From the HEC-RTS main window, click on the Setup tab, from the watershed tree, from the Models folder, expand HMS.
- Right-click on an HEC-HMS model alternative, from the shortcut menu, click Forecast Configuration, the Forecast Configuration editor will open (Figure 3).
- Edit the HEC-HMS model alternative as desired, click Apply button to save your changes. Click Close, the Forecast Configuration editor will close, save your HEC-RTS study.
Copy an HEC-HMS Alternative
To copy an HEC-HMS model alternative:
- From the HEC-RTS main window, click on the Setup module, from the Models menu, point to HMS, click Forecast Alternative Manager, the Forecast Alternative Manager dialog (Figure 3) opens.
- From the Current forecast alternatives box, select the forecast alternative you wish to copy, click Copy.
- The Copy Forecast Alternative dialog (Figure 13) opens. Enter a new alternative name in the Name field (required) and enter a description in the Description field (optional).

- Click Copy, the Copy Forecast Alternative dialog will close. The new HMS alternative will now be display in the Current forecast alternatives box. Close the Forecast Alternative Manager dialog (Figure 3).
Delete an HEC-HMS Alternative
To delete an HEC-HMS alternative:
- From the HEC-RTS main window, click on the Setup module, from the Models menu, point to HMS, click Forecast Alternative Manager, the Forecast Alternative Manager dialog (Figure 3) opens.
- From the Current forecast alternatives box, select the forecast alternative you wish to delete, click Delete.
- The Delete Confirmation window (Figure 14) opens, asking you if you wish to delete the selected HMS forecast alternative.

- Click OK, the Delete Confirmation window will close. The HMS forecast alternative no longer displays in the Current Forecast Alternatives box. Close the Forecast Alternative Manager dialog (Figure 3).