Script Editor
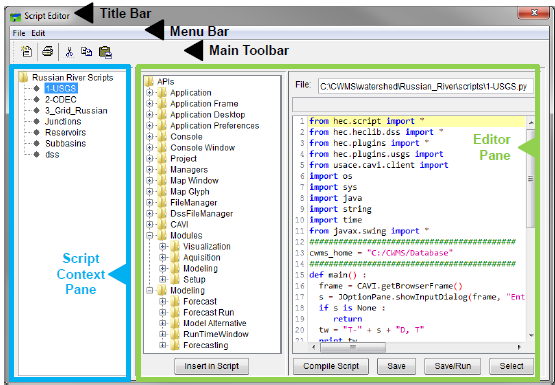
You create, edit, and delete scripts using the Script Editor. From the Tools menu click Script Editor, and the Script Editor will open (Figure 1). Components of the Script Editor include the Menu Bar, the Script Context Pane, the API Pane, and the Editor Pane. The following sections describe these components.

Menu Bar
An overview of the Script Editor's menu bar:
- File: From this menu, you create and import scripts, open, delete, print, save, and run scripts, or make a copy of the script. Available commands are New, Open, Run, Delete, Save, Save As, Print, and Close.
- Edit: From this menu, you can modify a script or search a script. Available commands are: Cut, Copy, Paste, Select All, and Find.
Script Context Pane
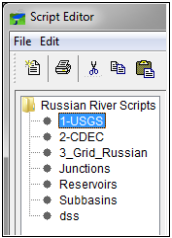
The Script Context Pane (Figure 2) of the Script Editor you can navigate to folders in the CWMS directory structure and access scripts. The tree structure allows you to navigate through the directory structure for scripts within CWMS. Scripts can be stored that are applicable to all CWMS modules or to individual CWMS modules. The name of the script is also the script name displayed on the associated script button in the Script Selector. To edit a script, double-click on the script name and the script opens in the Editor Pane.

Editor Pane
Scripts are modified in the Editor Pane (Figure 3) of the Script Editor. The name displayed on the associated script button in the Script Selector is the same as the name in the Script Context Pane and the .py name (i.e. 1-USGS.py) in the *File box of the Editor Pane. The File box (Figure 3) also shows where the user can find the location of the associated file of the script. By default, a button for each script created will appear on the Script Selector. If the user wants an icon to appear on the script button, then from the Icon list, select an icon. If you do not want a button, you need to clear Display Script to User.
The Test Arguments field (Figure 3) allows you to initialize the values of variables used by the script. You can enter as many semicolon-separated variable assignments as your script requires (e.g., var1="abc"; var2=7.5) or leave the area blank.

The Description field (Figure 3) allows you to enter a description of the script. The first line of your description serves as tooltip for the associated script button. The field below the Description field in the Editor Pane (Figure 3) is where you will enter the script text and serves as an editing window. This field will be referred to as the Script Text field. By right-clicking in the Script Text box, shortcut menu will appear (Figure 4) that contains the following commands:

- Cut: Copies the currently selected script text to the system clipboard and removes it from the script.
- Copy: Copies the currently selected script test to the system clipboard and leaves it in the current script.
- Paste: Copies text from the system clipboard into the script at the current cursor location.
- Select All: Selects all the text in the script.