Team Forecasting
Team forecasting allows multiple modelers to work on the same forecast simultaneously. Each team member has a copy of the master watershed forecast on their computer. Changes that are uploaded to the master watershed forecast can be downloaded and modified by other team members.
The following sections go over retrieving a team forecast from the master watershed, creating a new team forecast, uploading, and downloading team forecast changes, and the available team tools to help with this process.
Retrieving a Team Forecast
Once a forecast has be uploaded to the master watershed, it can be shared with other team members as a team forecast. Note: When retrieving team forecasts from the master watershed, a forecast cannot be open in the Modeling module. If a forecast is open, you will be unable to download a team.
To download a team forecast from a master watershed:
- First, from the HEC-RTS main window, open the master watershed that is on your computer, click the Modeling tab. Do not open a forecast, if you have a forecast open, close the forecast.
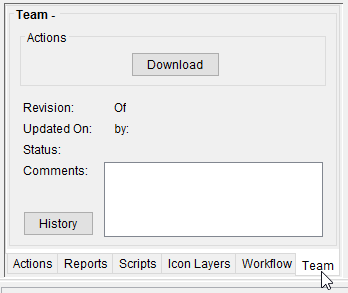
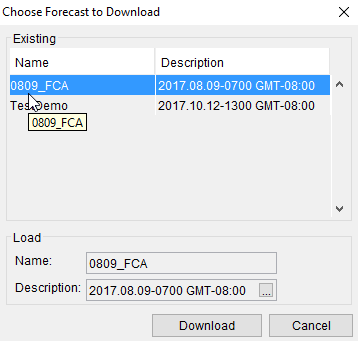
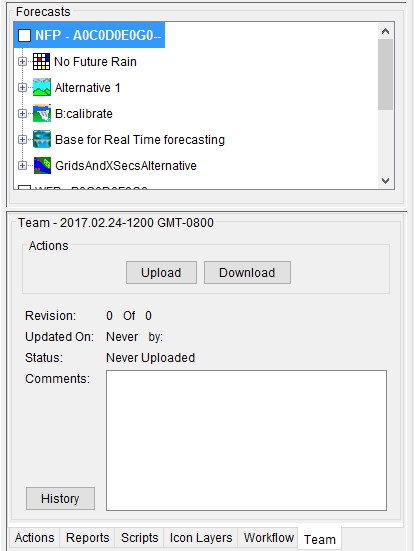
- From the Forecast Tabs (Figure 1), click on Team. Click Download, the Choose Forecast to Download dialog will open (Figure 2).
- From the Existing box (Figure 2), select the forecast you would like to download from the list, click Download. A Download from Master Watershed confirmation message will display.
- Click Yes, the download will begin. A Download tab will display in the Message Pane, providing status updates during the download process.
- When the download is finished a Download Complete window will display. Click Yes, the forecast will open.
Creating a Team Forecast
To create a team forecast, use your local copy of the master watershed, and create a forecast as you normally would. Once the forecast is created you can upload it to the master watershed before or after you compute it.
To create a team forecast:
- First, from the HEC-RTS main window, open the master watershed that is on your computer, click the Modeling tab. Steps for creating a new forecast are detailed in HEC-RTS Forecasts.
- From the Forecast Run Details area (Figure 3), select a forecast. From the Forecast Tabs (Figure 1), click Team.
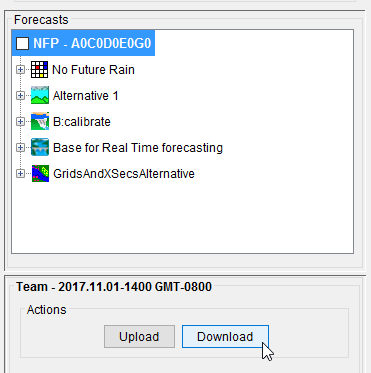
- Click Upload (Figure 3), the Enter Upload Comments dialog will appear open.
- In the Enter Upload Comments dialog, enter information about the upload click OK.
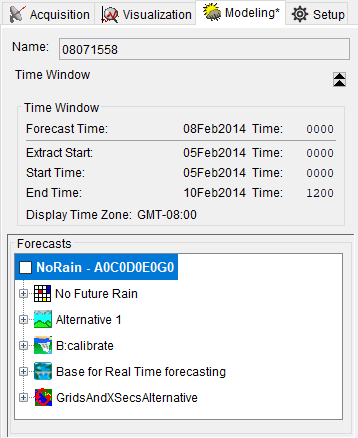
- The forecast will temporarily close in HEC-RTS and the upload will begin. Once the upload is complete, the forecast will display in the Modeling tab (Figure 4). More team forecasting information will display on the Team tab now that the forecast is a team forecast.
Uploading Forecast Changes
Changes made to the team forecast on your computer can be uploaded to the master watershed and shared with other team members. If other team members have the forecast open in HEC-RTS, the team members will receive a notification message that the master watershed has been updated. The uploaded forecast changes can include all the forecast data or a single model alternative's data. When uploading a single model alternative's data, only the model alternative's data and the model alternative's DSS records will be uploaded to the master watershed. If uploading the entire forecast, all model alternatives and the entire forecast.dss file will be uploaded.
Note: Before making changes and uploading forecast data, the status displayed in the Team tab needs to read Current. The Current status means you have a copy of the most recent changes from the master watershed on your computer. This copy can be changed once it is downloaded. Best practice would be to download the forecast to the status current, and then make changes to the model alternatives. This prevents you from unintentionally erasing data that has been changed since you last updated your local data files.
To upload the changes for the team forecast to the master watershed:
- First, from the HEC-RTS main window, open the master watershed that is on your computer, click the Modeling tab. From the Forecast menu, open a team forecast.
- From the Forecast Run Details area (Figure 5), select a forecast. From the selected forecast tree, click on a model alternative. For example, in Figure 5, the MFP model alterative has been selected.
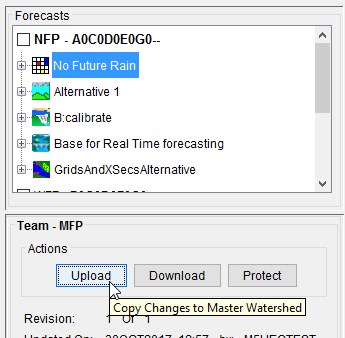
- From the Actions box (Figure 5), click Upload, the Enter Upload Comments dialog will open. Enter comments on the upload in the text field. When you are done, click OK, the upload will begin.
Note: You can upload ALL data for the selected forecast by checking the Upload All Files checkbox located on the bottom left-hand side of the Enter Upload Comments dialog. This will override all the data for that forecast model in the master watershed, not just the changes.
If you try to upload changes for a model alternative and the current local revision number does not match what is on the master watershed, you will be notified that your model alternative is out-of-date and prompts you to download the latest changes from the master watershed.
- When the upload starts, the forecast will close and an Upload tab will appear in the Message Pane on the CAVI. The Upload tab displays information on the files uploading.
- When the upload is complete, the real-time notification messages will appear on the bottom right-hand side of your monitor screen and the forecast will be re-opened and displayed again in HEC-RTS.
- If changes have been made within a team forecast, the affected model alternative's icon will display two red arrows, indicating that your local copy is no longer current (Figure 6).
- When attempting to close a team forecast without first uploading changes to the master watershed, the Copy Model Changes dialog (Figure 7) will prompt you to sync your changes.
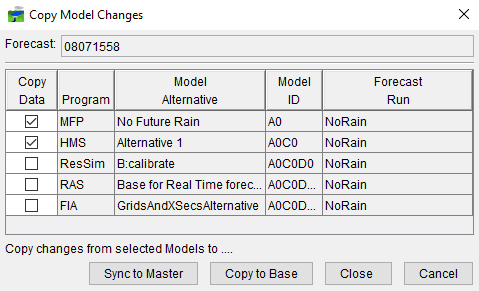
To upload the changes to the master watershed from the Copy Model Changes dialog (Figure 7):
- Select the model alternatives to sync with the master watershed by selecting the check next to their name. Any model alternatives that do not match the copies in the master watershed will be checked by default. The MFP and HMS model alternatives need to be synced with the master watershed in the example (Figure 7).
- Copy to Base updates changes in model files from the forecast folders back to the watershed "base" model folders.
- Click Sync to Master, an Enter Upload Comments dialog will open for each model alternative selected to sync.
- Enter upload comments and click OK to start the upload process. An Upload tab will display in the Message Pane. The tab will display the status message during the upload.
- If your local files are not current, you will receive an Out Of Date warning reminding you to sync with the master copy before making and uploading changes.
Downloading Forecast Changes
Changes made to the team forecast on the master watershed can be downloaded to your computer's team forecast copy. You can download the entire forecast or a single model alternative's data. When downloading a single model's data, only the model alternative's data and DSS records will be downloaded to your local copy. If downloading the entire forecast, all model alternatives and the entire forecast.dss file will be copied.
Note: It is important to download any files that have been updated before you start revising the files on your copy. This is to ensure you do not accidentally override another modeler's changes.
To download team forecast changes to your local copy of the forecast:
- First, from the HEC-RTS main window, open the master watershed that is on your computer.
- Select the forecast run or model alternative node in the Forecast Tree you would like to download changes for. For example, in Figure 8, the HEC-HMS model alternative is selected.
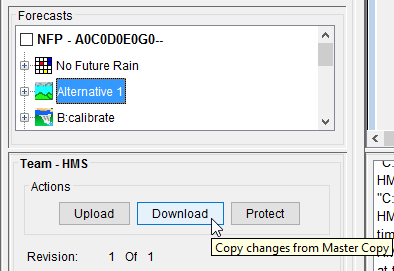
- From the Team tab, click the Upload button in the Actions (Figure 8).
- The Download from Master Watershed message will appear.
- Click Yes to continue with the download. If you would like to override all files for the selected forecast node you are downloading, check the Download All Files checkbox before clicking Yes.
- The forecast will close in the HEC-RTS main window and the download will start. A Download tab will display in the Message Pane that displays information about the download.
- When the download is complete, the forecast will re-open in the HEC-RTS main window and a real-time message will display on the bottom right-hand side of your screen (Download Notification Message).
- The download will replace any out-of-date files for the selected Forecast Tree node on your computer with the files from the master watershed and the Revision information on the Team tab will update. Only the files that have had a revision update on the master watershed will be downloaded.
Team Forecast Tab
The Team tab (Figure 9) is located at the bottom of the Modeling tab and provides access to team forecasts, and allows you to upload, download, and protect forecast data. It also provides detailed information on the forecast data's revision information and history. Each of these features are explained in more detail in the following sections.
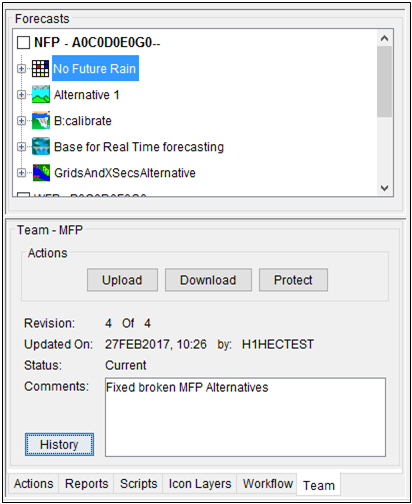
The Forecasts box (Figure 9) displayed at the top of the Team tab displays the Forecast Tree, which displays the different forecast runs and model alternatives for the forecast. When a node is selected in the Forecast Tree, the bottom half of the tab will populate with information about forecast teaming on that selected forecast data. For example (Figure 9), if a forecast run node is selected, the Team area reflects the information for that specific forecast run. If a model alternative is selected in the tree, the Team tab will display information on that model alternative in the forecast run. If there are no team forecasts open and the watershed is a master watershed, the Team tab will display a Download button that allows you to select a pre-existing team forecast on the master watershed and download it to your computer.
For example, in Figure 9, displays the MFP model alternative "No Future Rain" selected in the Forecast Tree and the Team tab displaying information on that model alternative.
The following sections go over the different features provided in the Team tab in detail.
Action Buttons
Depending on what is selected in the Forecast Tree, the Actions area provides Upload, Download, Protect, and UnProtect buttons (Figure 10). These different options allow you to interact directly with the master watershed forecast.

The Actions box includes the following:
| Upload | allows you to upload a new forecast or changes made to an existing team forecast to the master watershed. When a forecast run is selected in the Forecast Tree, the Upload button will upload all changed data for the forecast run to the master watershed. If a single model alternative is selected in the Forecast Tree, the Upload button will upload only changes made to that model alternative. |
| Download | allows you to download the whole team forecasts or its individual model alternative updates, depending on what is selected in the Forecast Tree. If a forecast is not opened in the Modeling module, the Download button allows you to download team forecasts available for the master watershed. |
| Protect | prevents others from uploading any changes to the forecast on the master watershed. You can protect a single model alternative or the entire forecast. |
If a forecast or model alternative is already protected, you will see an UnProtect option.
| UnProtect | allows you to begin uploading changes to the forecast or model alternatives on the master watershed again. |
Once you unprotect the data, Protect becomes available again.
If a forecast is not open on the Modeling tab, only the Download button will be available to download team forecasts from the master watershed.
Revision Pane
The Team tab also displays information on team forecast revisions. This information can be found directly underneath the Actions box (Figure 11).
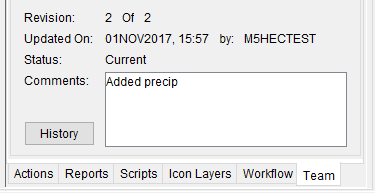
The revision information displays for the selected node in the Forecast Tree. The information includes the following:
| Revision | The Revision displays # Of #. The first number represents the version number you have on your local computer's copy. The second number is the revision number of the forecast data on the master watershed copy. If the two numbers are the same, this means that you have the most recent copy of the master watershed data. If the first number is smaller than the second, the master watershed's copy is newer than your copy. |
| Updated On | The Updated On information, in the format "DDMMMYYYY, HH:MM by: <username>", reports the date, time, and username of the person who last updated the forecast data on the master watershed. The date is set by the team member who made the revision's computer date and time. The username displayed is that team member's workstation login username. |
| Status | The Status reports if the version on your computer is Current or Out of Date. The Current status means that your computer's version of the watershed data and the master watershed data are the same. The Out of Data status means that the master watershed is newer than the copy that is currently on your computer. |
| Comments | this text area displays any comments made on the last revision on the master watershed. |
| History | The History button will open the Revision History dialog which provides detailed information on all the revisions made to the master watershed data. The Revision History dialog is described in further detail in the next section, Revision History. |
Revision History Dialog
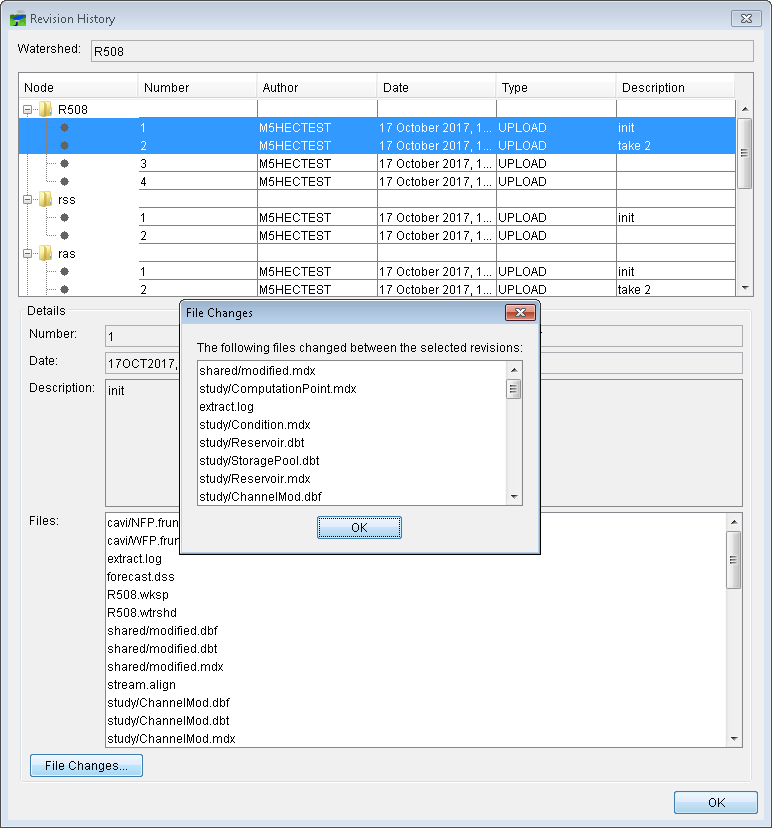
The Revision History dialog (Figure 12) is available on the forecast's Team tab (Figure 1) from the History button. It is also available on the Out of Date with Master Watershed dialog. It displays detailed information on the versions for the watershed data selected in the forecast or Synchronization Tree.
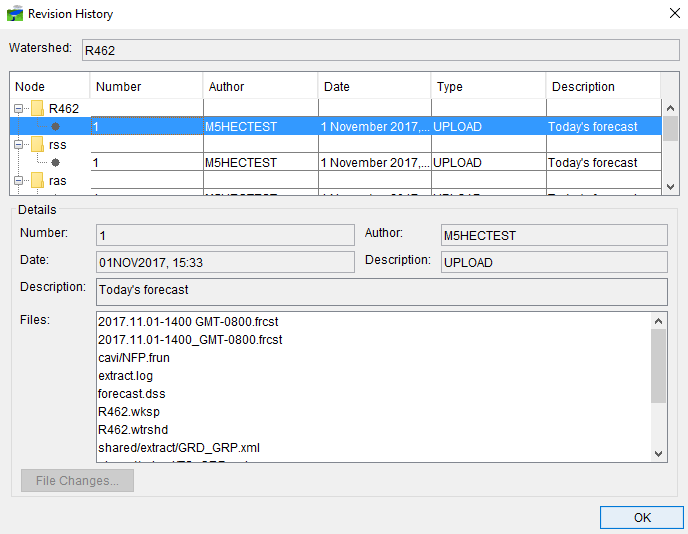
Clicking on a row of the table populates the bottom section of the Revision History dialog with expanded information from the columns: Node, Number, Author, Date, Type, and Description. Expanded descriptions of the features of the Revision History dialog can be found in the following sections.
Revision Table and Details Panel
The Revision Table (Figure 13) displays information on a revision that has been made. The revisions are grouped by forecast and then model alternative. When a row is selected in the table (Figure 13), the information on the Details panel (Figure 12) of the Revision History dialog is populated.

The table (Figure 13) and panel (Figure 12) contain the following information:
| Node | is the first column of data in the Revision Table (Figure 13) and provides information about the data group that was revised. Revisions are made and grouped by forecast run and models. |
| Number | displays the revision the row represents. The number assigned is based on the order that that revision to the master watershed was made. |
| Author | this column tells you which modeler submitted the revision to the master watershed data. |
| Date | date of the revision made by the team member who made the revision's (computer's date and time). |
| Type | indicates what caused the revision change. There are five types that can cause a revision change: UPLOAD, DOWNLOAD, PROTECTED, and UNPROTECTED. The UPLOADED option indicates the revision changed when the modeler uploaded new data to the master watershed. |
Additional information at the bottom of the Revision History dialog (Figure 13) includes: Description, Files, and File Changes.
| Description | The Description box (Figure 12) is filled in by the team member that made that revision. The description cannot be changed later. |
| Files | The Files box (Figure 12) contains a list of the modified files in the text field. The Files box only populates with the information of the revision that has been selected above in the Revision Table (Figure 13). |
| File Changes | To display a list of files that were changed between the selected revisions in the Revision Table (Figure 12), from the Revision History dialog (Figure 12), click File Changes. The File Changes dialog (Figure 14) will open displaying the files that were changed between the selected revisions. File Changes is available to you when a revision row has been selected in the Revision Table (Figure 13). |
