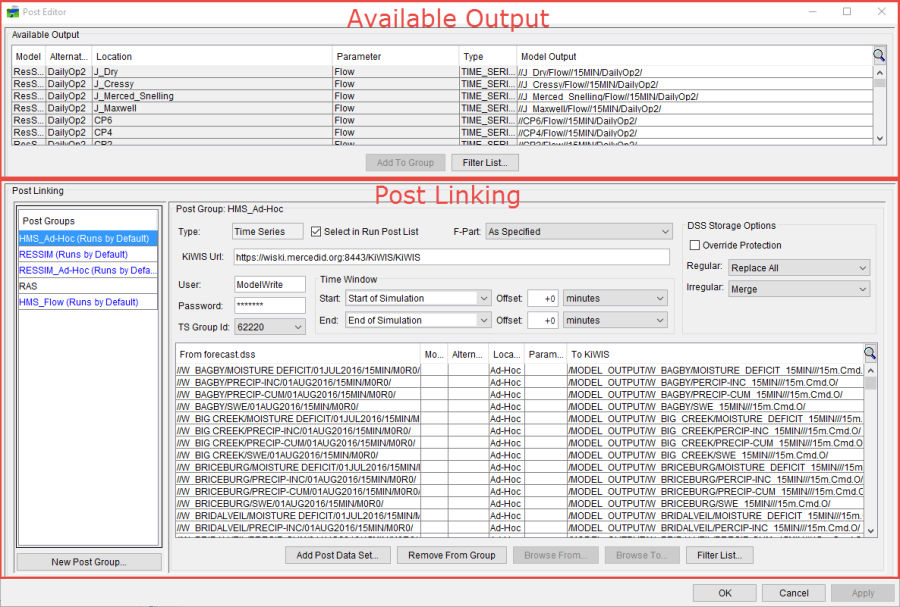
KiWIS Post Group
When a post group is selected that is a KiWIS post group, information displayed in the Post Linking section (Post Editor) is the data Type, KiWIS Url, and the User name and Password needed to access the KiWIS database. The TS Group Id lists all the time series group ID's that are in the KiWIS database. The TS Group Id can be used to filter KiWIS records, which will increase the speed of the query process for large databases when accessing them through HEC-RTS. The Post Linking table (Post Editor) displays the following information when a KiWIS post group has been selected:
| From forecast.dss | this column lists the selected model alternative output records for the post group. This data will fill with the KiWIS record displayed in the To KiWIS column. |
| Model | this column lists which software application is generating the output. |
| Alternative | this column lists the model alternative name that is creating the output record. |
| Location | this column displays the name of the model location object that is associated with the output record. |
| Parameter | this column displays the parameter associated with the output record's data. |
| To KiWIS | this column shows the actual input record pathname that the output record will be written to during the post process. |
| Index | Each required destination pathname is assigned an Index number when it is loaded into the Post Editor. This number has no real usage except keeping the initial filtered list set. There can be multiple indices for a single DSS pathname. |
This information does not display by default in the Post Linking table, you will need to set up the table view, see Post Editor.
Create a KiWIS Post Group
A KiWIS post group maps the model alternative output time series data from a forecast.dss file to a WISKI database. You will need the KiWIS URL, a username, and a password to set up a KiWIS post group. While a TS Group ID is not required, it can simplify the setup process.
To create a KiWIS post group:
- From the HEC-RTS main window, click on the Setup tab, from the Models menu, click Edit Post, the Post Editor will open.
- From the Post Editor, from the Post Groups box (Figure 1), click New Extract Group. The New Extract Group dialog will open (Figure 2).


- In the Name box (Figure 2), enter a name for your KiWIS post group.
- For a post group the only data type is Time Series.
- From the Destination list (Figure 2), select KIWIS.
- From the User box, enter your user login (Figure 2) and from the Password box, enter the password that is associated with the entered user login. Both the username and password are case sensitive. From the KiWIS Url box, enter the url for the WISKI database.
- The items in the DSS Storage Options box (Figure 2) are only applicable to Oracle and DSS source files. No changes to these values are necessary when using KiWIS as your data source.
- By default, Select in Run Post List (Figure 2) is selected, which means the post group will run automatically when a post process is running.
- Specify the Time Window to post the data from the Start and End lists (Figure 2); available options are: Extract Start, Start of Simulation, Forecast Time, End of Simulation. Offsets for the start and end times can also be included, available options are: hours, minutes, or seconds. In the Offset box, you will enter the offset increment. This time window is relative to the forecast time window the you defined when you created the forecast.
- When you are done, click OK, the New Post Group dialog will close (Figure 2). The new post group will display at the bottom of the Post Groups box (Figure 1), and the information about the post group will display.
Note: Post groups are run in the order they are displayed in the Post Groups box. If you run more than one post group during the post process and there are records that are mapped in more than one of the selected post groups, the last post group mapping will replace all previous mappings.
Adding Output Data to Post Groups
Once a post group is defined, you can select which model alternative output data you want to map to the selected destination data. In this case the destination data is the WISKI database. Detailed information is provided in Post Groups.
Selecting KiWIS Destination Records
When Available Output records are added to a KiWIS post group, the name of Available Output record, is displayed in the Post Linking table (Post Editor), under the To KiWIS column. The To KiWIS record pathnames need to be replaced with WISKI database destination time series record names.
To select a WISKI database time series record for the To KiWIS record:
- The TS Group Id list (Post Editor), in the Post Linking, provides a list of all the time series groups created in KiWIS. The TS Groupd Id is used in the Post Editor to manage the size of the WISKI database request and speed up the time required to populate the list of records when selecting KiWIS records for the post.
- Double-click the row in the To KiWIS column (Figure 3) you would like to set the KiWIS time series record for.

- Click the ellipse that appears in the right side of the cell with the To KiWIS name. The KiWIS Time Series Record Chooser dialog will open.
- You can filter the KiWIS time series pathnames displayed in the table by using the Search By Parts Parameters at the top of the KiWIS Time Series Record Chooser.
- To select a KiWIS time series record to replace the one displayed in the selected row in the Post Linking table (Post Editor), select the time series record row in the KiWIS Time Series Record, click Set Pathnames.
- The WISKI time series record you selected will display back on the Post Linking table in the row you original selected.
- To set another KiWIS time series record, from the Post Linking table click on the WISKI time series record you want to replace. From the KiWIS Time Series Record Chooser dialog, click Set Pathname.
- When all of the KiWIS time series records have been set in the Post Linking table, from the KiWIS Time Series Record Chooser dialog, from the File menu, click Close.
Ad-Hoc Records - Post
Additional output data not listed in the Available Output table may be needed from the forecast.dss file. You can add additional time series records to the WISKI database using the Ad-Hoc Record feature in a post group. An Ad-Hoc record allows you to save forecast.dss time series record data to the WISKI database even if those records were not listed in the Available Output table.
To add a WISKI Ad-Hoc record:
- From the Post Editor, click Add Post Data Set, the Adhoc: KiWIS Time Series Record Chooser dialog will open.
- From the Search By Parts area, use the various filter lists to locate the desired forecast.dss time series record.
- Select the pathname row for the record, click Set Pathname.
- Once you have selected all the pathnames for all the necessary time series records, from the File menu, click Close. The Adhoc: KiWIS Time Series Record Chooser dialog will close.
The From forecast.dss and To KiWIS time series records (Post Linking table) will display the same pathname. The time series record pathname displayed in the To KiWIS column of the Post Linking table will need to be changed to match the KiWIS time series name. You can either enter the KiWIS pathname, or select one through the KiWIS Time Series Record Chooser dialog.
To select a DSS pathname using the KiWIS Time Series Record Chooser:
- From the Post Editor, from the Post Linking table, select the To KiWIS record you would like to change.
- Click Browse To, the KiWIS Time Series Record Chooser dialog will display.
- From the KiWIS Time Series Record Chooser dialog. from the File menu, click Open. An Open HEC-DSS File browser will open, browse to location of the DSS file you will be copying time series record to, select the filename, click Open. The Open HEC-DSS File browser will close, the DSS file is displayed.
- Select the pathname for the KiWIS record listed in the table, click Set Pathname. This will copy the selected record to the Post Linking table (Post Editor).
- When you are finished selecting the KiWIS pathnames, from the File menu, click Close. The KiWIS Time Series Record Chooser dialog will close.