Configuring Photo and Web Images Icons, Documents and Scripts
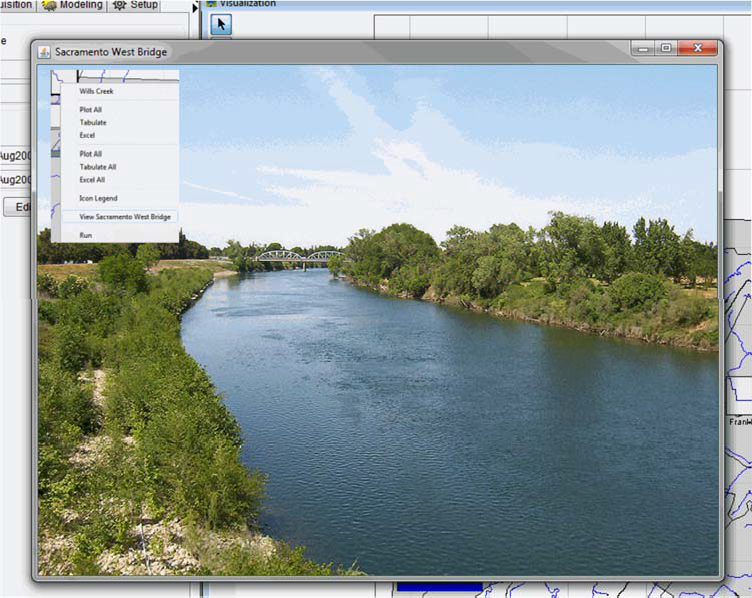
Photos, web pages, and webcam images can be assigned to the time series icons. Documents, such as reports or spreadsheets, can also be assigned. Once assigned, they can be accessed through the icon's shortcut menu in the selected modules and will appear as the icon's image. The following steps describe how to configure photo, images, and webcams or a script, web pages, and documents:
To configure a photo, image, or webcam .jpg file:
- From the CAVI main window, open a watershed, click the Setup tab, from the Map Window, click the Time Series Icon.
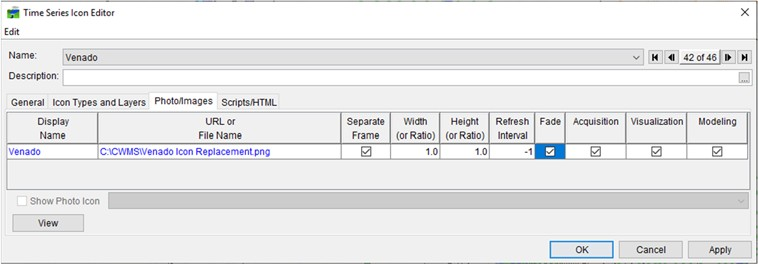
- Right-click the time series icon you want to modify, from the shortcut menu, click Edit, the Time Series Icon Editor dialog opens. Click the Photos/Images tab (Figure 1).
- From the Edit menu, click Browse and an Enter Image file browser opens. Select an image file, click Open, and the selected file will be added to table. Alternatively, image files can be stored and retrieved from DSS. If this is the case for your image, click Browse DSS from the menu and select your image from the DSS-Vue pathname selector.


- The image files name will appear in the Display Name column (Figure 1) and the full path to the file will appear in the URL or File Name column.
- Alternatively an image file may be available through a website, as in the case of a webcam. If so, type in the URL of the website in the URL or File Name column.
- To modify the Display Name of an image, click the cell under the Display Name column that corresponds to the image file you want to modify and enter the new name. The Display Name will be the text of the menu option in the time series icon's shortcut menu, which will trigger the image to display.
- Select Separate Frame if you would like the image to display in a new window when it is triggered.
- Specify the Width (or Ratio) and Height (or Ratio) of the displayed image. By default the image will display as the image file size.
- The Refresh Interval is specific to webcam images. The webcam image is refreshed with a new webcam image at a rate of seconds. The rate starts at 0 seconds. For example, if the Refresh Rate is set to 10, the image will be retrieved every 10 seconds. To only have the image loaded once, set the rate to -1.
- Fade is an on/off switch specific to webcam images. It transitions each image into the next one by showing 10% or more of the next .jpg every 0.05 seconds, until the full picture is shown. This gives a smooth motion like flow to the image.
- When all the information is configured, click View to preview the image.
- To add another image to the table, first select Add Row or Insert Row from the Edit menu. Then follow the same steps as outlined above.
- To remove an image from the table, select the image in the table and choose Delete Row from the Edit menu.
- To change the order of image in the table, first select the image in the table then select Move Row Up or Move Row Down from the Edit menu.
To configure a script, web page, or other supported file:
- From the CAVI main window, open a watershed, click the Setup tab, from the Map Window, click the Time Series Icon.
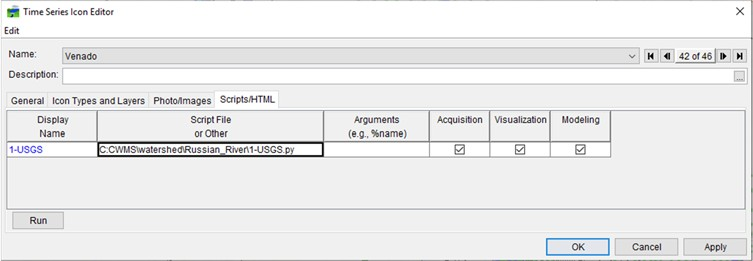
- Right-click the time series icon you want to modify, from the shortcut menu, click Edit, the Time Series Icon Editor dialog opens. Click the Scripts/HTML tab (Figure 3).

- From the Edit menu, click Script Editor/Selector, the Script Editor will open. In the Script Editor, highlight the script you would like to assign to the time series icon and click OK, the Script Editor closes. The selected script's name will fill the Display Name column and its path on disk will fill the Script File or Other column.
- To add a file to the table, from the Edit menu, click Browse Other. An Open browser will display. Browse to the location of the file you would like to assign to the time series icon, click on the filename, click Open. The Open browser will close and the selected file's name will fill the Display Name column (Figure 3) and its path on disk will fill the Script File or Other column.
- To assign a web page, type in the URL of the website in the Script File or Other column.
- To modify the Display Name an image, click the cell under the Display Name column that corresponding to the image file you want to modify and enter the new name. The Display Name will be the text of the menu option in the time series icon's shortcut menu, which will trigger the image to display.
- Place a check in the module columns (Acquisition, Visualization, or Modeling) you would like the script file or other to be available in.
- When all the information is configured, click Run to preview the file or script.
- To remove a script or other from the table, select script or other in the table, and choose Delete Row from the Edit menu.
- To change the order of image in the table, select the script or other in the table then select Move Row Up or Move Row Down from the Edit menu.