Map Layers Dialog
The Map Layers dialog allows the user to add map layers, organize layers, view all the layers associated with the watershed, and add sub-layers to primary layers. The Map Layers dialog can be accessed from any of the modules. From the HEC-RTS main window, from the Maps Menu, click Map Layers. The Map Layers dialog will open. The following sections describe the commands available in the Map Layers dialog.
Menu Bar
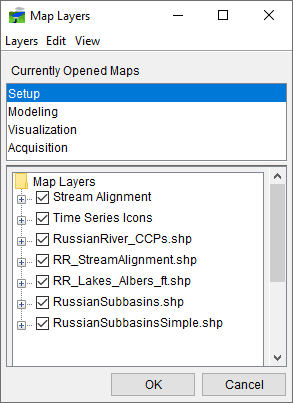
The menu bar of the Map Layers editor (Figure 1) contains commands for managing watershed layers. The following is a summary of the available menus and the commands associated with each one.
| Layers | From this menu, you can add map layers; import images; remove map layers; and, close the Map Layers dialog. |
| Edit | From this menu, based on your selection in the Layer Tree (Figure 1), you can rearrange layers, access each layer's properties, and, other items specific to the selected layer. |
| View | This menu has one command, Always On Top, which keeps the Map Layers dialog on top of the HEC-RTS main window. |
Layer Tree
The Map Layers editor (Figure 1) contains a Layer Tree for controlling the display of layers in the watershed. The tree represents the hierarchical arrangement of layers. The top level of the tree is the Map Layers folder, which contains all of the layers in the watershed. Beneath the Map Layers folder is a tree branch for each primary layer or map layer, beginning with a plus/minus sign, followed by a checkbox, then the layer name.
When a plus sign is displayed, you can click it to expand the tree branch and display sub-layers. If sub-layers do not exist, you will see a legend for the layer. When a minus sign is displayed, you can click it to collapse the tree branch. You can also expand and collapse branches by double-clicking on a layer. Figure 2 shows the Map Layers editor for the Modeling module (with a selected forecast), with the Model Schematic layer expanded. The checkbox turns display of a layer or sub-layer on or off. If a layer is unchecked, that layers sub-layers will not display, even if the sub-layers are checked.

Layer Organization
You can arrange the layers in the Map Window with the Map Layers editor. By default, the primary layers are at the top of the tree. Map layers are added to the bottom of the tree. Layers are drawn in the order that is displayed in the Map Layers editor. So typically background layers are on the bottom, and layers containing smaller, more-detailed items such as time series icons, gages, and rivers are on top.
To rearrange the order of layers:
- Select a layer from the Layer Tree (Figure 2). From the Edit menu, or by right-clicking on a layer, from a shortcut menu. Select Move Up, Move Down, Move to Top (moves the selected layer to the top of the tree), or Move to Bottom (moves the selected layer to the bottom of the tree).
- Continue to change the position of each layer until the necessary features are visible on the map window.
- Click OK, and the Map Layers editor (Figure 1) will close.