Download PDF
Download page Basics of HEC-DSSVue.
Basics of HEC-DSSVue
Introduction
This workshop is meant to familiarize the student with the basic functionality of DSSVue.
Data: Unzip the file below to C:\Class\DSS\Overview of HEC-DSSVue

Sample DSS files are provided under C:\Class\DSS\Overview of HEC-DSSVue for manipulation. Sample data stored in an Excel spreadsheet is also provided so that data can be copied and pasted into DSS records.
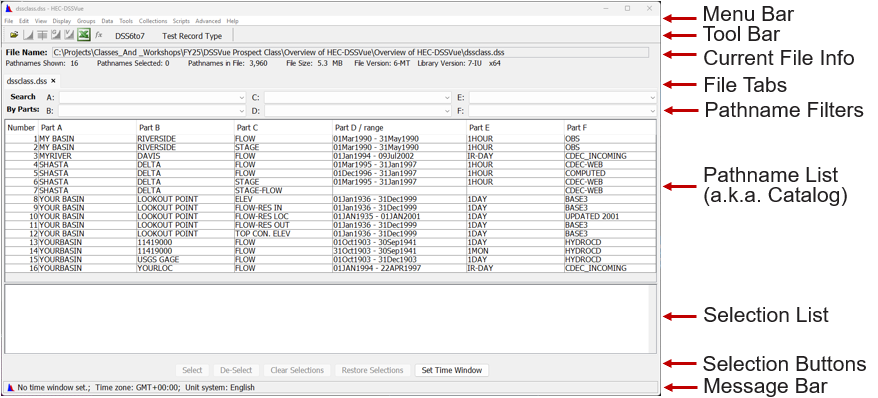
The Figure below shows the main window of DSSVue with identified sections for your reference as you follow instructions during this workshop. A series of tasks are outlined below to guide you through general data management executions in DSSVue including:
- Cataloging files and searching for records
- Plotting and Tabulating data
- Copying Plots and Tables for use in other programs
- Copying, duplicating, renaming, and deleting existing records
Navigating through the basic features of DSSVue is fairly straightforward, so please feel free to further experiment with operations of your choice similar to tasks highlighted by this workshop. More features such as Graphics, Data Entry, Math Functions, and Scripting will be covered in later workshops this week.
Task 1. Cataloging Files and Searching for Records
Open the DSS file dssclass.dss. There are three main catalog views in DSSVue: Pathname List, Pathname Parts, and Condensed Catalog. These catalog options are available under the View menu and can be selected one at a time. By default, each catalog view will display a list of record pathnames sorted in ascending alphanumeric order (by A, B, C, D, E, and F Parts). The No Pathnames and Unsorted List options are used (rarely) to access very large databases using scripted functions. Sorting large catalogs can take time, and there is the potential of running out of sort memory, so these options allow access to the file without sort problems.
- From the View Menu, switch between the options “Pathname List”, “Pathname Parts”, and “Condensed Catalog”.
- In each catalog view, browse the list of displayed DSS records using the scroll bar to get a general idea about the assortment of pathnames in this particular DSS file.
- Test the search options from the View menu to filter the list of pathnames by String or by Parts. (For Instance, in the Pathname Parts view, filter the list of pathnames to only show one pathname: /MYRIVER/DAVIS/FLOW/18NOV2001/IR-DAY/CDEC_INCOMING/)
- Try sorting DSS records within each catalog view by clicking on different headers of the DSS records. (For Example, in the Condensed Catalog view, click on the “C Part” header to sort the DSS records by C Parts. Or click on the “F Part Header” to sort records by F Parts.)
Question 1. List one or two distinctive differences in the display of pathnames among the catalog views of DSS records.
Pathname List – no columns to separate the pathname parts – parts are delimited by /s
Pathname Parts – columns are used to separate the pathname parts
Condensed Catalog – displays a shorter list than Pathname Parts because the D parts are compressed into a “range” (for records whose other pathname parts are all the same)
No Pathnames and Unsorted List – used for (very) big DSS files which are slow to catalog and sort.
Search …by string – a single field is displayed to allow you to enter a filter string. Wildcards are implied. For example – if you just enter “flow”, every pathname that includes flow ANYWHERE in the pathname will be listed.
Search …by parts – six dropdown boxes are displayed allowing you to selected filters by pathname parts. The dropdowns include each unique string that is used by the pathnames in the current dss file.
Question 2. For A Part = YOUR BASIN, B Part = LOOKOUT POINT, C Part = FLOW-RES IN, E Part = 1DAY, F Part = BASE3, determine the number of records whose pathname references in the Pathname Parts view was reduced to a single line reference in the Condensed Catalog view
32.
The View-Condensed Catalog combines 32 different D parts into a single string '06Jan1936 - 31Dec1999'
Question 3. Search for pathnames with D Parts that contain the year 1945. Which catalog view did you search in? What type of search did you carry out? How many pathnames were filtered by your search?
5.
Searching with 'Search pathnames by string' allows searching for '1945'. This works with all catalogs except (no pathnames, and condensed catalog).
Note: visually verify the string 1945 does not occur in other than the D parts.
Task 2. Plotting and Tabulating data
Open the DSS file Sample.dss and select the Condensed Catalog view. A single DSS record or multiple DSS records listed in the main DSSVue window can be plotted and/or tabulated by using the Plot and Tabulate options in the Display menu or using the shortcut buttons in the tool bar menu (for plotting, and for tabulating).
- Plotting a single record.
- Highlight any row in the list of pathnames.
- Double click on the row, or alternatively press the Select button at the bottom of the main DSSVue window. The complete pathname should appear in the Selected Records section of the main window.
- Try plotting and then tabulating. Separate windows should pop up, one for the plot and another for the table.
- The plot and table windows can be closed when they are no longer of use.
- In the main DSSVue window, deselect the pathname in the Selected Records section by highlighting and then pressing the De-Select button at the bottom of the main window.
- Plotting multiple records at the same time.
- Highlight, Select, and Plot two non-consecutive rows from the list of pathnames that have different C Parts:
/GREEN RIVER/GLENFIR/FLOW/01APR1992 – 01MAY1992/1HOUR/EDIT/
/GREEN RIVER/OAKVILLE/ELEVATION/01MAY1992/1HOUR/OBS/ - You can highlight and select one row at a time. Or you can highlight the two different rows at the same time with the left mouse button while holding down the CTRL key, then press the Select button to select the pathnames simultaneously.

- Once the pathnames are selected, plot their associated records.
The resulting plot should contain two viewports for the different records, as well as a legend. Notice that as a default setting within the plot, the viewports have the same weight in area. Changing the relative sizes of viewports in a plot as well as other wide-ranging customizations of plots, such as customizing axes and adding titles, are possible in DSSVue and will be covered in the Graphics Capabilities workshop.
- Highlight, Select, and Plot two non-consecutive rows from the list of pathnames that have different C Parts:
- Drag the following pathname on to your plot: /GREEN RIVER/ OAKVILLE/STORAGE/01MAY1992/1HOUR/OBS/
- With your mouse, highlight the pathname. Do this by single clicking it.
- Release the mouse button. Now click it again and hold down the mouse in the highlighted pathname. Move your mouse, without lifting up the button, to the plot. Release when you are on the plot.
- It can take some time to get the hang of selecting and dragging in Windows.
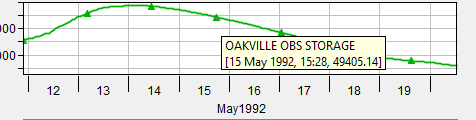
- For this workshop, try out the zoom tool. In addition to enlarging sections of the plot, you can hover the zoom tool over a curve, which will pop up a text box with the date and value of the point on the curve you are pointing to.
e. Tabulate these multiple records by using the Table button from HEC-DSSVue.
f. You can customize the resulting table’s display from the View menu by choosing to show Commas in tabulated numbers and selecting the number of Decimal Places you wish to display.
g. You can also show the Date and Time Separately and display the Date with 4 Digit Years as opposed to the default setting that shows the date and time in one column and displays the date with 2-digit years.
4. Now try dragging the reservoir outflow onto your table:
/GREEN RIVER/WALNUT/FLOW-RES OUT/01APR1992/1HOUR/OBS/
Question 4. What happened when you dragged the pathname onto it?
Another column was added to the table
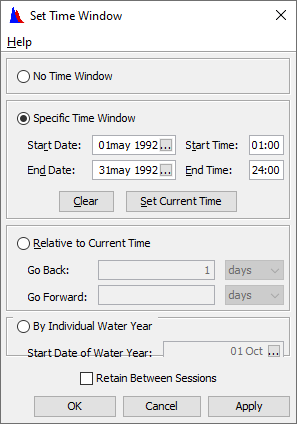
5. Try setting a time window for these multiple records for plotting and tabulating.
- Click on the Set Time Window button at the bottom right-hand corner of the main DSSVue window.
- Limit the time window to the month of May 1992.
- Press OK and notice the bottom prompt of the main DSSVue window, which will indicate the specified time window.
- Re-plot and tabulate the selected record data, which would only span the specified time window.
- When finished, you can clear the time window by pressing the Clear button in the Set Time Window
Question 5. Select the following pathname:
/GREEN RIVER/OAKVILLE/FLOW-RES OUT/01MAY1992/1HOUR/OBS/
and determine how many data values are stored in this record? Are there any missing values? What is the maximum reservoir release and when does it occur?
One way to investigate the data is to tabulate, then click on the value column to sort. Click a second time to sort High to Low.
Max value is 8,000 cfs
There are 504 data values.
Task 3. Copying Plots and Tables for use in other programs
Reset the time window back to No Time Window. Keep working with the DSS file Sample.dss. A Plot can be printed, saved as an image format, or copied to the system clipboard and placed in other applications such as Microsoft Word and Excel. A Table can likewise be printed, exported and saved as an external file, and contents of a table can be copied and pasted directly into other applications such as Microsoft Word and Excel.
- Select any pathname and Plot.
- Select the Print Preview option from File menu and close the preview after you glance at it.
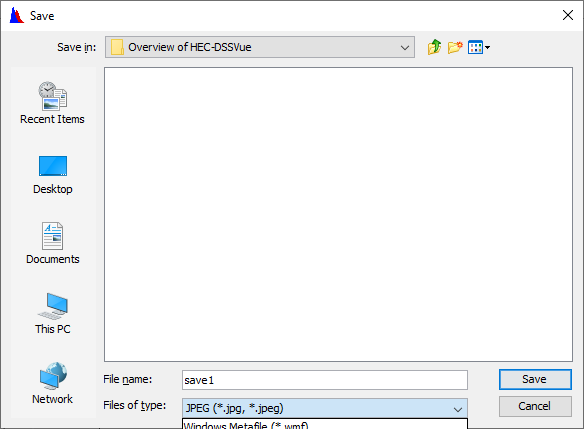
- Save the plot in *.JPEG format with the Save As option in the plot’s File Save the image to the workshop directory C:\Class\DSS\Overview of HEC-DSSVue
4. Generate a Table by selecting Tabulate from the File menu in the plot window
5. Use the View menu to cause the date and time to be in separate columns.
6. Highlight a portion of the table by holding down on the left mouse button and dragging the mouse over the area to be selected.
7. Right-Click on the highlighted cells and, from the context menu, select the Copy option (or select the Copy option from the table’s Edit menu).
8. Paste the data in an MS Excel sheet.
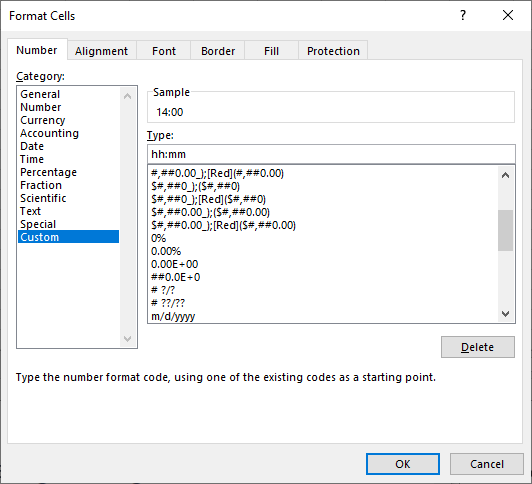
Note that when pasted into Excel, time values that fall on midnight (24:00) are displayed in a different format. To change that, simply highlight the column with Time and choose the Format Cells option from the context menu (Shortcut Ctrl-1). Within the Format Cells dialog, click on the Number tab and choose Custom for the Category and “hh:mm” for the Type.
Task 4. Copying, duplicating, renaming, and deleting existing records
- Open the DSS file dssclass.dss.
- In DSSVue, record data can be copied in a couple of ways:
- Records can be copied from one DSS file to another DSS file or duplicated within the same DSS file.
- Record Pathnames can also be renamed or deleted within a DSS file.
- In DSSVue, record data can be copied in a couple of ways:
- Copy a record to another DSS file:
- Highlight then Select the record pathname /SHASTA/DELTA/STAGE-FLOW///CDEC-WEB/.
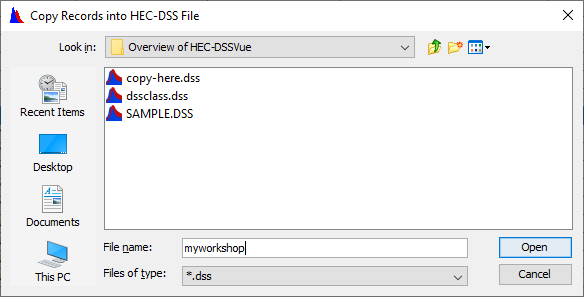
- Choose the Copy To option in the Edit (A Copy Records into HEC-DSS File dialog should appear.)
- Browse to the workshop directory C:\Class\DSS\Overview of HEC-DSSVue
- Create a new DSS file by typing a new file name MyWorkshop.dss in the File Name field of the dialog, then press Open.
- Open your new HEC-DSS file and verify that the data has been successfully copied to the DSS file you specified. The file you open should show up in a new tab.
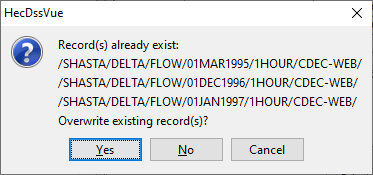
Question 6. Try copying a record from a DSS file it into the same DSS file.
A warning indicates records with the same name will be overwritten.
3. Select the dssclass.dss tab.
4. Copy the remainder of the SHASTA records by dragging them onto the MyWorkshop.dss tab.
- With your mouse, highlight the other three SHASTA pathnames.
- Do this by single clicking on the first and then hold down the Shift key and clicking on the third pathname.
- Release the shift key and mouse button.
- Now click and hold down the mouse in the middle of the highlighted pathnames.
- Move your mouse, without lifting up the button, to the MyWorkshop.dss tab.
- Release when you are on the tab.
- Which pathnames are highlighted may change when you are moving your mouse, but they should resort when you get to the tab (or anywhere off that part of the window.)
The records are copied to myworkshop.dss
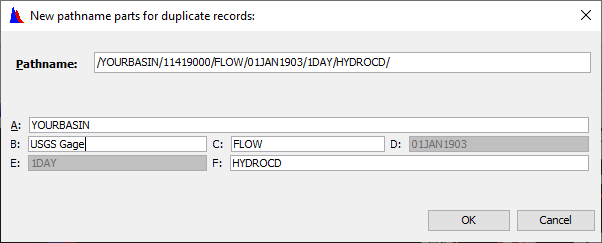
5. Duplicate the pathname /YOURBASIN/11419000/FLOW/01JAN1903/1DAY/HYDROCD/.
- Highlight the pathname and right click and select Duplicate from the popup menu.
- You will be prompted with a dialog where you can change the pathname.
- Change the B Part from “11419000” to “USGS GAGE” and press OK.
- The catalog should refresh automatically.
Question 7. There are 44 record pathnames where the B Part=11419000.
Before using the duplicate command, first change the catalog view to be condensed catalog. This way all records in the data set are copied together.
6. rename all pathnames with A Part “YOURBASIN” to “YOUR BASIN”.
- Select all the pathnames with A Part=YOURBASIN
- Apply the Rename option in the Edit Or just right-click the pathname and select Rename.
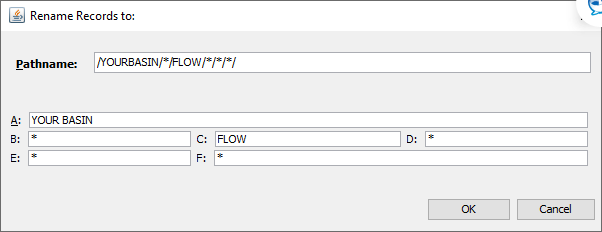
The asterisks '*' indicates match and re-use the existing Part names.
7. Delete the 44 records you duplicated earlier with B Part=USGS GAGE.
- The Delete Records option is under the Edit menu.
- Note that after you have deleted the records you can restore them by applying the Undelete -> Last Deleted option under the Edit menu.
- The Undelete -> Last Deleted option will only restore the most recently deleted records.
- The Undelete option will NOT restore deleted files after the Squeeze option, which removes inactive space in a DSS file, is applied from the Tools menu.
Question 8. If a record pathname were in the Selected Records section, and another record pathname was only highlighted in the Pathname List, then the Delete option is applied, which record will be deleted?
Only the records selected in the Selected Records Section.