Editing Tabular Data
In HEC-DSSVue, you can edit data directly in tables, but first you must set the table to allow editing. From a tabulate dialog box select the Edit menu, click Allow Editing. This will set the table editable and allow you to manually edit the listed data. When this option is checked, the background of non-editable table cells display grey and the Cut, Paste, Insert Rows, and Delete Rows commands become available from the Edit menu.

If the Allow Editing option is disabled (grayed-out), you may not have permission to write to the file or the table was started from a dialog that does not have access to write to the file (such as a plot window).
Changes made to a table can be saved, from the File menu, click Save or click Save As. If you do not save your data before you close the table window, HEC-DSSVue will prompt you to save your changes before it closes the window.
Selecting Table Cells
To select an individual table cell, simply click on it.
To select several consecutive cells, click, hold down and drag your mouse over the cells. You can also hold down the Ctrl key and click to select multiple, non-consecutive records.
If you wish to select all rows in a table, from the Edit menu, click Select All.
You can also use shortcut (Right Click) menu items to edit multiple selected cells in tables shown below.

Cutting and Pasting Data
The Cut command removes data from the cell and places it on the computers clipboard in ASCII format. For regular-interval time series data, the Cut command will set the emptied cell to the missing data flag.
You can cut data from one set of cells and paste it into another set of cells (in the same table or another table). To do a cut and paste:
1.From the View menu, click Allow Editing.
2.Select the cells you want to Cut the data from.
3.From either the View menu or the shortcut menu , click Cut.
4.Select the cells where you want to Paste the data.
5.From either the View menu or the shortcut menu, click Paste.
Tip: The keyboard shortcut keys, Ctrl + x and Ctrl + v also work for cut and paste.
Copying and Pasting Data
The Copy command copies selected cell data and places it on the computers clipboard in ASCII format.
You can copy data from one set of cells and paste it into another set of cells (in the same table or another table). To do a copy and paste:
1.From the View menu, click Allow Editing.
2.Select the cells you want to Copy the data from.
3.From either the View menu or the shortcut menu, click Copy.
4.Select the cells where you want to Paste the data.
5.From either the View menu or the shortcut menu, click Paste.
Tip: The keyboard shortcut keys, Ctrl + x and Ctrl + v also work for cut and paste.
Clearing Table Cells
To delete and remove data from table cells use the Clear command. Cleared data is not saved to the computer's clipboard, so you will not be able to paste the data back into the table. However, for time series data, the Clear command will remove the data from the cell and add a missing flag to the emptied cell. To clear table cells:
1.From the View menu, click Allow Editing.
2.Select the cells you want to clear.
3.From the shortcut menu, click Clear.
Adding and Inserting Rows
Depending on what type of data is being edited in a table, rows can be inserted, appended, or added to the beginning or end of the table.
Appending rows is automatic when Allow Editing is set. When Allow Editing is selected, two blank rows automatically appear at the end of the table. When you enter data in a row at the bottom of the table, an additional blank row will be appended. When you save the data, any blank rows at the end of the table are removed automatically.
For regular interval time series data, rows can only be inserted at the beginning or end of the data set. For irregular interval time series data and paired data, rows can be inserted between any existing table rows. To insert a row into the table:
1. Using your mouse pointer, click on the row you would like to insert rows next to and then from the Edit menu, click Insert Rows.
2. The Extend Data Set dialog box will open (shown below). This dialog may be different from what's pictured below depending on what type of data is displayed in the table.

3. For irregular interval time series data, you have the option to Insert between the selected dates, Insert before the first date, and Append after the last date. Regular interval data can only have data inserted before and after the existing time steps. Each choice requires you to enter the number of rows that will be added. From the Number Rows list, enter or select the number of rows that will be added to the table at the given area.

4. Irregular interval time series data requires an interval to be selected. From the Interval list, select an interval, default is 1HOUR. If you would like the data and time filled for each inserted row, be sure Set the data and time for each row is selected.
5. For a paired data table, enter the number of rows you would like to insert. From the Edit menu, click Insert Rows, the Insert Rows dialog box will open. In the Number to insert box, enter the number of rows you would like to add. Paired data tables also allow you to add additional columns, from. 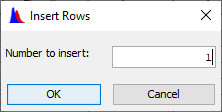
6. Once you are done entering information for the insert, click OK.
7.The entered number of blank rows will be inserted at that row, moving the original row that you selected down.
Deleting Rows and Columns
You may delete rows from a table when working with irregular-interval time series data and paired data. To delete a row from a table, select the row and then from the Edit menu, click Delete Rows.
If you are working with regular interval time series data, you will not be able to delete rows; instead, the Delete Rows function will change the data values to missing. This is the same as clicking Clear from the shortcut menu.
In a paired data table you can delete a column. To delete a paired data column, select the column and then from the Edit menu, click Delete Column. The Delete Column message box will open, requiring you to verify you would like to delete the entire column. Click Yes to finish deleting the column.