HEC-DSSVue Main Window
The main window of HEC-DSSVue (previous page) consists of a Menu Bar, Tool Bar, Current File Information, Files Tabs, Search Boxes, a list of DSS Pathnames, Selection Area, Selection Buttons, and Message Bar. The following sections describe these features in detail.
Menu Bar
Main menu options in HEC-DSSVue allow you to search for, select, and edit HEC-DSS data sets; control the display of pathnames and access plots and tables among other tasks. The HEC-DSSVue main menu options are as follows:
![]()
HEC-DSSVue Menu Bar
| File | File menu commands include New, Open, Close DSS File(s), Print Catalog Preview, Print Catalog, and Exit. The file menu also lists the last six opened files |
| Edit | Edit menu commands are Tabular Edit, Graphical Edit, Edit in Excel, Select All, Rename Records, Delete Records, Undelete, Duplicate, Copy To, and Merge Records. |
| View | The View menu allows you to customize the display of HEC-DSS pathnames, refresh the catalog and search pathnames. Available commands are Pathname List, Pathname Parts, Condensed Catalog, No Pathnames, Unsorted List, Search pathnames by string, Search pathnames by parts, and Refresh Catalog. |
| Display | Use the Display menu to view data. Options in this menu are Plot, Plot Individual Data Sets, Tabulate, Tabulate in Excel, Display Data Options, Supplemental Information, Time Window, Charts, and NC DWR Duration Hydrograph. |
| Groups | Use the Group menu to organize selected records into groups or view and edit existing Groups. Group menu commands include Save Selected, Get, Plot, Plot Individual Sets, Tabulate, Math, and Merge. |
| Data Entry | The Data Entry menu is used to add data and files to records. Commands include Manual Time Series, Manual Paired Data, Manual Text, Import, and Export. |
| Tools | The Tools menu provides tools for manipulating DSS records. These tools include Math Functions, Compare, Search for Value, Check File Integrity, Squeeze, Script Editor, and Script Selector. |
| Custom | (Optional) If your office has written their own plug-ins, those plug-ins can be made available under the Custom menu. The menu name is set from the plug-in. See the Writing Plug-ins Appendix for more information. |
| Scripts | (Optional) If you use scripts, you can activate the Scripts menu from the Script Editor (under Tools) and have quick access to your selected scripts from this menu. |
| Advanced | Through the Advanced menu you can create, view, or print a Condensed Disk Catalog, Abbreviated Disk Catalog, or a Full Disk Catalogs. Additional options are Console Output, DSS Output, Status, Debug, and Program Options. |
| Help | The Help menu contains the About option, which displays the HEC-DSSVue version information and gives access to the terms and conditions of the software. |
.
Tool Bar
The Tool Bar buttons provide shortcuts to frequently used menu commands:
| Opens the Open HEC-DSS File browser that allows you to select and open a HEC-DSS file. This button would be equivalent to selecting Open in the File menu. |
| Plots the selected data, equivalent to selecting Plot in the Display menu. |
| Displays the selected data in a table, equivalent to selecting Tabulate in the Display menu. |
| Graphically edit the selected data, equivalent to selecting Graphical Edit in the Edit menu. |
| Open the Math Functions dialog with the selected data, equivalent to selecting Math Functions in the Tools menu. |
| (Optional) Open the selected records in Microsoft Excel, equivalent to selecting Tabulate in Excel in the Display menu. This function relies on the Excel plug-in to be installed. |
File Tabs
Multiple DSS files can be opened and viewed in HEC-DSSVue at the same time (below). Each time you open a new dss file, a tab is created with the name of the dss file shown on it. The pathnames

File Tabs
displayed are from the selected tab's DSS file. If more than one file is opened, selected pathnames will include the name of the DSS file they are from. For example:
BaldEagleHist.dss://BALDE/FLOW/01DEC1993/1HOUR/BB/.
Current File Name
The Current File area displays the information of the selected tab's DSS file. The File Name box (below) displays the file name and location of the selected HEC-DSS file.

File Name Box
Tip: If you know the exact location and name of the HEC-DSS database file you wish to open, you can type it directly into the File Name box and then click the Enter key to open it.
Beneath the File Name box is statistical information on the pathnames contained in that file. Pathnames Shown displays the number of pathnames available in the DSS file and shown in the DSS Pathname list. Pathnames Selected provides the number of pathnames currently selected from the file. Pathnames in File shows the total number of records in the file, including files and images. And finally, File Size displays the amount of disk space the file uses.
Search Boxes
Searches of the DSS pathnames can be made by full pathnames or by pathname parts. These search methods are set through the View menu.
The selected search method will display a checkmark next to the menu option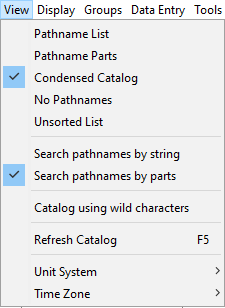
To search and display all pathnames containing a specific text, from the View menu click Search pathnames by string. Then type the text into the Search Pathnames box and click Search. The pathnames in the file that contain the text will be displayed in the DSS Pathname table.

To search using DSS parts, select from the View menu click Search pathnames by parts. Use the Drop Down boxes to filter based on the available part names contained in the selected DSS.

List of HEC-DSS Pathnames
Once you have opened an HEC-DSS file, its pathnames appear below the search filters. The pathnames can be displayed as in the following formats:
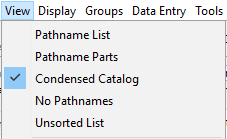
| Path Display Option | Description |
| Pathname List | Paths are each listed as a separate row as simple strings e.g. '/W HARTLEY GULCH/CALDWELL ID/FLOW/01Jan2019/1Day/USGS/' |
| Pathname Parts | Paths are split out into columns for each part (A,B,C,D,E,F) |
| Condensed Catalog | A column is displayed for each part (A,B,C,D,E,F) with Part D (dates) condensed |
| No Pathnames | typically used to access very large databases using only scripted function |
| unsorted List | Same as 'Pathname List' but unsorted. This is helpful with large databases, avoiding the time required to sort the pathnames. |
Selected Pathnames
When you select a pathname (by double clicking), it appears beneath the list of all pathnames in the Selection Area. It includes the name of the DSS file followed by the full DSS pathname. You can change the height of the Selection Area by grabbing the separator line between the two lists with your mouse, and moving it up or down. Your mouse pointer will change to a double ended arrow when you are over the separator line, indicating you can slide the line up or down. You add a pathname to the selection list by highlighting it and then clicking the Select.
Selection Area

You can also Quick Select pathnames if the Selection Area is empty by just highlighting pathnames from the main list with your mouse, and then selecting a function such as plot or tabulate. The Selection Area must be empty to use Quick Select.
Selection Buttons
Selection buttons located below the Selection Area operate on the selected paths as follows:

The Select button will remain inactive until a pathname is highlighted. Tip: You can also select pathnames by double-clicking on a pathname in the list or clicking on a pathname to highlight it, then click and hold the right mouse key and drag the pathname to the Selection Area.
De-SelectTo remove a pathname from the Selection Area list, highlight the pathname in the Selection Area then click the De-Select button.
Tip: You can de-select by double-clicking on a pathname in the Selection Area list.
Clear SelectionsYou can remove all pathnames from the Selection Area list by clicking the Clear Selections button.
Restore SelectionsThe Restore Selections button restores all selections you have cleared or de-selected from the Selection Area list.
Set Time WindowYou can set the time window of the data to view with the Set Time Window button.