Download PDF
Download page Reproduction.
Reproduction
Reproduction Rules simulate increasing a community and size class’s count and density through a rate of reproduction for a given season.
Reproduction Rules tab
The Reproduction Rule tab allows you to configure reproduction for a community and size class. The reproduction may occur at a constant rate or be dependent on a model variable and season.
A reproduction rule is configured for a community and size class (Figure). The selected community and size class becomes the spawning class during reproduction. Multiple reproduction rules can be configured for the same community and size class combination.
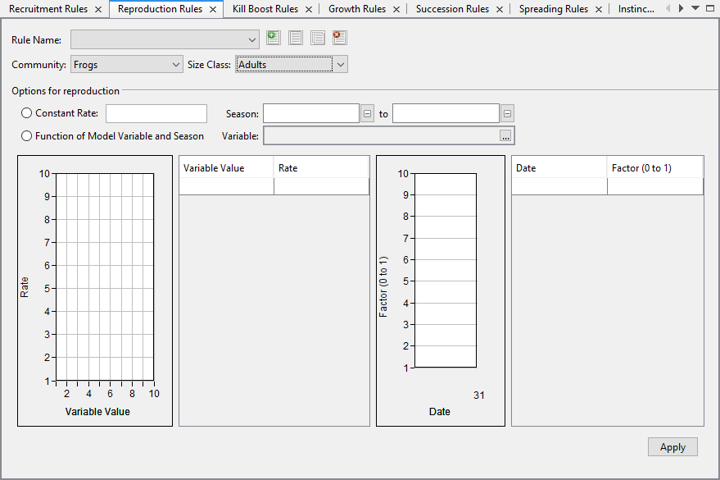
Figure. The Reproduction Rules interface.
Rule Name: this field displays the name of a selected reproduction rule. Expanding the dropdown for this field displays all reproduction rules in the study.
Add, Rename, Copy, and Delete Rule: described above in the common features section.
Community: dropdown list all of all communities in the study.
Size Class: dropdown list of all size classes of the selected community.
Constant Rate: this radio button selects the constant rate option for reproduction.
Season: start and end of season for the reproduction rule when the Constant Rate radio button is selected.
Function of Model Variable and Season: this radio button selects the function of model variable and season option for reproduction.
Variable: this field displays the selected variable used for determining the reproduction rate for the rule. Clicking the ellipses button for this field loads the Variable Picker dialog.
Variable Value-Rate table: this table configures the reproduction rate per variable value when the Function of Model Variable and Season radio button is selected.
Variable Value-Rate plot: this plot displays the points in the Variable Value-Rate table.
Seasonal Factor table: this table configures the factors for the reproduction depending on the season when the Function of Model Variable and Season radio button is selected.
Seasonal Factor plot: this plot displays the points in the Seasonal Factor table.
Apply: clicking this button saves the recruitment rule.
Configuring a Reproduction Rule
When you create a reproduction rule, you must:
- Assign a unique name,
- Select the community and size class to configure the reproduction rule for,
- Select the reproduction option,
- Configure the reproduction factor and season.
Creating a New Reproduction Rule
The first step in creating a new reproduction rule is to assign a rule name. Because multiple reproduction rules may be created in a study and for the same community and size class combinations, each reproduction rule must have a unique name. When attempting to create a reproduction rule that duplicates an existing rule’s name, an error is produced.
To create a new reproduction rule:
- Click the Add Rule This loads the New Rule dialog (Figure).
- Enter a unique rule name for the new reproduction rule in the New Rule
- Click OK in the New Rule
- After the New Rule dialog closes, the new rule name is displayed in the Rule Name
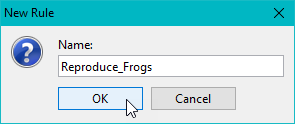
Figure. Interface for creating a new reproduction rule.
Select Community and Size Class
When creating a reproduction rule, the community and size class is selected from the Community and Size Class dropdown fields. The content in the Size Class dropdown depends on the selected community.
To select a community and size class:
- Expand Community dropdown list. List includes all communities in the model.
- Select community to create reproduction rule for. Content in Size Class dropdown will update.
- Expand Size Class dropdown list. List includes all the size classes for selected community.
- Select size class to create the reproduction rule for.
Using a Constant Rate for Reproduction Rule
When selecting the Constant Rate option for reproduction, the value for the reproduction and the season must be configured. This option is selected by default when creating a new reproduction rule.
To select and configure a constant rate for reproduction:
- Select the Constant Rate radio button.
- Configure a value in the Constant Rate
- Configure the start and end of the reproduction season.
- Click the Apply
Using a Function of Model Variable and Season for Reproduction Rule
When selecting the Function of Model Variable and Season option for reproduction, the variable must be selected. After a variable is selected, the Variable Value-Rate and Seasonal Factor tables must be configured.
To select and configure reproduction using a function of model variable and season:
- Select the Function of Model Variable and Season radio button.
- Click on the Ellipses button in the Variable This loads the Variable Picker.
- Select the Category of the variable to use.
- Select the Member of the variable to use.
- If necessary, configure Temporal Options for the selected variable.
- Click the OK button in the Variable Picker.
- After the Variable Picker closes, the selected variable is displayed in the Variable
- In the Variable Value-Rate table, add the rows needed to create the look-up table for determining the reproduction rate given a variable value.
- Configure the values for the variable and its corresponding reproduction rate.
- In the Seasonal Factor table, add the rows needed to create a look-up table for determining a factor based on a given date.
- Configure the values for the date and its corresponding factor.
- Click the Apply button (Figure).
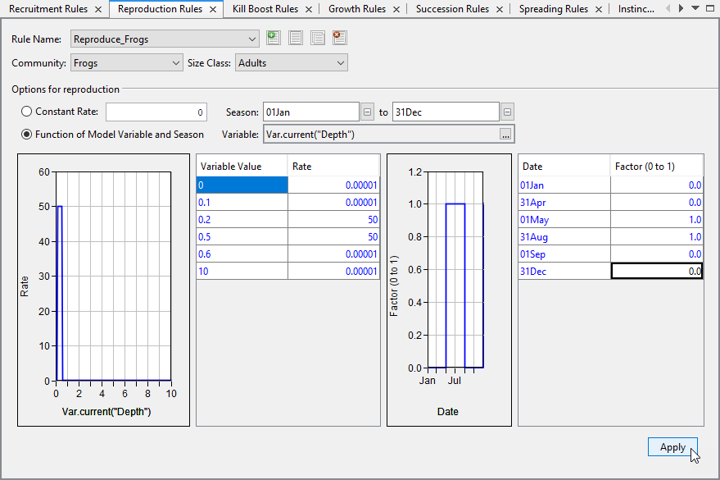
Figure. Click the Apply button to save the reproduction rule.
Simulation
Before reproduction occurs, the community in its spawning class must be present in the study area. When reproduction occurs, the count of offspring is added to the count of existing members of the community in a given area. This results in the overall count of the community increasing. This repeats for each subsequent time step while a reproduction rule is in effect.
| Count_{total}=Count_{existing}+Count_{offspring} |
The count of offspring is the reproduction rate multiplied to the count of the spawning class. The spawning class is the size class that the reproduction rule is configured for.
| Count_{offspring}=reproduction rate*Count_{spawning class} |
When reproduction occurs, the size is then averaged with the sizes of existing and newly added offspring members of the community in the area. The offspring size class is added at its smallest size during reproduction.
| Average Size of Community=(Count_{existing}*Size_{existing}+Count_{offspring}*Size_{offspring})/(Count_{existing}+Count_{offspring}) |
The reproduction rate used may either use a constant rate or be a function of a model variable.
The spawning size class may also be the offspring size class.
Reproduction Rate Using a Constant Rate
When the reproduction rate uses a constant rate, the constant rate is multiplied directly to the count of the spawning size class per time step to determine the count of the offspring for the community.
For example, the reproduction rate for the adults of a bunny community is a constant of 0.5. If there are 2 adult rabbits, 1 bunny will be added to the 2 adult rabbits.
Reproduction Rate Using a Function of Model Variable
When the reproduction rate uses a function of a model variable, the rate is determined by the look-up table configured for the Variable Value-Rate table. The rate is linearly interpolated between rows in the table.
When the reproduction rate uses a function of a model variable, a seasonal factor may be configured. This seasonal factor is multiplied to the reproduction rate depending on the configured Date-Factor table.
Reproduction Rate Seasonality
The reproduction occurs for the season that it is configured for. When the reproduction rule uses a constant rate, a single season is configured. If multiple seasons are required using a constant reproduction rate, multiple reproduction rules for the same community and size class may need to be configured.
When the reproduction rate uses a function of model variable and season, the seasonal factor table may be configured to determine the seasons that the reproduction occurs by setting the factor to 0 for no effect and 1 for full effect.
Multiple Reproduction Rules
Multiple reproduction rules may be configured for the same community and size class. The seasonality configured for each reproduction rule for the same community and size class dictates the order of which rule comes into effect.
Simulation Output
After a simulation is computed with reproduction rules for communities and size classes, the results can be observed in the output Plots, Simulation Map, and in the generated Simulation HDF tables.
After computing a simulation with a reproduction rule, the Count, Density, and Size plots reflect changes in community status as reproduction occurs. These plots are accessed from the context menu of an alternative in the Simulation tab. The Count and Density plots reflects the increase in community numbers. The Size plot reflects the average size of the community when reproduction occurs.
The Simulation Map displays the values from the action table of reproduction rules in a simulation.
Simulation HDF output includes Action Tables for Reproduction rules. Under the Action Table at the community level, the action table for Reproduction is generated. The Reproduction Action Table notes when a reproduction rule occurs. Each reproduction rule is noted with its unique Rule ID.
Action tables are generated after successfully computing an alternative with reproduction rules. These tables detail when a reproduction rule occurs in an element at a given time step.
When a reproduction action table is generated per rule (per settings in the Settings - Project Properties… - Spatial Output Controls menu option), an action table is generated for each reproduction rule created per community-size class.
When the total reproduction action table is generated, this is organized under each community-size class. This table collects the rule numbers for each reproduction rule in a community-size class.
Configuring the Animation Properties
In the Animation Properties, a simulation with a computed reproduction rule has options to display the Density, Size, and Reproduction Rule. There are no other properties specific to reproduction rules.
Animating the Reproduction Rule
To animate the reproduction rule for a community and size class, animating the Density of the community and size class can be effective. The Animation Properties may be configured by:
- Selecting the Community-Size Class to animate on the Simulation Map.
- Select the Model Variable radio button.
- Select Density in the corresponding dropdown.
- Configure the Tic Interval and Contour Limits as needed.
- Click the Apply
To animate the values in the reproduction rule’s action table:
- Select the Community-Size Class to animate on the Simulation Map.
- Select the Model Variable radio button.
- Select the Reproduction Rule option in the corresponding dropdown.
- Configure the Tic Interval and Contour Limits as needed.
- Click the Apply
Configuring Spatial Output Controls
The Spatial Output Controls, which are accessed from the Project Properties dialog, control whether additional tables are generated in the simulation HDF file after computing a simulation with configured reproduction rules. Without configuring the Spatial Output Controls, the simulation HDF file includes tables for the Density and Size of the community.
The Spatial Output Controls have checkboxes for Reproduction under the Rules section. There are separate checkboxes to generate the action tables for the reproduction rules for individual rules or for all the reproduction rules.
By default, the Total checkbox is checked and the Per Rule checkbox is unchecked.