Download PDF
Download page Applying the Terrain Reconditioning Tools.
Applying the Terrain Reconditioning Tools
Download the initial project files here - startPunxsutawney.zip
Overview
In this tutorial you will modify a terrain dataset by using the Terrain Reconditioning tool to Burn Streams and Build Walls. You would use these two options when you want to enforce known information, like the locations of streams from the National Hydrography Dataset or the boundaries of watersheds from the Watershed Boundary Dataset, into the terrain dataset. An example would be if you had subbasin boundaries and a river reach shapefile from an existing study and you wanted to make sure the automated delineation tools in HEC-HMS recreated the subbasin and reaches from the existing study.
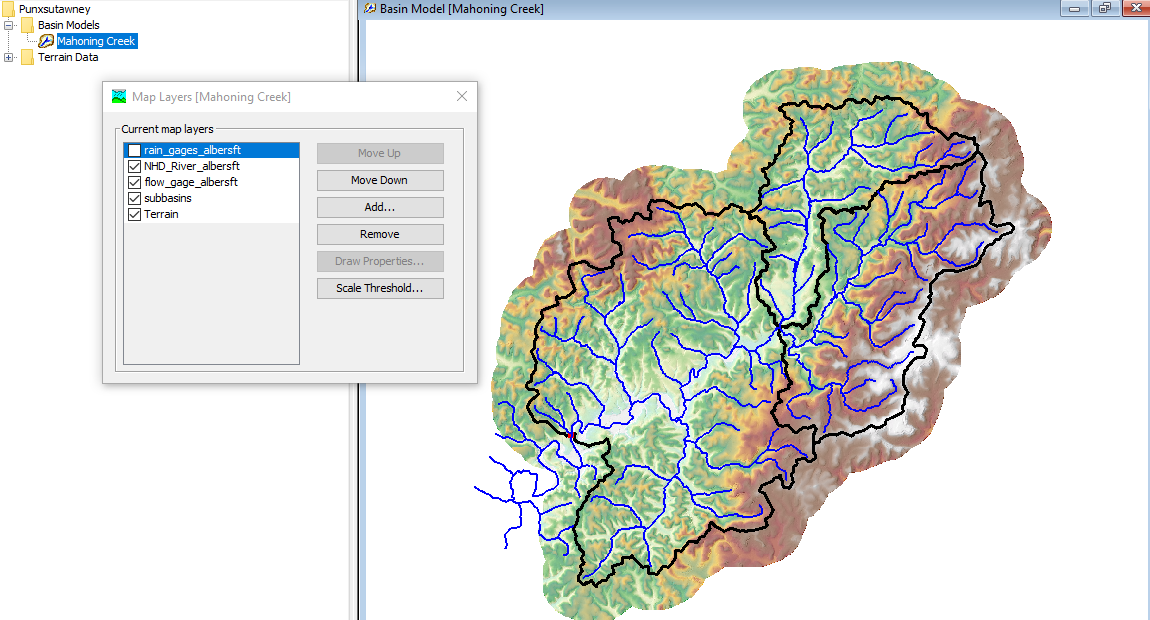
The figure below shows two subbasin shapefiles. The red polygons were generated by someone digitizing subbasin boundaries using topographic maps. The black polygons were generated by an automated delineation tool within a GIS. There are similarities and differences in the subbasin delineations across the watershed. The automated delineation could be improved by modifying the terrain with known information, like where subbasin boundaries and stream locations exist. 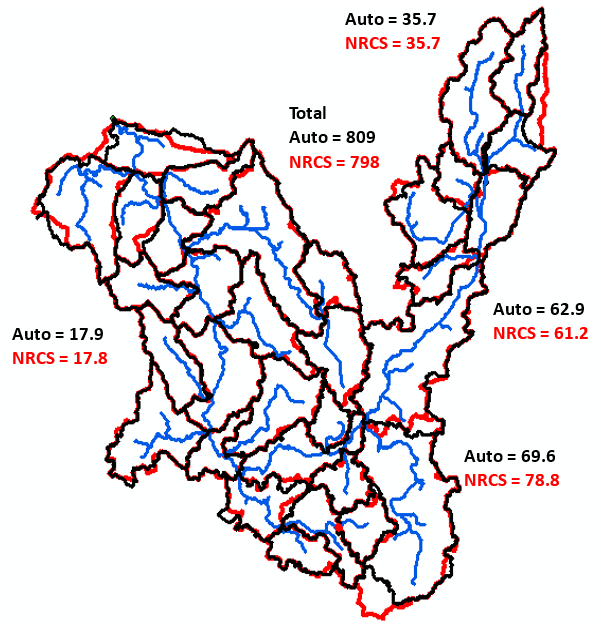
The Terrain Reconditioning options are described in the HEC-HMS User's Manual, HEC-HMS GIS Menu. The following figure illustrates how the burn streams tool works. The black circle represents a stream polyline and the brown line represents the land surface from the terrain. I set the buffer to 2 cells, the smooth drop to 5 feet, and the sharp drop to 1 foot. The profile on the left is the original terrain and the figure on the right is the reconditioned terrain. Finally, the blue squares below the terrain profiles represent the grid cells within the terrain. In this example, the burning algorithm will buffer the stream line by 2 grid cells on each side. The algorithm will lower the elevation of the grid cells directly beneath the stream line by 5 feet and then gradually lower the elevation for the other cells within the buffer so that there is a smooth transition to the existing elevation of the grid cells adjacent to the buffered area. The sharp drop is an additional drop that is added to the smooth drop. In this example, the grid cells directly beneath the stream line were lowered an additional 1 foot, for a total decrease in elevation of 6 feet for those grid cells directly beneath the stream lines. 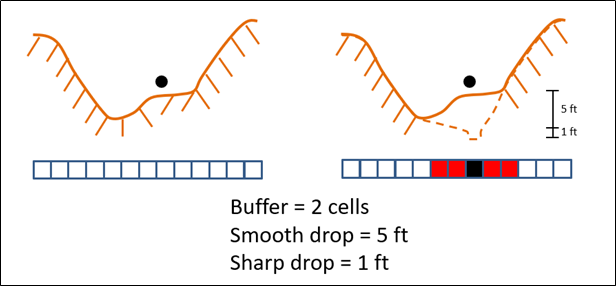
The tutorial is divided into two sections. The first section shows how to use the burn streams option only and the second sections shows how to use the build walls and burn streams options together. This tutorial uses the same watershed and datasets as the ones described here: Introduction to Creating an HEC-HMS Model from Scratch using HEC-HMS GIS Tools.
Use the Burn Streams Option Only
- Start HEC-HMS (version 4.10 and newer) and open the Punxsutawney project.
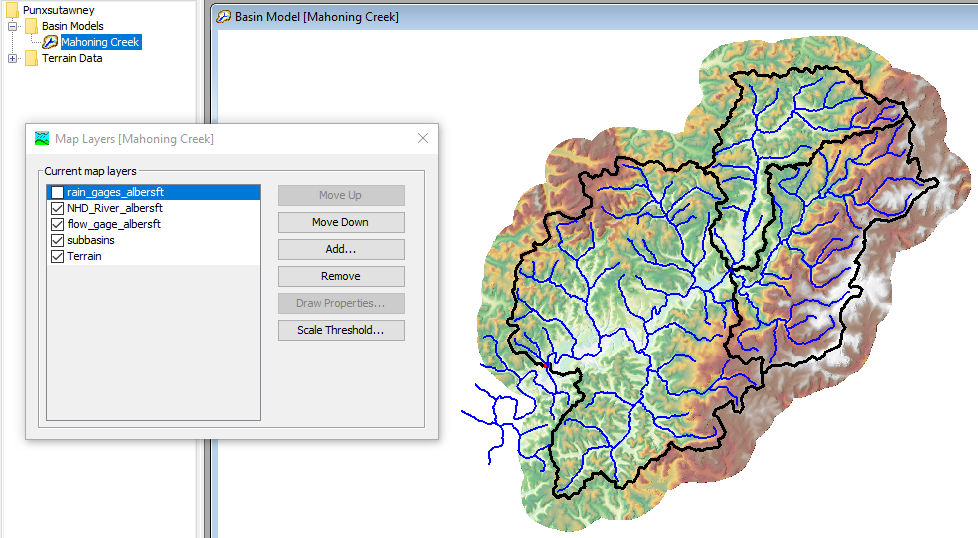
- Open the Mahoning Creek basin model. A terrain dataset has been added to the basin model. Three shapefiles have been added and displayed in the basin model map. The NHD_River_albersft shapefile is a portion of the stream layer that was extracted from the National Hydrography Dataset. The streams were re-projected to the same projection as the terrain model. The subbasins shapefile represents subbasin polygons from an existing model of the watershed. The subbasin shapefile was also re-projected to the same projection as the terrain model. As a side note, the Terrain Reconditioning tool will still work with shapefiles that have a different projection than the terrain model; the tool re-projects the shapefiles to the projection of the terrain model during building and burning.
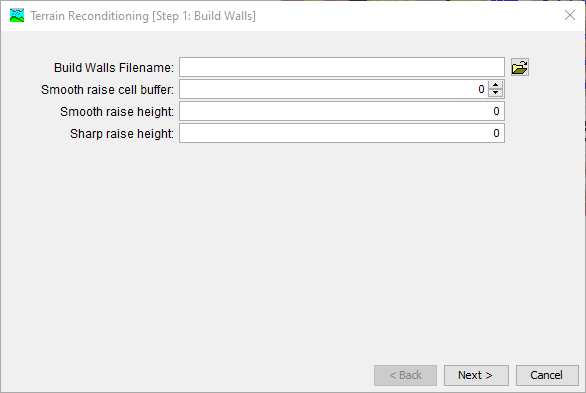
- From the GIS menu, select Terrain Reconditioning….
- We are not going to build walls, click the Next> button.
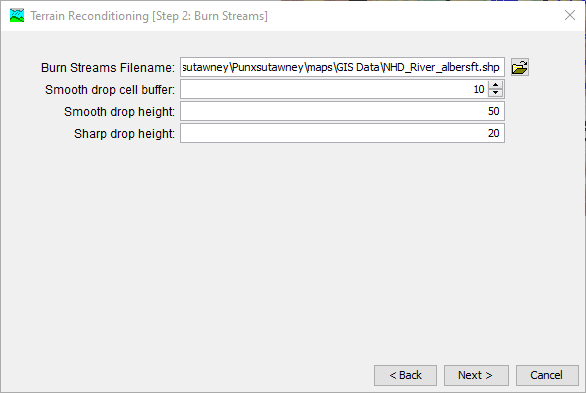
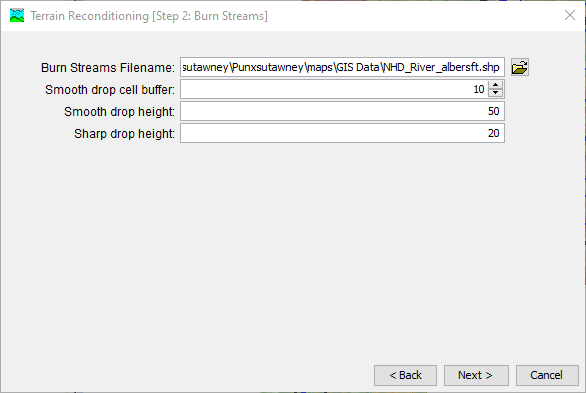
- In the next step, select the NHD_River_albersft shapefile, it is in the GIS Data folder in the project directory (…\Punxsutawney\maps\GIS Data). I set the buffer to 10 cells, a smooth drop height of 50 feet, and a sharp drop height of 20 feet. The amount of terrain reconditioning might be excessive for this example, I want to make sure the terrain modification was visible for illustration. In many cases, editing the terrain is an iterative process. The goal is to reproduce a known drainage network (subbasin and reach delineation); therefore, you might have to try different options and datasets to get appropriate results.

Burn Streams
When burning streams, it is recommended that the input streams file extends past the lowest point of the elevation raster, as seen in the below figure. This ensures that subsequent GIS processes yield an identified streams layer that reaches the most downstream portion of the underlying terrain.

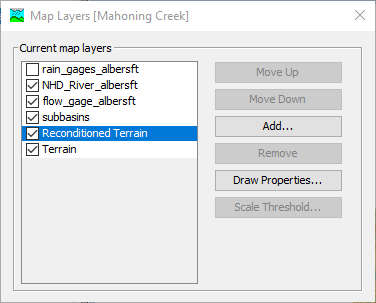
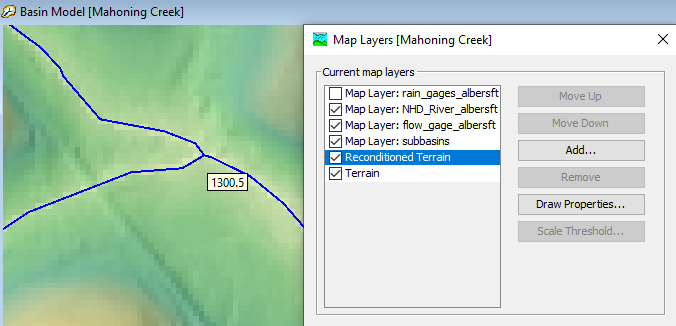
- Click the Next button. A new terrain dataset is created and is referred to as the "Reconditioned Terrain" dataset, see the Map Layers editor in the figure below. You can identify cell values in the Basin Model map by selecting a map layers in the Map Layers editor list and then hovering your mouse on top of the reconditioned terrain in the map.
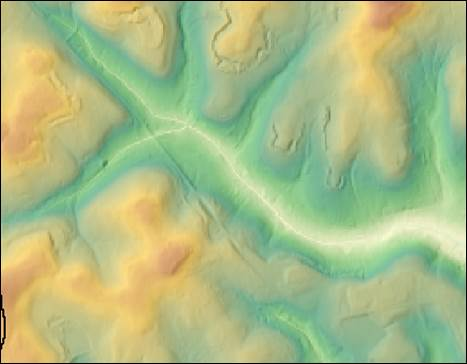
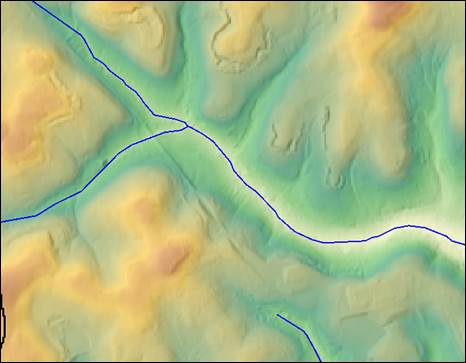
- Both figures below show the reconditioned terrain. The figure on the right has the NHD_River_albersft stream shapefile turned on to help see which grid cells would have been lowered in the burn streams process. If the amount of burning in is large, then you will be able to visually see the cell elevations below and within the buffer tolerance of the stream shapefile have been lowered.
The figures below show the elevation for a grid cell that fell along the stream shapefile, the location is approximately at the confluence of the two reach lines. The figure on the left shows the original terrain, the elevation for this location was 1370.5 feet. The figure on the right shows the reconditioned terrain and the elevation was 1300.5 feet. The total elevation drop for this cell, which is collocated with the stream line was 70 feet. The buffer was set to 10 cells around the stream shapefile and the smooth drop was 50 feet. The buffer cells farthest out from the stream line had the smallest adjustment while the cells collocated with the stream line were adjusted by a total of 50 feet. For those grid cells collocated with the stream line, the sharp drop of 20 feet was added to the smooth drop of 50 feet, for a total elevation drop of 70 feet.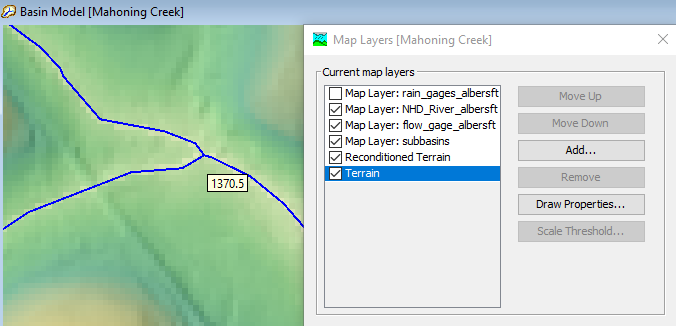
Each time you run the Terrain Preprocessing tool, the program will automatically use the original terrain dataset. The program does not continue to edit the reconditioned terrain dataset. After you modify the terrain, the next step is to run the Preprocess Sinks step before running the remaining tools to delineate subbasin and reach elements.
Using the Build Walls and Burn Streams Options in Sequence
- Start HEC-HMS (version 4.10 and newer) and open the Punxsutawney project.
- Open the Mahoning Creek basin model. A terrain dataset has been added to the basin model. Three shapefiles have been added and displayed in the basin model map. The NHD_River_albersft shapefile is a portion of the stream layer that was extracted from the National Hydrography Dataset. The streams were re-projected to the same projection as the terrain model. The subbasins shapefile represents subbasin polygons from an existing model of the watershed. The subbasin shapefile was also re-projected to the same projection as the terrain model.
- From the GIS menu, select Terrain Reconditioning….
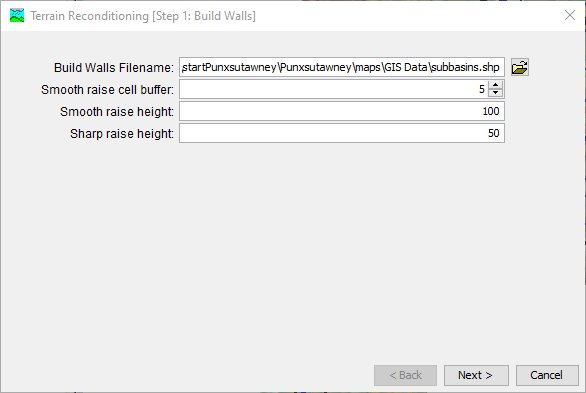
- Within the Build Walls step, select the subbasins shapefile, it is in the GIS Data folder in the project directory (…\Punxsutawney\maps\GIS Data). I set the buffer to 5 cells, a smooth raise height of 100 feet, and a sharp raise height of 50 feet. The amount of terrain reconditioning might be excessive for this example, I want to make sure the terrain modification was visible for illustration. In many cases, editing the terrain is an iterative process. The goal is to reproduce a known drainage network (subbasin and reach delineation); therefore, you might have to try different options and datasets to get appropriate results. Click the Next> button.
- In the next step, select the NHD_River_albersft shapefile, it is in the GIS Data folder in the project directory (…\Punxsutawney\maps\GIS Data). I set the buffer to 10 cells, a smooth drop height of 50 feet, and a sharp drop height of 20 feet.
- Click the Next button. A new terrain dataset is created and is referred to as the "Reconditioned Terrain" dataset, see the Map Layers editor in the figure below. You can identify cell values in the Basin Model map by selecting a map layers in the Map Layers editor list and then hovering your mouse on top of the reconditioned terrain in the map.
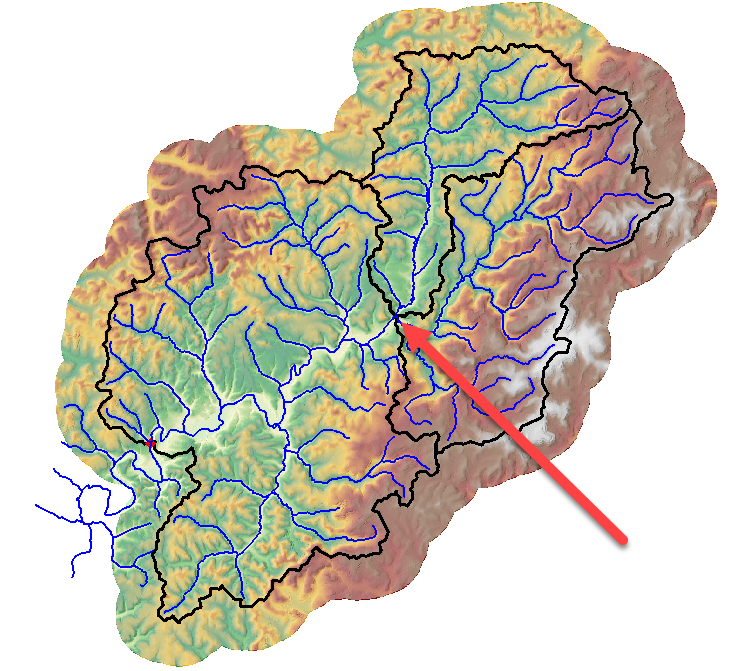
- Zoom into the area the red arrow is pointing to in the figure below. This area is at the confluence of two rivers (Stump Creek and East Branch Mahoning Creek).
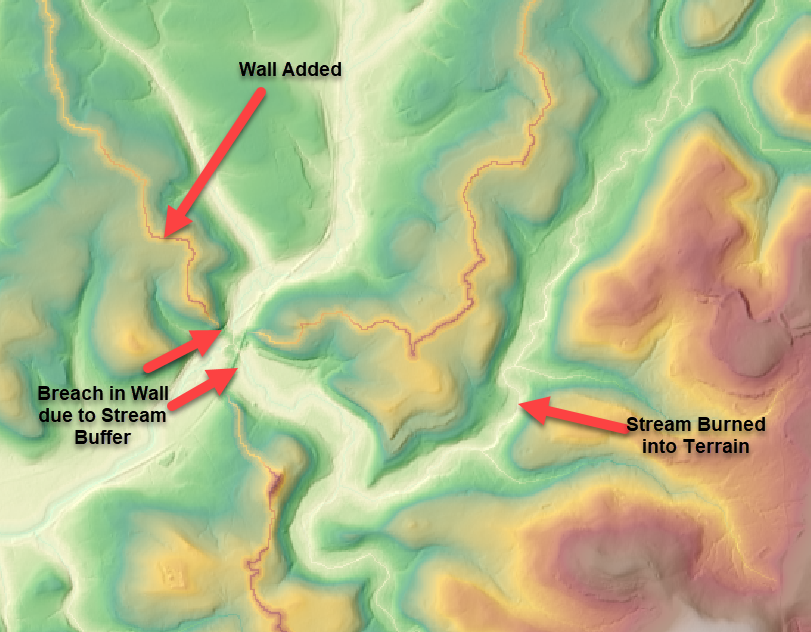
- Turn on display of the subbasins and NHD_River_albersft shapefiles and make sure the reconditioned terrain is displayed as well. As shown below, you can see the terrain cells where the elevation was raised based on the subbasin layer's polygon outline (see the "Wall Added" area in the figure below). You can also see the terrain cells that were lowered because of their proximity to the stream layer's polyline (see the "Stream Burned into Terrain" area in the figure below). You can also see where the stream polylines acted as a breach in the walls (see the "Breach in Wall due to Stream Buffer" area in the figure below).
It is suggested when using the build walls option that you always specify a stream layer to breach each of the subbasin polygons. You do not have to burn in the streams (smooth and sharp drops are not required). If you do not specify a stream polyline layer when building walls, the Preprocess Sinks tool will fill in a large amount of the terrain in order to create a hydrologically corrected DEM. As an example, I ran the steps shown above, but did not choose a stream layer to burn in or to ensure that a breach was added to the walls. Then I ran the Preprocess Sinks option. The following figure shows the Sink Locations that were filled in by the preprocess sinks tool. Notice a significant amount of the reconditioned terrain had to be filled in for water to flow across the terrain. 
Each time you run the Terrain Preprocessing tool, the program will automatically use the original terrain dataset. The program does not continue to edit the reconditioned terrain dataset. After you modify the terrain, the next step is to run the Preprocess Sinks step before running the remaining tools to delineate subbasin and reach elements.
Download the final project files here - finalPunxsutawney.zip