Download PDF
Download page Ensemble Analyses.
Ensemble Analyses
An Ensemble Analysis is a tool used to analyze multiple member models and to aggregate the results. In HEC-HMS, member models can currently consist of either Simulation Runs or Forecast Alternatives which can, in turn, be comprised of different boundary condition data, antecedent conditions, paremeterizations, modeling methods, and/or hydraulic structure configurations. One of the key aims of the Ensemble Analysis is to reduce uncertainty in the modeled predictions.
For example, several Forecast Alternatives could be created as member models in HEC-HMS, each with a different precipitation forecast used as boundary condition data. As long as the forecasts are diverse and largely independent of each other, the prediction error of the member models decreases when using the ensemble approach. An ensemble approach with respect to precipitation forecasts can more accurately encompass the "what if" scenarios that are present in each individual member model.
While selecting member models, also referred to as ensemble members, is an important part of carrying out an Ensemble Analysis, aggregating the results of each member model into a single ensemble result is also an important step to consider. Currently in HEC-HMS, Ensemble Analyses can aggregate member model results and output an ensemble time-series of average, minimum, maximum, and +/- one standard deviation.
Creating a New Ensemble Analysis
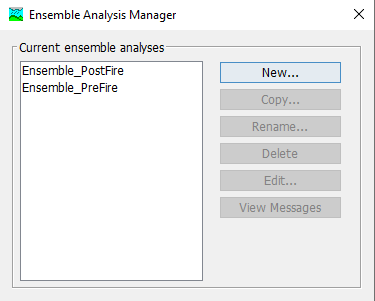
A new Ensemble Analysis is created using a wizard that helps you navigate the steps to creating a new analysis. There are two ways to access the wizard. The first way to access the wizard is to click on the Compute menu and select the Create Compute | Ensemble Analysis command; it is only enabled if at least two Simulation Runs or Forecast Alternatives already exist in the project. The wizard will open and begin the process of creating a new Ensemble Analysis. The second way to access the wizard is from the Ensemble Analysis Manager. Click on the Compute menu and select the Ensemble Analysis Manager command. The Ensemble Analysis Manager will open and show any analyses that already exist. Press the New button to access the wizard and begin the process of creating an Ensemble Analysis, as shown in the following figure.
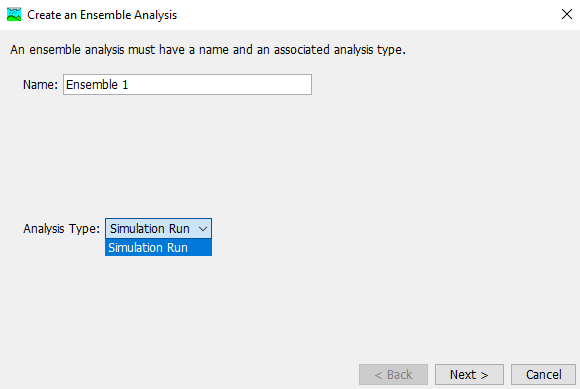
The first step of creating an Ensemble Analysis is to provide the name for the new analysis. A default name is provided for the new analysis; you can use the default or replace it with your own choice. Also, Ensemble Analyses can contain either Simulation Runs or Forecast Alternatives. Choose one. The option will only exist if at least two instances are present in the project. In the below figure, only Simulation Run is available because Forecast Alternatives have not been created in the project. If you change your mind and do not want to create a new Ensemble Analysis, you can press the Cancel button at the bottom of the wizard or the X button in the upper right corner of the wizard. The Cancel button can be pressed at any time you are using the wizard. Press the Next button when you are satisfied with the name you have entered and are ready to proceed to the next step.
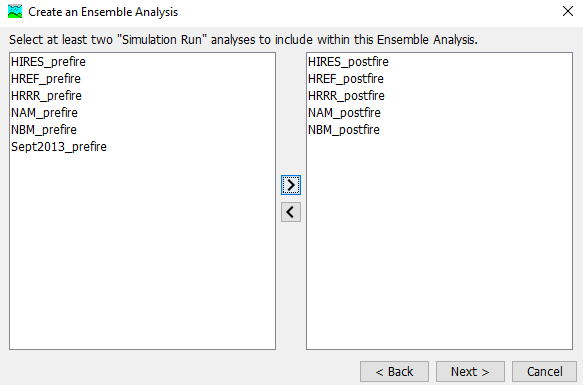
The second step of creating an Ensemble Analysis is to select the ensemble members, also referred to as base models, to be included in the analysis. To add an ensemble member, click on it in within the left window and then click the right-arrow to toggle your selection over to the right window. Repeat until you have chosen your desired ensemble members and then press Next and then Finish to create the Ensemble Analysis.
The last necessary step in setting up an Ensemble Analysis is to select the ensemble member time-series results that you wish to be aggregated and output to DSS. Navigate to the Watershed Explorer and select the Compute tab. Expand the Ensemble Analyses node and select the Ensemble Analysis that you just created. Now select the gear icon, as seen below, to open the output results control dialog. Only the selected time-series will have results available for analysis after compute.
Ensemble Analysis Results
Ensemble Analyses can be file intensive especially if they are comprised of many ensemble members. Be sure to select only the elements and time-series that you are interested in. The selected time-series will be included in the results. Optionally, you can specify the output interval that you would like to be written to DSS. If not, the Ensemble Analysis simulation interval will default to the interval of its members.
Ensemble Output Control Dialog
In an Ensemble Analysis, if results are desired at a given element then that element must be present in all of the ensemble member basin models. Otherwise, the element will not appear in the Output Control Dialog for selection.


Copying an Ensemble Analysis
There are two ways to copy an Ensemble Analysis. Both methods for copying an analysis create an exact duplicate with a different name. Once the copy has been made it is independent of the original, and they do not interact.
The first way to create a copy is to use the Ensemble Analysis Manager, which is accessed from the Compute menu. Select the Ensemble Analysis you wish to copy by clicking on it in the list of current analyses. The selected analysis is highlighted after you select it. After you select an analysis you can press the Copy button on the right side of the window. The Copy Ensemble Analysis window (shown in the following figure) will open where you can name and describe the copy that will be created. A default name is provided for the copy; you can use the default or replace it with your own choice. A Description can also be entered; if it is long you can use the button to the right of the description field to open an editor. When you are satisfied with the name and description, press the Copy button to finish the process of copying the selected Ensemble Analysis. You cannot press the Copy button if no name is specified. If you change your mind and do not want to copy the selected Ensemble Analysis, press the Cancel button or the X button in the upper right to return to the Ensemble Analysis Manager window.

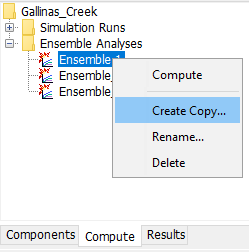
The second way to copy is from the Compute tab of the Watershed Explorer. Move the mouse over the Ensemble Analysis you wish to copy and press the right mouse button (shown in the following figure). A context menu is displayed that contains several choices including Copy. Click the Create Copy command. The Copy Ensemble Analysis window will open where you can name and describe the copy that will be created. A default name is provided for the copy; you can use the default or replace it with your own choice. A description can also be entered; if it is long you can use the button to the right of the description field to open an editor. When you are satisfied with the name and description, press the Copy button to finish the process of copying the selected Ensemble Analysis. You cannot press the Copy button if no name is specified. If you change your mind and do not want to copy the selected Ensemble Analysis, press the Cancel button or the X button in the upper right of the Copy Ensemble Analysis window to return to the Watershed Explorer.
Renaming an Ensemble Analysis
There are two ways to rename a Ensemble Analysis. Both methods for renaming an analysis change its name and perform other necessary operations.
The first way to perform a rename is to use the Ensemble Analysis Manager, which you can access from the Compute menu. Select the Ensemble Analysis you wish to rename by clicking on it in the list of current analyses. The selected analysis is highlighted after you select it. After you select an analysis you can press the Rename button on the right side of the window. The Rename Ensemble Analysis window (shown in the following figure) will open where you can provide the new name. If you wish you can also change the description at the same time. If the new description will be long, you can use the button to the right of the description field to open an editor. When you are satisfied with the name and description, press the Rename button to finish the process of renaming the selected Ensemble Analysis. You cannot press the Rename button if no name is specified. If you change your mind and do not want to rename the selected Ensemble Analysis, press the Cancel button or the X button in the upper right of the Rename Ensemble Analysis window to return to the Ensemble Analysis Manager window.

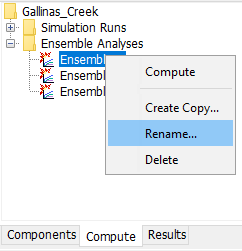
The second way to rename is from the Compute tab of the Watershed Explorer. Select the Ensemble Analysis you wish to rename by right-clicking on it in the Watershed Explorer. A context menu is displayed that contains several choices including Rename. Click the Rename command. The Rename Ensemble Analysis window will open where you can edit the existing name and/or description. When you are satisfied with the new name and description, press the Rename button to finish the process of renaming the selected Ensemble Analysis. You cannot press the Rename button if no name is specified. If you change your mind and do not want to rename the selected Ensemble Analysis, press the Cancel button or the X button in the upper right of the Rename Ensemble Analysis window to return to the Watershed Explorer.
Deleting an Ensemble Analysis
There are two ways to delete an Ensemble Analysis. Both methods for deleting an analysis remove it from the project and automatically delete previously computed results. Once an analysis has been deleted it cannot be retrieved or undeleted.
The first way to perform a deletion is to use the Ensemble Analysis Manager, which you can access from the Compute menu. Select the Ensemble Analysis you wish to delete by clicking on it in the list of current analyses. The selected analysis is highlighted after you select it. After you select an analysis you can press the Delete button on the right side of the window. A window will open where you must confirm that you wish to delete the selected analysis as shown in the following figure. Press the OK button to delete the analysis. If you change your mind and do not want to delete the selected Ensemble Analysis, press the Cancel button or the X button in the upper right to return to the Ensemble Analysis Manager window.

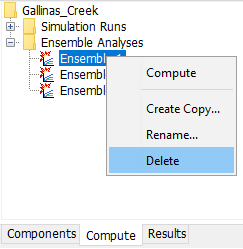
The second way to delete is from the Compute tab of the Watershed Explorer. Select the Ensemble Analysis you wish to delete by clicking on it in the Watershed Explorer; it will become highlighted (shown in the following figure). Keep the mouse over the selected analysis and click the right mouse button. A context menu is displayed that contains several choices including delete. Click the Delete command. A window will open where you must confirm that you wish to delete the selected analysis. Press the OK button to delete the analysis. If you change your mind and do not want to delete the selected Ensemble Analysis, press the Cancel button or the X button in the upper right to return to the Watershed Explorer.
Adding/Removing Ensemble Members
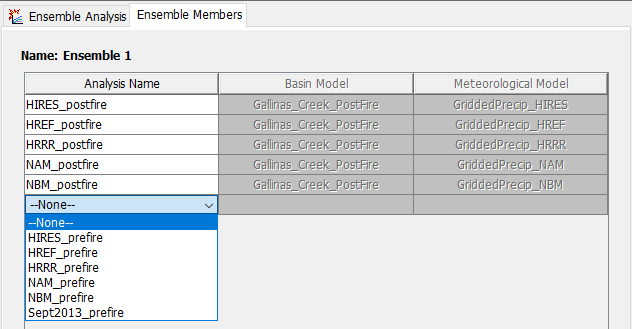
Ensemble members can be added (or removed) to an existing Ensemble Analysis via the Ensemble Members tab. Select the Ensemble Analysis in the Compute Tab of the Watershed Explorer to access the Component Editor for the Ensemble Analysis. Then select the Ensemble Members tab as seen in the below figure. To insert a new member, click the empty last row and select the desired member. Alternatively, you can remove a member by right-clicking its row and selecting Delete Row(s).
