Download PDF
Download page Computing Results for an Uncertainty Analysis.
Computing Results for an Uncertainty Analysis
Results for an uncertainty analysis are generated by computing it. Changes in all the components used in the analysis are automatically tracked to determine if the results are current. When the results are no longer current, the analysis must be recomputed in order to refresh the results. Computing results begins with selecting an uncertainty analysis.
Choosing Output Results
The uncertainty analysis is the only computation method that requires choosing output results. Results are automatically stored for all elements in the simulation run, optimization trial, forecast alternative, and depth-area analysis. These other computation methods can store results for all elements because the amount of computed output is relatively compact. Conversely, if results were stored for all elements in the uncertainty analysis, the amount of computed output would be significant and potentially overwhelming. Choosing the elements in the uncertainty analysis where output results will be stored saves space and improves manageability.
Choose the output results for an uncertainty analysis using the Watershed Explorer. Move the mouse over the analysis and press the right mouse button (Figure 1). A context menu is displayed that contains several choices including results. Click the Results… command to choose the output results for the uncertainty analysis. The Results window (Figure 2) will open for choosing the output results.
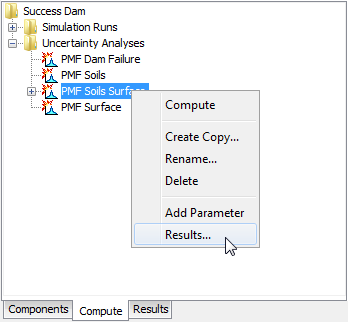
Figure 1. Preparing to choose the element and time-series output results for an uncertainty analysis.
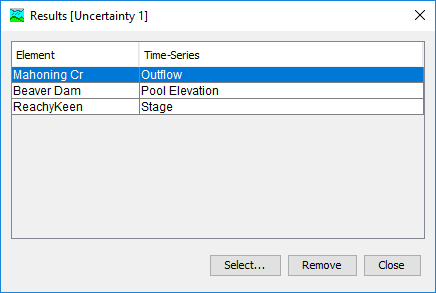
Figure 2. Choosing the elements and time-series for output results.
The Results window displays the elements and time-series that will be stored when the uncertainty analysis is computed. Press the Select… button to choose additional time-series. The Select Results window (Figure 3) is used to choose time-series at specific elements. All of the elements in the uncertainty analysis are shown on the left side of the window. Click on an element to choose a result from among the time-series computed at the element. Only one element can be selected at a time. After clicking on an element, the available time-series at the element will be shown on the right side of the window. Select the time-series that should be added to the stored results. Multiple time-series can be selected simultaneously by holding the control key and clicking on additional time-series. Press the Select button and the selected time-series for the selected element will be added to the stored results. Additional elements and time-series can be selected. Press the Close button when you have finished choosing results. Presently, the only time-series that will be retained in the uncertainty analysis are element outflow, subbasin LWASS and SWE, and reservoir pool elevation.
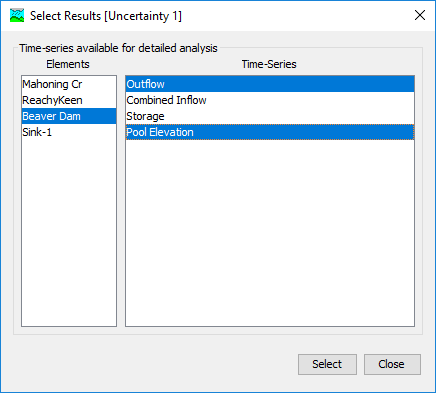
Figure 3. Choosing two time-series at an element for the output results.
The Results window is also used to stop storing elements and time-series data when the uncertainty analysis is computed. Time-series that have been removed will not be stored the next time the uncertainty analysis is computed. Select the row in the table that should be removed from the stored results. Multiple rows can be selected simultaneously by holding the control key and clicking on additional rows (Figure 4). Press the Remove button and the selected elements and time-series will no longer be stored. Press the Close button when you have finished removing elements and time-series.
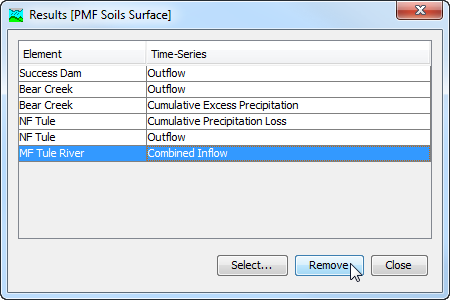
Figure 4. Removing a selected time-series from the output results.
Selecting a Current Uncertainty Analysis
There are two ways to select the current uncertainty analysis. Both methods set the analysis so that it can be computed and results can be accessed from the Watershed Explorer as soon as they are available. The current uncertainty analysis is shown in the title of the basin map even though results cannot currently be selected through the map.
The first way to select the current uncertainty analysis is from the toolbar. The compute selection box shows all of the compute components in the project; uncertainty analyses appear after depth-area analyses in the selection box. Each uncertainty analysis in the selection box includes the prefix Uncertainty followed by the name of the analysis. Click on the toolbar selection box and choose an uncertainty analysis to become the current analysis.
The second way to select the current uncertainty analysis is from the Watershed Explorer, on the "Compute" tab. Select the uncertainty analysis you wish to become the current analysis by clicking on it in the Watershed Explorer. The uncertainty analyses are listed alphabetically in the "Uncertainty Analyses" folder.
Computing an Uncertainty Analysis
There are three ways to compute the currently selected uncertainty analysis. All methods automatically perform parameter checking, and if no errors are generated, proceed to the actual computing of uncertainty analysis results. Additionally, the program is designed to be computationally efficient. Only components with data changes since the last compute will be recomputed; the remainder of the components have not changed so previous alternative results are still applicable. If you wish, you may force all components to be recomputed regardless of data changes since the last compute.
The first way to compute an uncertainty analysis is from the Compute menu. Click on the Compute menu and then select the Compute Uncertainty command. The name of the current uncertainty analysis is shown in brackets as part of the menu command. If the command is not available, it is because there is no current uncertainty analysis; you must first select an analysis. A window will automatically open that shows the progress of the compute. You will need to manually close the window when the compute is done, whether it failed or was successful. If you wish to force all components to be recomputed instead of just those with data changes, hold the control key while selecting the menu command.
The second way to compute an uncertainty analysis is from the Watershed Explorer, on the "Compute" tab. Select the uncertainty analysis you wish to compute by clicking on it in the Watershed Explorer with the right mouse button. A context menu is displayed that contains several choices including compute. Click the Compute command. The progress window will automatically open. If you wish to force all components to be recomputed instead of just those with data changes, hold the control key while selecting the right mouse menu command.
The third way to compute an uncertainty analysis is from the toolbar. The compute button is enabled whenever there is a current analysis that can be computed. If the button is not available or shows a different type of compute, you must first select an uncertainty analysis. Press the button to compute the current uncertainty analysis. The progress window will automatically open. If you wish to force all components to be recomputed instead of just those with data changes, hold the control key while selecting the toolbar button.
Computing Multiple Analyses
Multiple uncertainty analyses can be computed in rapid succession. This feature should be used carefully because the time required to compute an uncertainty analysis is much longer than all other compute types. Each simulated analysis is internally managed the same as if it were computed in isolation. The steps performed for the user begin with selecting the uncertainty analysis, checking parameters for the analysis, and finally computing the simulation. This sequence is repeated in rapid succession for each uncertainty analysis in the selected set. Appropriate feedback is provided through a progress bar.
The multiple uncertainty analyses must exist before they can be selected for a multiple compute. Select the Multiple Compute command on the Compute menu. A manager is used to select uncertainty analyses (Figure 5). Make selections in the list and then press the Compute button to begin computing the selected analyses. A separate progress bar will be displayed for each uncertainty analysis as it is computed. The progress bar may disappear automatically at the conclusion of an uncertainty analysis depending on the configurations in the Program Settings. If errors are encountered while computing an analysis, the progress bar will always remain visible after all selected analyses have finished computing regardless of any other settings.
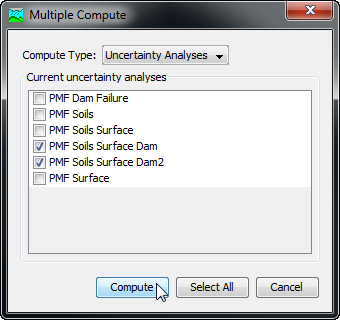
Figure 5. Selecting multiple uncertainty analyses for sequential compute.