Download PDF
Download page Simulation Runs.
Simulation Runs
Simulation runs are the primary method of computing results. Each run is composed of one meteorologic model, one basin model, and one control specifications. Results can be visualized as graphs, summary tables, and time-series tables either through the basin map or from the Watershed Explorer. In addition to selecting the meteorologic, basin, and control components, advanced features for controlling the run are also included.
Creating a New Run
A new simulation run is created using a wizard that helps you navigate the steps to creating a new run. There are two ways to access the wizard. The first way to access the wizard is to click on the Compute menu and select the Create Compute | Simulation Run command; it is only enabled if at least one basin model, one meteorologic model, and one control specifications exist. The wizard will open and begin the process of creating a new simulation run. The second way to access the wizard is from the Simulation Run Manager. Click on the Compute menu and select the Simulation Run Manager command. The Simulation Run Manager will open and show any runs that already exist. Press the New… button to access the wizard and begin the process of creating a simulation run, as shown in Figure 1.
The first step of creating a simulation run is to provide the name for the new run (Figure 2). A default name is provided for the new simulation run; you can use the default or replace it with your own choice. After you finish creating the run you can add a description to it. If you change your mind and do not want to create a new simulation run, you can press the Cancel button at the bottom of the wizard or the X button in the upper right corner of the wizard. The Cancel button can be pressed at any time you are using the wizard. Press the Next> button when you are satisfied with the name you have entered and are ready to proceed to the next step.
The second step of creating a simulation run is to select a basin model. All of the basin models in the project are shown and you must select one before proceeding to the next step. By default the first basin model in the table is selected. The selected model is highlighted. You can use your mouse to select a different basin model by clicking on it in the table of available choices. You can also use the arrow keys on your keyboard to select a different model. Press the Next> button when you are satisfied with the basin model you have selected and are ready to proceed to the next step. Press the <Back button if you wish to return to the previous step and change the name for the new simulation run.
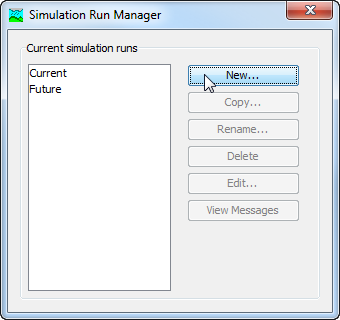
Figure 1. Beginning the process of creating a new simulation run using the Simulation Run Manager.
The third step of creating a simulation run is to select a meteorologic model. All of the meteorologic models in the project are shown and you must select one before proceeding to the next step. By default the first meteorologic model in the table is selected. The selected model is highlighted. You can use your mouse to select a different meteorologic model by clicking on it in the table of available choices. You can also use the arrow keys on your keyboard to select a different model. Press the Next> button when you are satisfied with the meteorologic model you have selected and are ready to proceed to the next step. Press the <Back button if you wish to return to the previous step and select a different basin model.
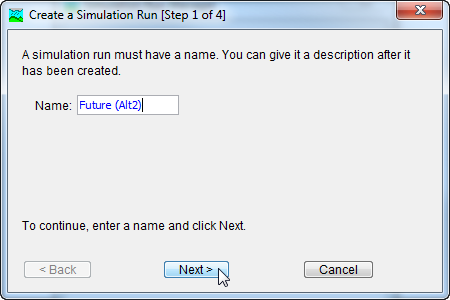
Figure 2. Entering a name for a new simulation run. The remaining steps are to select a basin model, meteorologic model, and control specifications.
The fourth and final step of creating a simulation run is to select a control specifications. All of the control specifications in the project are shown and you must select one before proceeding to the next step. By default the first control specifications in the table is selected. The selected specifications is highlighted. You can use your mouse to select a different control specifications by clicking on it in the table of available choices. You can also use the arrow keys on your keyboard to select a different specifications. Press the Finish button when you are satisfied with the name you have entered and the components you have selected, and are ready to create the simulation run. Press the <Back button if you wish to return to the previous step and select a different meteorologic model.
Copying a Run
There are two ways to copy a simulation run. Both methods for copying a run create an exact duplicate with a different name. Once the copy has been made it is independent of the original and they do not interact.
The first way to create a copy is to use the Simulation Run Manager, which is accessed from the Compute menu. Select the simulation run you wish to copy by clicking on it in the list of available simulation runs. The selected run is highlighted after you select it. After you select a run you can press the Copy… button on the right side of the window. A new Copy Simulation Run window (Figure 3) will open where you can name and describe the copy that will be created. A default name is provided for the copy; you can use the default or replace it with your own choice. A description can also be entered; if it is long you can use the button to the right of the description field to open an editor. When you are satisfied with the name and description, press the Copy button to finish the process of copying the selected simulation run. You cannot press the Copy button if no name is specified. If you change your mind and do not want to copy the selected simulation run, press the Cancel button or the X button in the upper right to return to the Simulation Run Manager window.
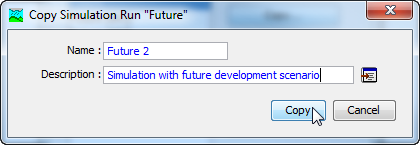
Figure 3. Creating a copy of a simulation run.
The second way to copy is from the "Compute" tab of the Watershed Explorer. Move the mouse over the simulation run you wish to copy, then press the right mouse button (Figure 4). A context menu is displayed that contains several choices including copy. Click the Create Copy… command. A new Copy Simulation Run window will open where you can name and describe the copy that will be created. A default name is provided for the copy; you can use the default or replace it with your own choice. A description can also be entered; if it is long you can use the button to the right of the description field to open an editor. When you are satisfied with the name and description, press the Copy button to finish the process of copying the selected simulation run. You cannot press the Copy button if no name is specified. If you change your mind and do not want to copy the selected simulation run, press the Cancel button or the X button in the upper right of the Copy Simulation Run window to return to the Watershed Explorer.

Figure 4. Copying a simulation run from the Watershed Explorer. The Copy Simulation Run window will appear after the Create Copy… menu command is selected.
Renaming a Run
There are two ways to rename a simulation run. Both methods for renaming a run change its name and then all references to the old run name are automatically updated to the new name.
The first way to perform a rename is to use the Simulation Run Manager, which you can access from the Compute menu. Select the simulation run you wish to rename by clicking on it in the list of available simulation runs. The selected run is highlighted after you select it. After you select a run you can press the Rename… button on the right side of the window. A new Rename Simulation Run window (Figure 5) will open where you can provide the new name. If you wish you can also change the description at the same time. If the new description will be long, you can use the button to the right of the description field to open an editor. When you are satisfied with the name and description, press the Rename button to finish the process of renaming the selected simulation run. You cannot press the Rename button if no name is specified. If you change your mind and do not want to rename the selected simulation run, press the Cancel button or the X button in the upper right of the Rename Simulation Run window to return to the Simulation Run Manager window.
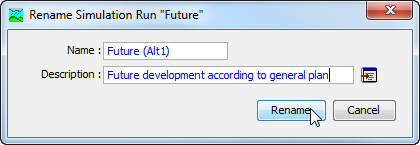
Figure 5. Renaming a simulation run. This was accessed from the Simulation Run Manager.
The second way to rename is from the "Compute" tab of the Watershed Explorer. Select the simulation run you wish to rename by clicking on it in the Watershed Explorer; it will become highlighted. Keep the mouse over the selected run and click the left mouse button again. The highlighted name will change to editing mode (Figure 6). You can then move the cursor with the arrow keys on the keyboard or by clicking with the mouse. You can also use the mouse to select some or all of the name. Change the name by typing with the keyboard. When you have finished changing the name, press the Enter key to finalize your choice. You can also finalize your choice by clicking elsewhere on the "Compute" tab. If you change your mind while in editing mode and do not want to rename the selected simulation run, press the Escape key.
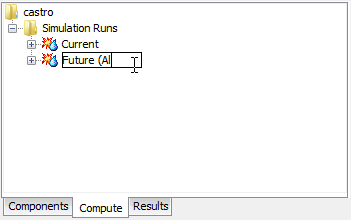
Figure 6. Renaming a simulation run in the Watershed Explorer.
Deleting a Run
There are two ways to delete a simulation run. Both methods for deleting a run remove it from the project, automatically update all references to that run, and delete previously computed results. Once a run has been deleted it cannot be retrieved or undeleted. Any references to the deleted run will switch to using no simulation run, which is usually not a valid choice during a simulation. At a later time you will have to go to those components and manually select a different simulation run.
The first way to perform a deletion is to use the Simulation Run Manager, which you can access from the Compute menu. Select the simulation run you wish to delete by clicking on it in the list of available simulation runs. The selected run is highlighted after you select it. After you select a run you can press the Delete button on the right side of the window. A window will open where you must confirm that you wish to delete the selected run as shown in Figure 7. Press the OK button to delete the run. If you change your mind and do not want to delete the selected simulation run, press the Cancel button or the X button in the upper right to return to the Simulation Run Manager window.
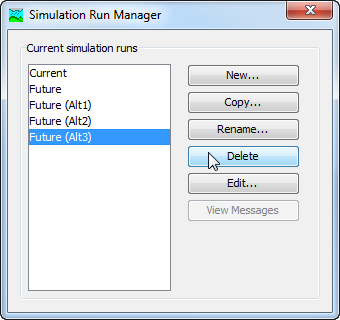
Figure 7. Preparing to delete a simulation run from the Simulation Run Manager. A confirmation will be required after pressing the Delete button.
The second way to delete is from the "Compute" tab of the Watershed Explorer. Move the mouse over the simulation run you wish to delete and press the right mouse button (Figure 8). A context menu is displayed that contains several choices including delete. Click the Delete command. A window will open where you must confirm that you wish to delete the selected run. Press the OK button to delete the run. If you change your mind and do not want to delete the selected simulation run, press the Cancel button or the X button in the upper right to return to the Watershed Explorer.
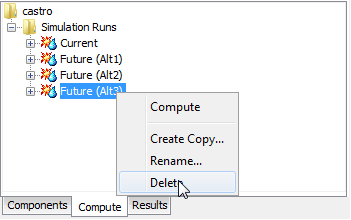
Figure 8. Deleting a simulation run in the Watershed Explorer.
Importing a Run
A simulation run can be imported into the current project. The run to be imported is selected from a source project. Once you select the run to be imported, all of the necessary simulation components will be imported into the current project. This includes the basin model, meteorologic model, control specifications, and any supporting data. The supporting data include background maps and grid cell file for the basin model, and shared data such as time-series gages, paired data, and grid data used either in the basin or meteorologic model. A simulation run will be created in the current project using the components that have been imported.
To import a simulation run, begin by selecting the File | Import | Simulation Run* menu command. Use the file chooser to select the project file for the project that contains the simulation run you wish to import (Figure 9). You will then be provided a selection list of available simulation runs in that source project (Figure 10). Select the simulation run that you wish to import and press the Import button.
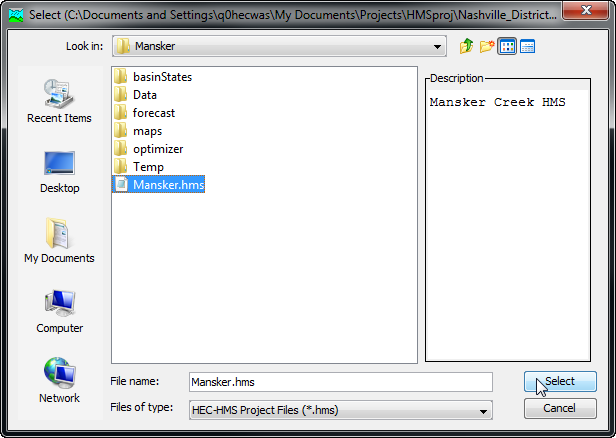
Figure 9. Selecting the source project to import a simulation run.
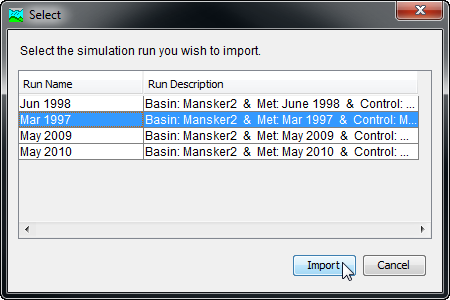
Figure 10. Selecting the simulation run to be imported from the source project into the current project.
Depending on the data used in the basin model and meteorologic model, you may be prompted to choose how to treat time-series, paired, and gridded data. If you select to import the data, a copy of the data will be made in the current project directory and appropriate gage, paired data, and grid components will be automatically created. Any references in the basin model or meteorologic model to the time-series, paired, and gridded data will be automatically updated to use the new shared component data in the current project. If you choose not to import the data, the basin model and meteorologic model will be imported without any of the data. In this second case, the current project should already include the necessary time-series, paired, and gridded data necessary for the proper simulation of the basin model and meteorologic model.
Depending on the data used in the basin model and meteorologic model, you may be prompted to choose how to treat external data. If you choose to localize external data, then copies of the files will be made in the current project directory. Any references in the basin model or meteorologic model to external data will be automatically updated to use the new copies in the current project. If you choose not to localize the external data, the components in the current project will be updated to reference the files in their original locations.
Selecting Components
The principal task when creating a simulation run using the wizard is the selection of a basin model, meteorologic model, and control specifications. However, you can change the components you wish to use at any time using the Component Editor for a simulation run. Access the Component Editor from the "Compute" tab of the Watershed Explorer. If necessary, click on the "Simulation Runs" folder to expand it and view the available simulation runs. Click on the simulation run node you wish to edit and its Component Editor will automatically be shown (Figure 11). The Component Editor contains three lists for selecting the basin model, meteorologic model, and control specifications, respectively. The first selection list shows all of the basin models currently available in the project. Likewise, the second list contains all of the meteorologic models and the third list contains all of the control specifications. As the user, you are responsible for knowing which components are intended to be used together to produce simulation results.
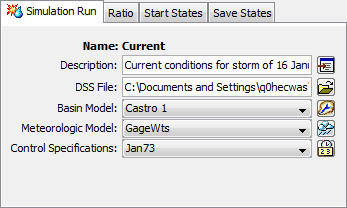
Figure 11. The simulation run component editor can be used to change a selected component after the run has been created.
Simulation Results Output
All of the model components produce time-series results during the simulation process. Some components also produce grid results. By default, all of these results are stored in the simulation DSS file. The output DSS file can be changed for each simulation run. To change the output file, specify a new file in the Component Editor (Figure 11).
Precipitation and Flow Ratios
Using precipitation and flow ratios is optional for a simulation run. If you do not use ratios, the simulation results will be exactly determined by the meteorologic conditions specified in the meteorology model and the watershed physical properties specified in the basin model. Optionally, you can apply a ratio to the precipitation computed by the meteorologic model before the precipitation is applied to the basin model. Alternately, you may instead apply a ratio to the outflow computed by subbasin and source elements in the basin model before routing the outflow downstream through the element network. You must choose between applying no ratio, a precipitation ratio, or a flow ratio. The same ratio is applied to all elements.
The ratio for the simulation run is accessed from the "Compute" tab of the Watershed Explorer. Click on the "Ratio" node under the simulation run to display the Component Editor for the ratio (Figure 12). The "Ratio" and other optional tabs are always shown whenever the Component Editor is shown. Select the type of ratio you wish to apply from the available choices. If you select the precipitation method, you can only choose to apply the ratio to subbasins. If you select the flow method, you can choose to apply the ratio to subbasins, sources, or both element types. Finally, enter the ratio value. When working with a precipitation ratio, the precipitation value for each time step computed by the meteorologic model is multiplied by the specified ratio before the precipitation is applied to the subbasin elements. When working with a flow ratio, the outflow computed for each time step by the basin model is multiplied by the specified ratio before the outflow is routed to the next downstream element. You can only select whether to apply a ratio to subbasins and sources, and enter a ratio, if a ratio method is actually selected.
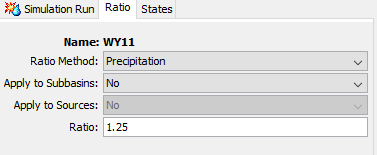
Figure 12. Entering a precipitation ratio for all of the subbasins in the simulation run. If a flow ratio were selected, it could be applied to subbasins or sources or both subbasins and sources.
Start and Save States
The various mathematical equations used in the basin and meteorologic models all contain state variables. A state variable is simply the current condition of the system at the end of a time interval. For example, the state variable in a reservoir is the amount of water in storage, usually measured as an elevation. In the soil moisture accounting loss method, the state variable is the amount of water currently held in each of the layers. The state variables change during a simulation in response to changing boundary conditions and the dynamics of the mathematical equation governing the method.
The state variables all must be specified at the beginning of a simulation, in which case they are called initial conditions. Some methods allow you to specify the value you wish to use, such as the initial storage in a reservoir. Some methods implicitly specify the initial condition, for example loss methods that allow you to specify the amount of infiltration that must occur before surface runoff begins, often called the initial loss. Many of the channel routing methods assume the initial condition that initial outflow equals the first inflow to the reach, or the user can specify the initial outflow.
States have two main purposes: breaking long simulations into smaller time periods, and real-time forecasting operations. In the first case of long simulations, using states achieves exactly the same results as one long simulation. Suppose that a long simulation covers all of 1995 and 1996. You could configure a simulation run for 1995 and save states at the end of the simulation. You could then configure a simulation for 1996 that uses as start states the states saved at the end of the 1995 run. The results obtained by breaking the simulation into two runs and using states would be identical to the results obtained from a single long run. This approach can be useful when performing continuous simulation for many years or decades. In the second case of real-time forecasting operations, the typical approach is often to compute a simulation run daily and forecast three to five days into the future. The simulation can be configured to run for five days, saving the state variables at the end of the first day. When the forecast is updated on the subsequent day, it can start from the saved states of the previous day and continue forward. In this way, continuously updated results can be obtained without requiring the simulation to start at the last known watershed conditions which might be very old.
Saving out the start state variables during a simulation run, or starting a run from saved state variables is optional. If you do not use saved state variables (start states), then the initial conditions will be specified from the basin and meteorologic models. If you do use the start states, the initial conditions specified in the basin and meteorologic models will be overridden by the values contained in the saved states used as the start states. If you do not use save states, the simulation will run normally. If you do choose to save states, the simulation will pause momentarily to save the state variables and then continue normally. The save states condition (file) that is created can be used for any simulation, the start date of the simulation does not have to be similar to the date when the save states were created. The save states can be used across different simulation runs, but you must make sure the basin and meteorologic models have similar configurations (similar elements in the basin model and similar modeling methods in the basin and meteorologic models) in order for the save states to be applicable.
Selecting optional start states for the simulation run is accessed from the "Compute" tab of the Watershed Explorer. Open the Component Editor for the simulation run and then click on the "States" tab (Figure 13). The "States" and other optional tabs are always shown whenever the simulation run Component Editor is shown. You can choose to save states and start the simulation with existing saved states. Start the simulation with saved states by choosing the states you wish to use from the "Start States" selection list. Only states saved by running a simulation configured to save states are shown. You will not be able to select start states unless there are valid states available. A descriptive save states name can be helpful when selecting the states to start a simulation. For example, a name of "March 30 – 1200" was used when saving states when creating the example for Figure 13. The date and time the states were saved were used for the name to aid in choosing these saved states in subsequent simulations.
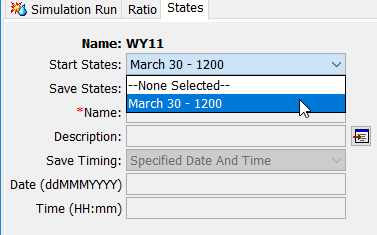
Figure 13. Starting the simulation using a save states file.
Creating optional save states for the simulation run is accessed from the "Compute" tab of the Watershed Explorer. Open the Component Editor for the simulation run and then click on the "States" tab (Figure 14). The "States" and other optional tabs are always shown whenever the Component Editor is shown. To create a save states file, you must change the Save States option from No to Yes, as shown in Figure 14. You must specify a name for the save states and optionally may enter a description. There are two ways to specify when the states will be saved: at the end of the simulation run, or at a specified date and time during the simulation run. If you select to save states at the end of the run, the program will automatically determine the correct date and time to save states. If you select to save states at a specific time, you must enter the date and time. The specified date and time must be after the start and either at or before the end of the simulation run.
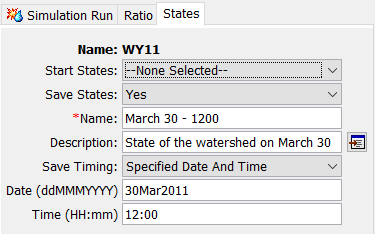
Figure 14. Configuring a simulation run to save states during the compute time window.