Download PDF
Download page Meteorologic Models.
Meteorologic Models
Meteorologic models are one of the main components in a project. The principle purpose is to prepare meteorologic boundary conditions for subbasins. Consequently, you must create at least one basin model before creating a meteorologic model. A meteorologic model can be used with many different basin models. However, results computed by the meteorologic model will be matched with the subbasins in the basin models using the name of the subbasin. If subbasins in different basin models have the same name, they will both receive the same boundary conditions from the meteorologic model. Careful naming of subbasins is necessary so that the the correct boundary conditions are computed for each one.
Creating a New Meteorologic Model
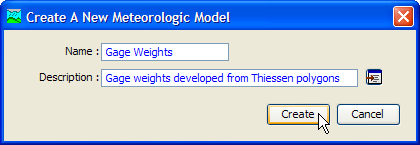
A new meteorologic model is created using the Meteorologic Model Manager. To access the manager, click on the Components menu and select the Meteorologic Model Manager command. The manager will open and show all of the meteorologic models currently in the project. The manager can remain open while you manage meteorologic models or while you perform tasks elsewhere in the program. You can close the manager using the X button in the upper right corner. The buttons to the right of the model list can be used to manage existing models or create a new one. To create a new meteorologic model, press the New… button. After you press the button a window (Figure 1) will open where you can name and describe the new meteorologic model that will be created. A default name is provided for the new model; you can use the default or replace it with your own choice. A description can also be entered. If the description is long, you can press the button to the right of the description field to open an editor. The editor makes it easier to enter and edit long descriptions. When you are satisfied with the name and description, press the Create button to finish the process of creating the new meteorologic model. You cannot press the Create button if no name is specified for the new model. If you change your mind and do not want to create a new meteorologic model, press the Cancel button or the X button in the upper right to return to the Meteorologic Model Manager window.
Copying a Meteorologic Model
There are two ways to copy a meteorologic model. Both methods for copying a model create an exact duplicate with a different name. Once the copy has been made it is independent of the original and they do not interact.
The first way to create a copy is to use the Meteorologic Model Manager, which is accessed from the Components menu. Select the meteorologic model you wish to copy by clicking on it in the list of current meteorologic models. The selected model is highlighted after you select it. After you select a model you can press the Copy… button on the right side of the window. A new Copy Meteorologic Model window (Figure 2) will open where you can name and describe the copy that will be created. A default name is provided for the copy; you can use the default or replace it with your own choice. A description can also be entered; if it is long you can use the button to the right of the description field to open an editor. When you are satisfied with the name and description, press the Copy button to finish the process of copying the selected meteorologic model. You cannot press the Copy button if no name is specified. If you change your mind and do not want to copy the selected meteorologic model, press the Cancel button or the X button in the upper right to return to the Meteorologic Model Manager window.

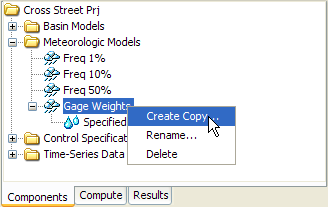
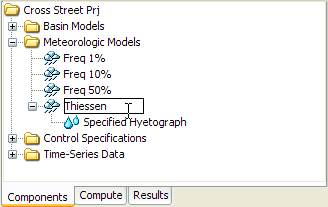
The second way to copy is from the "Components" tab of the Watershed Explorer. Move the mouse over the meteorologic model you wish to copy, then press the right mouse button (Figure 3). A context menu is displayed that contains several choices including copy. Click the Create Copy… command. A new Copy Meteorologic Model window will open where you can name and describe the copy that will be created. A default name is provided for the copy; you can use the default or replace it with your own choice. A description can also be entered; if it is long you can use the button to the right of the description field to open an editor. When you are satisfied with the name and description, press the Copy button to finish the process of copying the selected meteorologic model. You cannot press the Copy button if no name is specified. If you change your mind and do not want to copy the selected meteorologic model, press the Cancel button or the X button in the upper right of the Copy Meteorologic Model window to return to the Watershed Explorer.
Renaming a Meteorologic Model
There are two ways to rename a meteorologic model. Both methods for renaming a model change its name and then all references to the old model name are automatically updated to the new name.
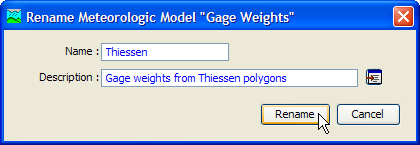
The first way to perform a rename is to use the Meteorologic Model Manager, which you can access from the Components menu. Select the meteorologic model you wish to rename by clicking on it in the list of current meteorologic models. The selected model is highlighted after you select it. After you select a model you can press the Rename… button on the right side of the window. A new Rename Meteorologic Model window (Figure 4) will open where you can provide the new name. If you wish you can also change the description at the same time. If the new description will be long, you can use the button to the right of the description field to open an editor. When you are satisfied with the name and description, press the Rename button to finish the process of renaming the selected meteorologic model. You cannot press the Rename button if no name is specified. If you change your mind and do not want to rename the selected meteorologic model, press the Cancel button or the X button in the upper right of the Rename Meteorologic Model window to return to the Meteorologic Model Manager window.
The second way to rename is from the "Components" tab of the Watershed Explorer. Select the meteorologic model you wish to rename by clicking on it in the Watershed Explorer; it will become highlighted. Keep the mouse over the selected model and click the right mouse button. Select the Rename… command from the menu and the highlighted name will change to editing mode as shown in Figure 5. You can then move the cursor with the arrow keys on the keyboard or by clicking with the mouse. You can also use the mouse to select some or all of the name. Change the name by typing with the keyboard. When you have finished changing the name, press the Enter key to finalize your choice. You can also finalize your choice by clicking elsewhere on the "Components" tab. If you change your mind while in editing mode and do not want to rename the selected meteorologic model, press the Escape key.
Deleting a Meteorologic Model
There are two ways to delete a meteorologic model. Both methods for deleting a model remove it from the project and then automatically update all references to that model. Once a model has been deleted it cannot be retrieved or undeleted. Any references to the deleted model will switch to using no meteorologic model, which is usually not a valid choice during a simulation. At a later time you will have to go to those components and manually select a different meteorologic model.
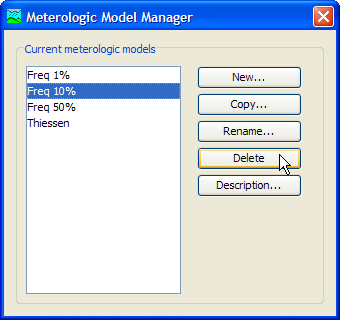
The first way to perform a deletion is to use the Meteorologic Model Manager, which you can access from the Components menu. Select the meteorologic model you wish to delete by clicking on it in the list of current meteorologic models. The selected model is highlighted after you select it. After you select a model you can press the Delete button on the right side of the window (Figure 6). A window will open where you must confirm that you wish to delete the selected model. Press the OK button to delete the model. If you change your mind and do not want to delete the selected meteorologic model, press the Cancel button or the X button in the upper right to return to the Meteorologic Model Manager window.
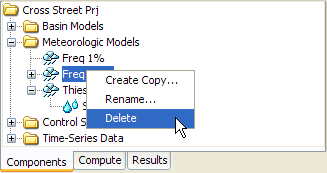
The second way to delete a meteorologic model is from the "Components" tab of the Watershed Explorer. Select the meteorologic model you wish to delete by clicking on it in the Watershed Explorer; it will become highlighted. Keep the mouse over the selected model and click the right mouse button (Figure 7). A context menu is displayed that contains several choices including delete. Click the Delete command. A window will open where you must confirm that you wish to delete the selected model. Press the OK button to delete the model. If you change your mind and do not want to delete the selected meteorologic model, press the Cancel button or the X button in the upper right to return to the Watershed Explorer.
Importing a Meteorologic Model
You can import a meteorologic model from another project into the current project. The model must have been created previously and stored on your computer or an accessible network location. Click the File menu and select the Import | Meteorologic Model command. A file browser will open that you can use to find the model you wish to import. The browser will only allow you to select meteorologic model files which end with the MET extension. When you click on a meteorologic model file in the browser, the description of the model is shown on the right side of the browser. Once you have located and selected the desired meteorologic model, press the Select button. If you change your mind, you can press the Cancel button or the X button in the upper right to return to the main program window without importing a model. After you make your selection, the meteorologic model will be checked for dependent data such as time-series gages or parameter grids. The user is given the opportunity to also import any required data. The program automatically copies the selected file and any additional data into the project folder and adds the various components to the project.
Shortwave Radiation Method
Shortwave radiation represents the incoming radiation from the sun. It is usually the largest source of energy to the land surface, and is reduced by clouds in the atmosphere. Shortwave radiation is zero at night. There are five different shortwave radiation methods, including the option for no shortwave radiation. Shortwave radiation is only necessary when using energy balance evapotranspiration methods. This includes the Penman Monteith and Priestley Taylor evapotranspiration methods and the energy balance snowmelt method. You can use the "no shortwave" method if you are not using any of these methods.
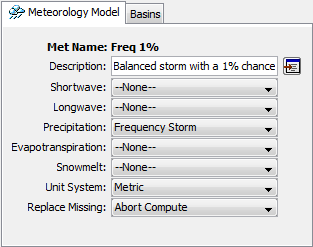
Select the shortwave radiation method in the Component Editor for the meteorologic model (Figure 8). Only one shortwave method can be selected at a time. You can always change the shortwave method. When you change the shortwave method, all data for the old method is deleted and cannot be retrieved or undeleted.
Some shortwave radiation methods require parameter data for each subbasin. Other methods use the same data for all subbasins. Depending on the method you choose, the Watershed Explorer will be updated to indicate which data is required.
Longwave Radiation Method
Longwave radiation represents the radiant energy given off by all bodies. It includes energy radiated by the land surface toward the atmosphere, and also energy radiated by clouds and the empty sky toward the land surface. Net longwave radiation can be either from the atmosphere toward the land surface, or the land surface toward the atmosphere. The direction of net longwave radiation depends on current conditions and temperatures. There are five different longwave radiation methods, including the option for no longwave radiation. Longwave radiation is only necessary when using energy balance evapotranspiration methods. This includes the Penman Monteith evapotranspiration method. You can use the "no longwave" method if you are not using either of these methods.
Select the longwave radiation method in the Component Editor for the meteorologic model (Figure 8). Only one longwave method can be selected at a time. You can always change the longwave method. When you change the longwave method, all data for the old method is deleted and cannot be retrieved or undeleted.
Some longwave radiation methods require parameter data for each subbasin. Other methods use the same data for all subbasins. Depending on the method you choose, the Watershed Explorer will be updated to indicate which data is required.
Precipitation Method
Precipitation includes all rain and snowfall over the land surface. The determination of liquid or frozen precipitation is performed in the snowmelt method; the precipitation method only determines the amount of water falling to the land surface. There are nine different precipitation methods including an option for no precipitation. If you plan to use the meteorologic model with basin models that contain subbasins, you must choose a precipitation method. If any of the subbasins use the ModClark gridded transform method you must use the gridded precipitation method. You can use the "no precipitation" option if the basin models do not contain subbasins.
Select the precipitation method in the Component Editor for the meteorologic model (Figure 8). Only one precipitation method can be selected at a time. You can always change the precipitation method. When you change the precipitation method, all data for the old method is deleted and cannot be retrieved or undeleted.
Some precipitation methods require parameter data for each subbasin. Other methods use the same data for all subbasins. Depending on the method you choose, the Watershed Explorer will be updated to indicate which data is required. Also, some precipitation methods have optional settings. If the method you select has optional settings then an additional tab may be added to the Component Editor.
Evapotranspiration Method
The meteorologic model is responsible for computing the potential evapotranspiration over the land surface. The potential evapotranspiration is the amount of evapotranspiration that would occur if there was an infinite supply of water in the soil. The potential amount can generally be computed based on atmospheric conditions. Including evapotranspiration is usually not important for short events, but becomes critical for longer simulations. There are seven different evapotranspiration methods including an option for no evapotranspiration. If you plan to use the meteorologic model with basin models that contain subbasins, you may need to choose an evapotranspiration method. The following loss methods require evapotranspiration boundary conditions: deficit constant, gridded deficit constant, soil moisture accounting, gridded soil moisture accounting. If you use a meteorologic model with subbasins using any of those loss methods, you should select an evapotranspiration method. If you use those loss methods but no evapotranspiration method is selected in the meteorologic model, then evapotranspiration is assumed to be zero in the subbasins. A gridded evapotranspiration method is provided for use with the ModClark gridded transform method. Using a gridded evapotranspiration method provides separate boundary conditions for each grid cell. Using a non-gridded evapotranspiration method means that the same boundary condition will be applied at each grid cell in a subbasin.
Select the evapotranspiration method in the Component Editor for the meteorologic model (Figure 8). Only one evapotranspiration method can be selected at a time. You can always change the evapotranspiration method. When you change the evapotranspiration method, all data for the old method is deleted and cannot be retrieved or undeleted.
Some evapotranspiration methods require parameter data for each subbasin. Other methods use the same data for all subbasins. Depending on the method you choose, the Watershed Explorer will be updated to indicate which data is required.
Snowmelt Method
The snowmelt method determines if precipitation is rain or snow using air temperature. The precipitation method is responsible for estimating the total depth of combined rain and snow. Once the amount of precipitation is determined by the precipitation method, the state of the precipitation is determined by the snowmelt method. Subsequently, the snowmelt method tracks the accumulation and melting of the snowpack throughout the winter season. The snowmelt methods can also operate during the summer season when precipitation is generally purely rain and no snowpack accumulates. There are three different snowmelt methods including an option for no snowmelt. Snowmelt is only required if you plan to use the meteorologic model with basin models that contain subbasins and the watershed receives precipitation as snow, or as both rain and snow. If any of the subbasins use the ModClark gridded transform method you must use a gridded snowmelt method.
Select the snowmelt method in the Component Editor for the meteorologic model (Figure 8). Only one snowmelt method can be selected at a time. You can always change the snowmelt method. When you change the snowmelt method, all data for the old method is deleted and cannot be retrieved or undeleted.
Some snowmelt methods require parameter data for each subbasin, and for elevation bands within each subbasin. Other methods use the same data for all subbasins. Depending on the method you choose, the Watershed Explorer will be updated to indicate which data is required.
Unit System
Each meteorologic model must be in either United States customary units (sometimes called English units) or in system international units (also called metric units). All parameter data in a meteorologic model, whether for all subbasins or individual subbasins, must be in the same unit system. If you change the unit system, all data will be automatically converted to the new unit system. All time-series data, paired data, and gridded data referenced in a meteorologic model will be in its own unit system. If necessary, these referenced data are automatically converted to the unit system of the meteorologic model during a simulation.
Select the unit system using the Component Editor for the meteorologic model (Figure 8). Access the Component Editor by clicking on the meteorologic model icon on the "Components" tab of the Watershed Explorer. If you change the unit system, all data is automatically converted to the new selection.
Missing Data
Missing data is a common problem with atmospheric measurements. The exact meaning of missing data often depends on the type of data. Missing precipitation data often means that no precipitation was occurring. Care must be used, but it is often possible to assume that zero rainfall can be substituted for missing data. Other types of atmospheric measurements are more difficult to manage when data is missing. When air temperature is missing there is usually no reasonable substitution that can be made.
There are two options for managing missing data in the meteorologic model. The first option is to abort the compute with an error message. Using this option means that when any missing data is encountered, the simulation is stopped and an error message will report the time-series gage or grid that contained the missing data. Using this approach is the best because it requires all atmospheric data to be reviewed and corrected before use in a simulation. The second option is to assume a default value. For example, with this option selected any missing precipitation data will be assumed to be zero. However, allowing missing data to be replaced with a default value sometimes leads to inconsistent results that can be difficult to interpret. Furthermore, some types of data such as temperature have no default value. The compute will always abort with an error message when missing data is encountered for data types with no defined default value.
Select the action to take for missing data using the Component Editor for the meteorologic model (Figure 8). Access the Component Editor by clicking on the meteorologic model icon on the "Components" tab of the Watershed Explorer.
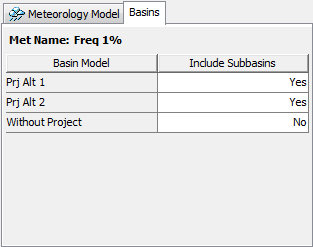
Selecting Basin Models
The main purpose of a meteorologic model is to prepare meteorologic boundary conditions for subbasins. These boundary conditions include precipitation and when also necessary, shortwave radiation, longwave radiation, potential evapotranspiration, and snowmelt. The meteorologic model must be configured to compute the necessary boundary conditions. This is accomplished by specifying which basin models will be used with each meteorologic model as shown in Figure 9. Once a basin model is selected to work with a meteorologic model, the subbasins are connected to the meteorologic model. The connection is performed using the name of the subbasin. If several basin models all include a subbasin with the same name, the meteorologic model will compute the same boundary conditions for the subbasin in each model. If you want each subbasin to have unique boundary conditions, then the name of the subbasin must be unique across all basin models that will be used with the same meteorologic model.
Once a basin model is selected to work with a meteorologic model, the meteorologic model is automatically kept synchronized with changes in that basin model. When a basin model is renamed, it is updated in all meteorologic models working with that basin model. When a basin model is deleted, any subbasins it contains are removed from all meteorologic models working with that basin model. However, subbasins will not be removed from a meteorologic model when a basin model is deleted if the subbasins are also included in other basin models still used by the meteorologic model. Subbasins are likewise removed if a basin model is unselected from a meteorologic model. Similar changes are also made automatically when subbasins are added to or deleted from a basin model set to work with a meteorologic model, or when they are renamed. Subbasins added to a basin model will be automatically added to all meteorologic models set to work with that basin model. Subbasins deleted from a basin model will be removed from all meteorologic models set to work with that basin model, so long as the subbasin in not included in any other basin models connected to a meteorologic model. Finally, renamed subbasins will also be renamed in the meteorologic model. However, if other basin models connected to the meteorologic model contain subbasins with the same name as the old name of the renamed subbasin, they will retain their original name and parameter data while the renamed subbasin receives a copy of the data.
The "Basins" tab, part of the Component Editor for the meteorologic model, is used to connect basin models to the meteorologic model. The "Basins" tab shows a table of all current basin models in the project. Each basin model can be selected or unselected to work with the meteorologic model. The table is automatically updated as basin models are created, renamed, or deleted.
Atmospheric Variables
Atmospheric variables are measurable properties of the atmosphere that change over time in response to external influences. The measured values provide insight to short term weather phenomena as well as long term climate trends. The measured values are also input to a number of physically-based models used to quantify various components of the hydrologic cycle including evapotranspiration and snowmelt, among others. Meteorologists and climatologists have established standard scientific methods for making measurements of the atmospheric variables.
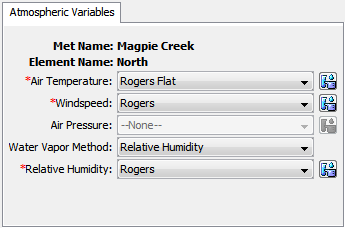
The most common atmospheric variable is air temperature which measures the internal energy of the air. The average speed of moving air is defined as the windspeed. The air pressure is defined as the absolute pressure which is actually the weight of the atmosphere. The amount of water vapor in the air can be measured either as relative humidity or dew point temperature.
Atmospheric variables are required for each subbasin when certain methods are selected for shortwave radiation, longwave radiation, evapotranspiration, and snowmelt. The same variables may be required for more than one method, for example, a shortwave radiation method and evapotranspiration method may both require the same variable. When necessary, time-series gages must be selected for each subbasin in order to specify the atmospheric variables. Click on the subbasin in the Watershed Explorer as shown in Figure 10 to access the Component Editor for the atmospheric variables (Figure 11). Gages only need to be selected for atmospheric variables that are required based on selections in the meteorologic model. Variables are enabled when they are required. Variables are disabled when they are not required and no selection can be made.
Observations for the atmospheric variables must be defined in the Time-Series Data Manager before they can be selected in the Component Editor. The Shared Component section of this manual describes how to create and manage time-series data. The available gages are shown in the selection list for each variable. If there are many different gages available, you may wish to choose a gage from the selector accessed with the gage button next to the selection list. The selector displays the description for each gage, making it easier to select the correct one.