Download PDF
Download page Grid Data.
Grid Data
Some of the methods included in the program operate on a grid cell basis. This means that parameters must be entered for each grid cell. It also means that boundary conditions like precipitation must be available for each grid cell. One example of grid data is the SCS curve number grid, which is used as a parameter grid. Another example is the temperature gridset, which is a time-series of grids. The program separates different types of grid data with different data types. Grid data only has to be entered one time. The data are part of the project and can be shared by multiple basin or meteorologic models.
Creating a New Grid
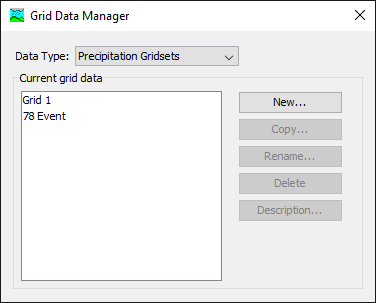
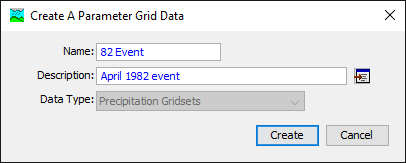
A new grid is created using the grid data manager. To access the manager, click on the Components menu and select the Grid Data Manager menu command (Figure 1). The manager can remain open while you perform tasks elsewhere in the program. You can close the manager using the X button in the upper right corner. At the top of the manager is a Data Type menu. This menu lets you select one of the grid data types supported by the program. Refer to Table 1 for a complete list of grid data types. When a data type is selected, the manager will show all grid data of the same type. The buttons to the right of the grid data list can be used to manage existing data or create new data. To create a grid, press the New… button. After you press the button a window will open (Figure 2) where you can name and describe the new grid. A default name is provided for the grid; you can use the default or replace it with your own choice. A description can also be entered. If the description is long, you can press the button to the right of the description field to open an editor. The editor makes it easier to enter and edit long descriptions. When you are satisfied with the name and description, press the Create button to finish the process of creating the new grid. You cannot press the Create button if no name is specified. If you change your mind and do not want to create the grid, press the Cancel button or the X button in the upper right to return to the grid data manager.
Copying a Grid
There are two ways to copy a grid. Both methods for copying a grid create an exact duplicate with a different name. Once the copy has been made it is independent of the original and they do not interact.
The first way to create a copy is to use the grid data manager, which is accessed from the Components menu. First, select the grid data type you want to copy from the Data Type menu. Then, select the grid you want to copy by clicking on it in the list of current grids. The selected grid is highlighted after you select it. After you select a grid you can press the Copy… button on the right side of the window. A new window will open where you can name and describe the copy that will be created (Figure 3). A default name is provided for the copy; you can use the default or replace it with your own choice. A description can also be entered; if it is long you can use the button to the right of the description field to open an editor. When you are satisfied with the name and description, press the Copy button to finish the process of copying the selected grid. You cannot press the Copy button if no name is specified. If you change your mind and do not want to copy the selected grid, press the Cancel button or the X button in the upper right to return to the grid data manager.
The second way to create a copy is from the Watershed Explorer, on the "Components" tab. Move the mouse over the grid data you wish to copy, then press the right mouse button (Figure 4). A context menu is displayed that contains several choices including copy. Click the Create Copy…menu option. A new window will open where you can name and describe the copy that will be created. A default name is provided for the copy; you can use the default or replace it with your own choice. A description can also be entered; if it is long you can use the button to the right of the description field to open an editor. When you are satisfied with the name and description, press the Copy button to finish the process of copying the selected grid. You cannot press the Copy button if no name is specified. If you change your mind and do not want to copy the grid, press the Cancel button or the X button in the upper right of the window to return to the Watershed Explorer.
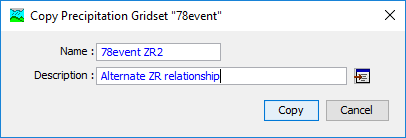
Figure 3. Creating a copy of a precipitation gridset after pressing the Copy… button in the Grid Data Manager.
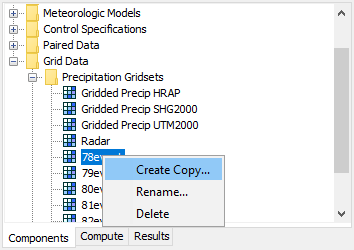
Figure 4. Creating a copy of a grid by selecting it in the Watershed Explorer and using the right-mouse menu.
Renaming a Grid
There are two ways to rename a grid. Both methods for renaming a grid changes its name and then all references to the old name are automatically updated to the new name.
The first way to perform a rename is to use the grid data manager, which you can access from the Components menu. First, select the grid data type you want to rename from the Data Type menu. Then, select the grid you want to rename by clicking on it in the list of current grids. The selected grid is highlighted after you select it. After you select a grid you can press the Rename… button on the right side of the window. A new window will open where you can provide the new name (Figure 5). You can also change the description at the same time. If the new description will be long, you can use the button to the right of the description field to open an editor. When you are satisfied with the name and description, press the Rename button to finish the process of renaming the selected grid. You cannot press the Rename button if no name is specified. If you change your mind and do not want to rename the selected grid, press the Cancel button or the X button in the upper right of the window to return to the grid data manager.
The second way to rename is from the Watershed Explorer, on the "Components" tab. Select the grid you want to rename by clicking on it in the Watershed Explorer; it will become highlighted. Keep the mouse over the selected grid and click the left mouse button again (Figure 6). The highlighted name will change to editing mode. You can then move the cursor with the arrow keys on the keyboard or by clicking with the mouse. You can also use the mouse to select some or all of the name. Change the name by typing with the keyboard. When you have finished changing the name, press the Enter key to finalize your choice. You can also finalize your choice by clicking elsewhere in the Watershed Explorer. If you change your mind while in editing mode and do not want to rename the selected grid, press the Escape key.
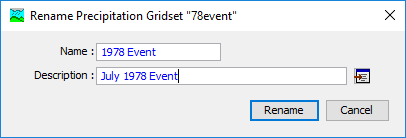
Figure 5. Renaming a precipitation gridset after pressing the Rename… button in the Grid Data Manager.
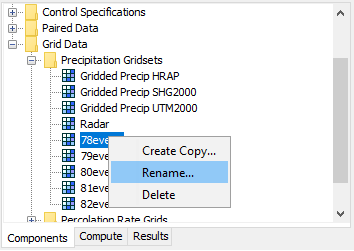
Figure 6. Renaming a precipitation gridset by selecting it in the Watershed Explorer and using the right-mouse menu.
Deleting a Grid
There are two ways to delete a grid. Both methods for deleting a grid will remove it from the project and then automatically update all references to that grid. Once a grid has been deleted it cannot be retrieved or undeleted. Any references to the deleted grid will switch to using no grid, which is usually not a valid choice during a simulation. At a later time you will have to go to those components and manually select a different grid.
The first way to perform a deletion is to use the grid data manager, which you can access from the Components menu. First, select the grid data type you want to delete from the Data Type menu. Then, select the grid you want to delete by clicking on it in the list of current grids. The selected grid is highlighted after you select it. After you select a grid you can press the Delete button on the right side of the window (Figure 7). A window will open where you must confirm that you want to delete the selected grid. Press the OK button to delete the grid. If you change your mind and do not want to delete the selected grid, press the Cancel button or the X button in the upper right to return to the grid data manager.
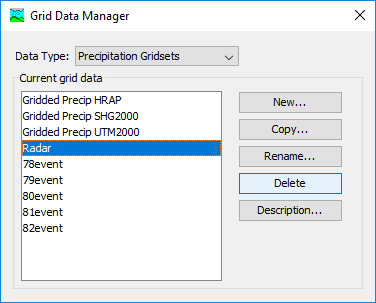
Figure 7. Preparing to delete a precipitation gridset from the Grid Data Manager.
The second way to delete a grid is from the Watershed Explorer, on the "Components" tab. Select the grid you want to delete by clicking on it in the Watershed Explorer; it will become highlighted. Keep the mouse over the selected grid and click the right mouse button (Figure 8). A context menu is displayed that contains several choices including delete. Click the Delete menu option. A window will open where you must confirm that you want to delete the selected grid. Press the OK button to delete the grid. If you change your mind and do not want to delete the selected grid, press the Cancel button or the X button in the upper right to return to the Watershed Explorer.
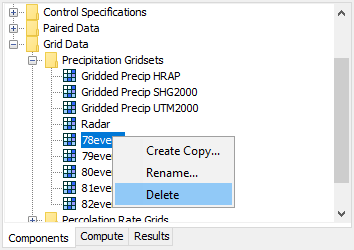
Figure 8. Preparing to delete a grid from the Watershed Explorer.
Retrieval From a HEC-DSS File
Retrieving grid data from a DSS file requires that the data be loaded in a file. The file can be stored on the local computer or on a network server. It is not a good idea to store the file on removable media since the file must be available whenever the grid data is selected in the Watershed Explorer, and during computes. It is poor practice to store the data in a DSS file used for storing simulation results. Data for each grid can be stored in a separate file or one file can contain data for several grids. However, all data for a gridset must be stored in the same DSS file and use appropriate pathname convention. It is best practice to store the DSS files in the project directory, or a subdirectory of the project directory. Utilities are available from HEC for loading various formats of gridded data into a DSS file.
You must specify the filename to use for the grid data component (Figure 9). You may type the complete filename if you know it. To use a file browser to locate the file, press the Open File Chooser button to the right of the "DSS Filename" field. The browser allows you to find the desired file but it is limited to locating files with the DSS extension which is required for all Data Storage System files. Once you locate the desired file, click on it in the browser to select it and press the Select button. If you change your mind, press the Cancel button or the X button in the upper corner of the Select HEC-DSS File window to return to the Component Editor.
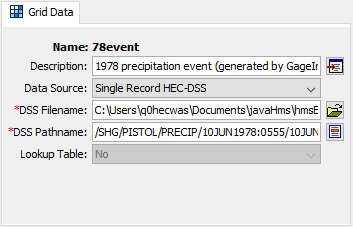
Figure 9. Component editor for a precipitation gridset. Gridsets (like gridded precipitation) can only be stored in a HEC-DSS file, parameter grids can be stored in multiple file formats.
You must also specify the pathname to retrieve from the selected DSS file (Figure 9). You may type the complete pathname if you know it. Each pathname contains six parts called the A-part, B-part, C-part, D-part, E-part, and F-part. The pathname parts are separated with a slash and may contain spaces. The complete pathname, including slashes and spaces, can total up to 256 uppercase characters. The following is an example of a pathname for a percolation parameter grid:
//SOLDIER CR WATERSHED/PERCOLATION///GIS ESTIMATE/
The convention for storing gridset data is different because a separate grid is required for each time interval. The different records will each have all the same pathname parts except for the D-part and E-part. The D-part indicates the starting time and the e-part the ending time of the individual record. Any of the record pathnames can be selected and the program will automatically retrieve the correct data depending on the time window during a compute. The following is an example of a temperature gridset:
//BRIDGER/TEMP/12JUL2003:1230/12JUL2003:1300/OBS/
If you do not know the full pathname of the record you wish you use, you can use the pathname browser to specify it. You must select a DSS file first before the browser is available. Press the Select DSS Pathname button to the right of the "DSS Pathname" field to open the browser. The browser initially shows all of the records in the specified DSS file, organized by pathname in the selection table. You can scroll through the list and select a record pathname by clicking on it. Press the Select button at the bottom of the browser to choose that record and return to the Component Editor. If you change your mind and do not want to select a record pathname, press the Cancel button or the X button in the upper right of the Select Pathname From HEC-DSS File window. You can reduce the number of record pathnames shown in the selection table using the "Search by Parts" filters. A separate filter selection is shown for each of the six pathname parts. By selecting a choice for a filter, only pathnames that match that choice will be shown in the selection table. If you make choices in several filters, only pathnames that satisfy all of the choices will be shown in the selection table.
Table 1. Internal DSS data type label for different types of grid data.
Grid | Label | Description |
Precipitation | PER-CUM | The precipitation depth occurring during the grid interval. The C-part should be "PRECIPITATION". The D-part and E-part, respectively, should give the start and end time for the cumulative value |
Temperature | PER-AVER INST-VAL | The average temperature in degrees over during the grid interval. The C-part should be "TEMPERATURE". The D-part and E-part, respectively, should give the start and end time for the average value. The temperature in degrees at a specific time. The C-part should be "TEMPERATURE". The time of the value should be specified in the D-part. |
Radiation | PER-AVER | The average solar radiation, measured in power per area, occurring during the grid interval. The C-part should be "SOLAR RADIATION". The D-part and E-part, respectively, should give the start and end time for the average value. |
Crop Coefficient | PER-AVER INST-VAL | The average crop coefficient, specified as a dimensionless decimal number, occurring during the grid interval. The C-part should be "CROP COEFFICIENT". The D-part and E-part, respectively, should give the start and end time for the average value. The crop coefficient, specified as a dimensionless decimal number, occurring at a specific time. The C-part should be "CROP COEFFICIENT". The time of the value should be specified in the D-part. |
| Storage Capacity | INST-VAL | The storage capacity, measured as a depth, associated with a particular condition of the watershed. The C-part should be "STORAGE CAPACITY". |
| Percolation Rate | INST-VAL | The percolation rate, measured as a depth per time, associated with a particular condition of the watershed. The C-part should be "PERCOLATION". |
| Storage Coefficient | INST-VAL | The storage coefficient, measured in hours, associated with a particular condition of the watershed. The C-part should be "STORAGE COEFFICIENT". |
| Moisture Deficit | INST-VAL | The moisture deficit, measured as a depth, associated with a particular condition of the watershed. The C-part should be "MOISTURE DEFICIT". |
| Impervious Area | INST-VAL | The impervious area, measured as a percentage, associated with a particular condition of the watershed. The C-part should be "IMPERVIOUS AREA". |
| SCS Curve Number | INST-VAL | The curve number, as a dimensionless decimal number, associated with a particular condition of the watershed. The C-part should be "CURVE NUMBER". |
| Cold Content | INST-VAL | The cold content, measured as a depth, associated with a particular condition of the watershed. The C-part should be "COLD CONTENT". |
| Cold Content ATI | INST-VAL | The cold content antecedent temperature index, measured in degrees, associated with a particular condition of the watershed. The C-part should be "COLD CONTENT ATI". |
| Meltrate ATI | INST-VAL | The meltrate antecedent temperature index, measured in degrees, associated with a particular condition of the watershed. The C-part should be "MELTRATE ATI". |
| Liquid Water | INST-VAL | The amount of liquid water, measured as a depth, associated with a particular condition of the watershed. The C-part should be "LIQUID WATER". |
| Snow Water Equivalent | INST-VAL | The snow water equivalent, measured as a depth, associated with a particular condition of the watershed. The C-part should be "SWE". |
| Water Content | INST-VAL | The fraction of the water holding capacity of the soil that is saturated. The C-part should be "WATER CONTENT". |
| Water Potential | INST-VAL | The potential or suction in the soil expressed as a pressure during the grid interval. The C-part should be "WATER POTENTIAL". |
| Humidity | PER-AVER INST-VAL | The relative humidity, expressed as a percentage of saturation, occurring during the grid interval. The C-part should be "HUMIDITY". The D-part and E-part, respectively, should give the start and end time for the average value. The relative humidity, expressed as a percentage of saturation, occurring at a specific time. The C-part should be "HUMIDITY". The time of the value should be specified in the D-part. |
| Windspeed | PER-AVER INST-VAL | The wind speed occurring during the grid interval. The C-part should be "WINDSPEED". The D-part and E-part, respectively, should give the start and end time for the average value. The wind speed occurring at a specific time. The C-part should be "WINDSPEED". The time of the value should be specified in the D-part. |
| Air Pressure | PER-AVER INST-VAL | The air pressure occurring during the grid interval. The C-part should be "PRESSURE". The D-part and E-part, respectively, should give the start and end time for the average value. The air pressure occurring at a specific time. The C-part should be "PRESSURE". The time of the value should be specified in the D-part. |
| Precipitation-Frequency | INST-VAL | The precipitation amount for a given return interval. The C-part should be "PRECIPITATION-FREQUENCY". |
Table 2. Internal DSS units label for different types of grid data.
Parameter | Units Label | Units |
Precipitation | MM IN | Millimeters Inches |
Temperature | DEG C DEG F | Degrees Celsius Degrees Fahrenheit |
Radiation | WATT/M2 LANG/MIN | Watts per square meter Langleys per minute |
Crop Coefficient | UNDEF | Dimensionless coefficient |
Storage Capacity | MM IN | Millimeters Inches |
Percolation Rate | MM/HR IN/HR | Millimeters per hour Inches per hour |
Storage Coefficient | HR | Coefficient in hours |
Moisture Deficit | MM IN | Millimeters Inches |
Impervious Area | % | Percent of area |
SCS Curve Number | UNDEF | Dimensionless parameter |
Elevation | M FT | Meters Feet |
Cold Content | MM IN | Millimeters Inches |
Cold Content ATI | DEG C DEG F | Degrees Celsius Degrees Fahrenheit |
Meltrate ATI | DEGC-D DEGF-D | Degrees Celsius day Degrees Fahrenheit day |
Liquid Water Content | MM IN | Millimeters Inches |
Snow Water | MM IN | Millimeters Inches |
Water Content | UNDEF | Fraction of saturation |
Water Potential | MM IN | Millimeters Inches |
Humidity | % | Percent relative humidity |
Windspeed | KPH MPH | Kilometers per hour Miles per hour |
| Pressure | KPA INHG IN HG | Kilopascal Inches of mercury Inches of mercury |
| Precipitation-Frequency | MM IN | Millimeters Inches |
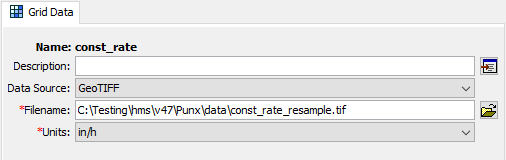
Retrieval From ASCII or GeoTIFF Files
Parameter grid types can be specified as ASCII or GeoTIFF (gridsets are a time-series of grids and include precipitation and temperature). ASCII/GeoTIFF parameter grids can only be sampled from the Expression Calculator that is launchable from select Basin Global Editors. ASCII/GeoTiff currently cannot be used to initialize gridded methods such as gridded Deficit and Constant loss or gridded SCS. These methods still need to be initialized using the grid capabilities in HEC-DSS. The ASCII/GeoTIFF file format is supported for all parameter grid types. The GeoTIFF and ASCII Data Source options are available in the Grid Component Editor.
For Filename, a path to the valid ASCII/GeoTIFF file is provided. To use a file browser to locate the file, press the Open File Chooser button to the right of the Filename field.
For Units, the user can select units for the gridded data from a list of valid unit options.
In the image below, a GeoTIFF percolation grid has been selected and parameterized.
Precipitation-Frequency Grids
Precipitation-frequency grids, which are currently used as a method for supplying precipitation to georeferenced models in the Hypothetical Storm Meteorologic Model, have some special properties. They may be specified from a Single-Record HEC-DSS file, but the most common usage is to use the grids directly produced by NOAA Hydrometeorological Design Studies Center in ASCII format. These have been produced as part of NOAA Atlas 2 and NOAA Atlas 14. Other sources of ASCII-format precipitation-frequency data may also be used. Many such products are distributed as integer grids with a scale factor. To get the true value of the data in the grid, the grid values must be divided by the scale factor. The Grid Data Component Editor for precipitation-frequency grids allows the user to select the units that the data are stored in (in or mm) and also the scale factor. Typical unit/scale factor combinations are inches/1000.0 for NOAA Atlas 14 and inches/100000.0 for NOAA Atlas 2. Metadata for the data source should always be checked prior to use. The figure below shows the Grid Data Component Editor for precipitation-frequency grids.
