Download PDF
Download page Saving Spatial Data.
Saving Spatial Data
When an aggregate TIN has been edited or modified, the changes can be saved using the File->Save TINs… selection on the main menu or the save Icon  on the toolbar. Editing changes that modify the geographic position of the aggregate TIN, such as using the Rotate or Translate Tool to move the aggregate TIN, may require using the 'Save Projection…' option instead of the 'Save TINs…' option when working with gridded datasets.
A TIN image may be a composite image, made up by aggregating two or more 'base' images. If the composite image has been rotated or had erroneous measurements deleted, then (in addition to possibly saving the composite image) it would also be desirable to have these edits applied to the base images. The implications of being able to do this are significant. If a faulty rainfall gage is deleted from a composite image, which is an aggregation of 24 hourly images, having the edit made to the single composite image would save a significant amount of time as compared to editing multiple timespans. In another example, a study which repositions the composite TIN storm to maximize precipitation would then also cascade those changes to the base images used to create the TIN. Any changes made to the positioning of the aggregate TIN can be applied to all the base TINs that were used to create it.
- Any edit changes that are made to the aggregate TIN which change the measurement values of the TIN points can be applied proportionally to the base TINs. For example, if a single TIN point on an aggregate TIN originally had the measurements of 1, 3, and 5; the aggregate would originally be 9. If the aggregate was modified to be 18, then when saving the images the measurements of the base images would be 2, 6, and 10 respectively. If a measurement on the aggregate TIN was originally zero and the modified TIN had this measurement to a non-zero value, the aggregate total would be equally distributed to the base images. This operation of proportioning the aggregate to the base images occurs on a point by point basis so even operations that result in massive differential modifications to the aggregate surface such as radar calibration can successfully applied to the base images.
- Any spatial translation, rotation, or scaling of the aggregate image is applied to the base images. However, moving gridded data usually means that the data is no longer a true X-Y grid in the coordinate system in which it was originally stored. Most I/O providers do not have the capability to store a grid that has been repositioned, but HEC-MetVue has built in support for user-created I/O providers that wish to implement this feature. The alternative is to save the TINs as a projection using the Project TIN(s) to Grid tool.
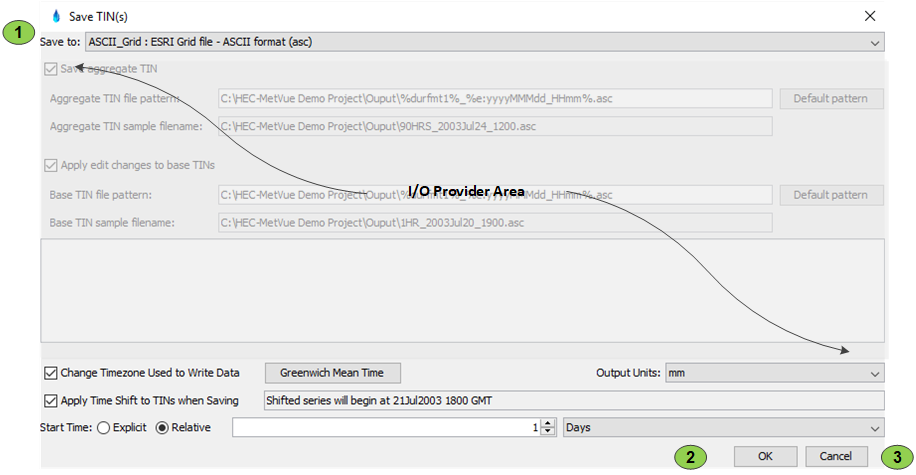
Similar to reading TINs, HEC-MetVue relies on I/O providers to write TINs. Not all I/O providers have write capabilities. For example, the PRISM I/O provider can read PRISM data but not write it. Edited PRISM data must be saved to some other file format such as ESRI ASCII grids. When the save tool is used, HEC-MetVue displays an editor similar to the one shown below. The dropdown at the top of the dialog along with the 'OK' and 'Cancel' buttons is controlled by HEC-MetVue. Depending on which I/O provider is selected, the contents of 'I/O Provider Area' will change to support whatever information is required by that I/O provider to save the TINs. HEC-MetVue gives I/O providers access to its File and DSS Save controls so that other providers that are saving to one of these types of storage medium do not have to create a custom control to do so. Other providers, such as a provider that stores results to an Oracle database or a remote Web server will likely have a completely different set of requirements for saving the edited data that cannot be satisfied by using one of the built in controls.
Item | Description |
1 | This dropdown gives a list to select the output target for the saved TINs. Depending on the edit changes made the list will vary. For example once a TIN has been rotated, most I/O providers cannot save the result so they would not appear in the list. |
2 | Press this button to dismiss the dialog and save the selected TINs with the options given. |
3 | Cancel the operation. |
Save TIN(s) - ESRI ASCII Grid

Item | Description |
1 | Check this to save the aggregate TIN to a file. |
2 | This is the location to enter the filename or file pattern for storing the aggregate TIN file. Strictly speaking, a file pattern is not actually required since only 1 aggregate TIN needs to be written. However by using a pattern the entry does not need to be continually changed for repetitive tasks that the program may be used for. The specification for how to define file patterns can be found in Table 25. |
3 | Press this button to replace the pattern in the edit field in item 2 with the default pattern defined by the program for aggregate TINs. This is convenient if the pattern in the edit field is invalid and starting from an existing valid pattern is preferred. |
4 | This field is a sample of what the filename used for the aggregate TIN will resemble based on the given pattern. It is non-editable. |
5 | Check this to save edited base TINs that were used create the aggregate TIN. |
6 | This is the location to enter the file pattern for storing the base TIN files. A file pattern is required so that each TIN written can be written to a different file. |
7 | Press this button to replace the pattern in the edit field in item 6 with the default pattern defined by the program for base TINs. This is convenient if the pattern in the edit field is invalid and starting from an existing valid pattern is preferred. |
8 | This field is a sample of what the filenames used for the base TINs will resemble based on the given pattern. It is non-editable. |
9 | This is an area where the I/O providers may display messages regarding the settings in the editor. It is non editable. |
10 | Use this to instruct the program to write the data in a specific time zone. By default the program writes the data in the same time zone which it used to read the data. The display time zone is not used during the writing of edited TINs. |
11 | Use this control to select the time zone to write the data. It is disabled unless item 10 is selected. |
12 | Select this to shift the time when writing the TINs. All the written TINs will be shifted the same amount of time. |
13 | This gives feedback to help select the correct time shift for the TINs. It is non editable and reflects the changes made to the controls in item 14. |
14 | This is the control for setting the amount of time to shift the TINs. It is disabled unless item 12 is selected. Setting the option to 'Explicit' will display an edit field to enter a start date and time (not shown). Setting the option to 'Relative' will enable the control to shift the data by a set number of specified units of time. |
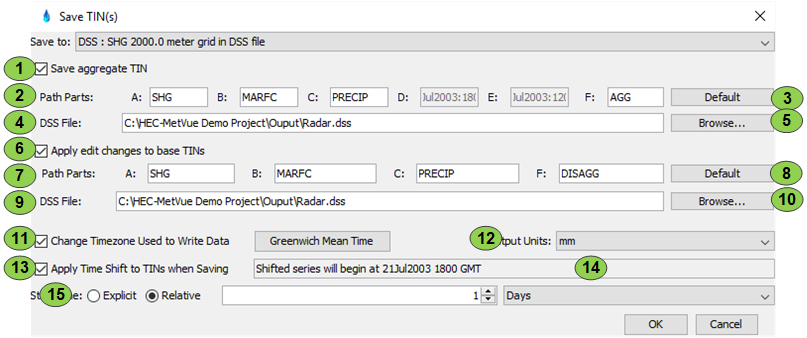
Save TINs - DSS
Item | Description |
1 | Check this to save the aggregate TIN to a file. |
2 | The DSS path parts to use when saving the TIN. The program controls the D and E path parts. |
3 | Used to set the default path parts. If the source of the TIN was a DSS path originally, using this option will populate the path with these parts. |
4 | The DSS file to save the new aggregate TIN to. The DSS file can use file name patterns to store the TIN to a file based on the data. The specification for how to define file patterns can be found in the File Masks and Naming Templates section. |
5 | Select this to browse the file system for the DSS file to use for the output of the aggregate TIN. |
6 | Check this to save edited discrete TINs that were used create the aggregate TIN. |
7 | The DSS path parts to use when saving the TINs. |
8 | Used to set the default path parts. If the source of the TIN was a DSS path originally, using this option will populate the path with these parts. |
9 | The DSS file to save the new discrete TINs to. The DSS file can use file name patterns to store the TIN to a file based on the data. The specification for how to define file patterns can be found in the File Masks and Naming Templates section. |
10 | Select this to browse the file system for the DSS file to use for the output of the discrete TINs. |
11 | Use this to instruct the program to write the data in a specific time zone. By default the program writes the data in the same time zone which it used to read the data. The display time zone is not used during the writing of edited TINs. |
12 | Use this control to select the time zone to write the data. It is disabled unless item 11 is selected. |
13 | Select this to shift the time when writing the TINs. All the written TINs will be shifted the same amount of time. |
14 | This gives feedback to help select the correct time shift for the TINs. It is non editable and reflects the changes made to the controls in item 15. |
15 | This is the control for setting the amount of time to shift the TINs. It is disabled unless item 13 is selected. Setting the option to 'Explicit' will display an edit field to enter a start date and time (not shown). Setting the option to 'Relative' will enable the control to shift the data by a set number of specified units of time. |