Download PDF
Download page Editing Annotations.
Editing Annotations
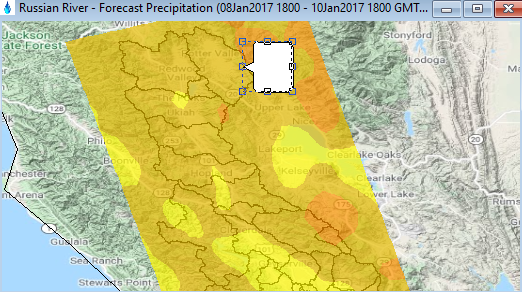
Once the desired annotation file has been selected, and an annotation has been dropped on the map window from the annotation palette control. The annotation can be selected after it is on the map window by clicking on it with the mouse. In addition, multiple annotations may be selected simultaneously by holding the ctrl key and left clicking on subsequent annotation objects. When selected, the annotation will be displayed with a sizing border. The small squares on the sizing border can be used to change the size of the object visually.

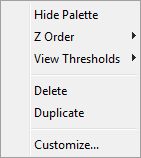
While the object is selected, right-clicking will bring up the context menu shown below. From this menu, the following actions are possible:
- Hide Palette – Hides the annotation editor palette.
- Show Palette (not shown) – Displays the annotation editor palette.
- Z Order – moves the selected annotation higher or lower in the plot order within the annotation file it resides.
- View Thresholds – Sets the view thresholds for the annotation. View thresholds control the visibility of the object as the map window zoom level changes.
- Set High View Threshold (not shown) – Sets the maximum zoom level at which a particular annotation will appear. Once the view is wider than the specified level, the annotation will not be rendered on the plot.
- Set Low View Threshold (not shown) – Sets the minimum zoom level at which a particular annotation will appear. Once the view is narrower than the specified level, the annotation will not be rendered on the plot.
- Remove High View Threshold (not shown) – Removes the upper view threshold from the annotation. For an annotation without an upper threshold, once the object appears on the plot, it will be displayed on the plot at any wider view selected.
- Remove Low View Threshold (not shown) – Removes the lower view threshold from the annotation. For an annotation without a lower threshold, once the object appears on the plot, it will be displayed on the plot at any narrower view selected.
- Delete – Deletes the selected annotation.
- Duplicate – Duplicates the selected annotation. Once an annotation has been customized, it is convenient to duplicate the annotation, then only requiring minor changes to the new annotation. This is typically easier than manually adding all of the desired settings into a new annotation from the annotation palette.
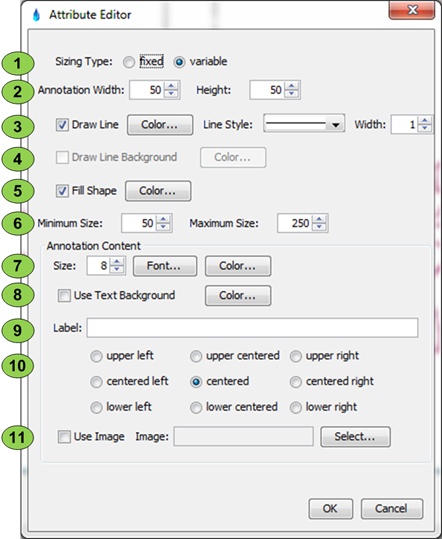
- Customize – This displays the dialog shown below, which allows the modification of the attributes of the selected annotations. The table below provides a description of the features available in the Annotation Attribute editor.
Item | Description |
1 | This sets the sizing type to either fixed or variable.
|
2 | This is annotation width and height. Note that if the annotation is using variable sizing, the values entered into these width and height controls will change as the map window size and the zoom level changes. |
3 | These controls are used to define visibility, color, line style and line thickness of the line defining the annotation. |
4 | This control defines the line background. It is disabled if the line style chose for the annotation is a solid line. |
5 | These controls specify whether the shape should be filled with color or not. If left unchecked, the annotation area will be transparent. |
6 | This allows the user to select a minimum and maximum size (in this case the object can be no smaller than 50 by 50), which keeps a relative object from becoming too large or small when zooming in or out, respectively. This limit will also prevent the user from sizing the object outside these limits. |
7 | These controls define the font used for the annotation label. Note that the font size for annotations, with variable sizing selected above, will change as the zoom level changes. |
8 | This specifies the visibility and background color behind text. |
9 | This is the textual information that is displayed in the annotation. |
10 | This specifies the alignment of the information within the text box of the annotation. |
11 | This allows the user to put an image inside of an annotation object. Supported formats are jpg, gif and png. |