Download PDF
Download page Rotating, Translating and Scaling TINs.
Rotating, Translating and Scaling TINs
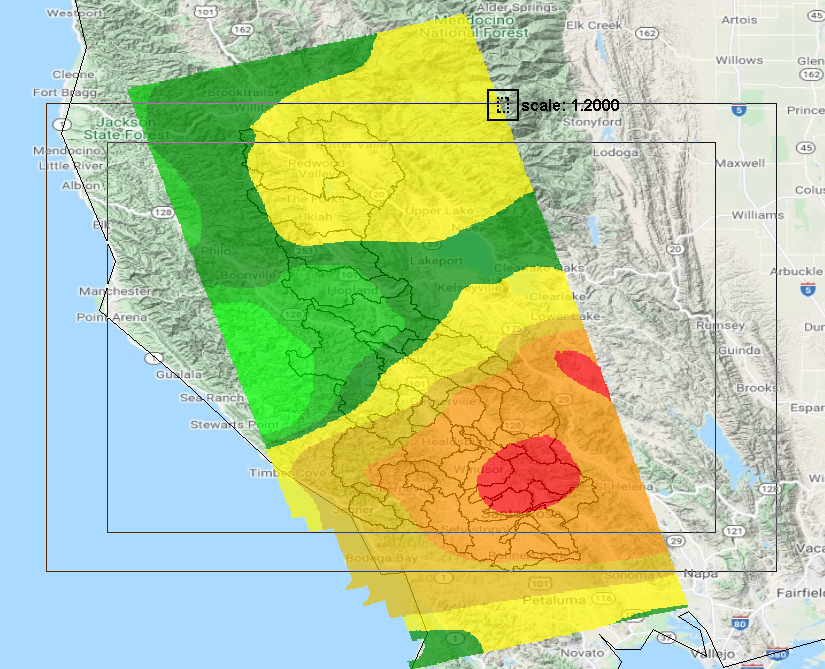
Many features in HEC-MetVue are designed for use in operational settings. However, there are some features that are beneficial for performing studies. Rotation, Translation, and Scaling of the TIN layer are three features designed to help with storm studies and other applications. Using these features, it is possible to move a storm over a basin and re-orient it to model what would happen should the storm occur at a different location. Since HEC-MetVue's storm rotation, translation, and scaling features provide simple TIN manipulations without regard to atmospheric dynamics, users should make practical decisions on manipulating the image placement and scale to provide reasonable what-if scenarios.
Currently, there are two ways to perform these options. The visual way is to use the mouse and directly drag/orient the storm to the desired location. The second method is to the use the studies toolbar and input the values directly.
Gridded data that have been scaled, translated, or rotated must be saved by projecting the results onto a new grid, using the Projecting Spatial Data section.
Method 1 – Manual TIN positioning
Rotating a TIN
To rotate a TIN, select the appropriate mouse mode  from either the toolbar or context menu and then depress the left mouse button and drag the mouse. The TIN will be rotated around one of the following centerpoint options accessible from the Properties tab of the Project Settings:
- Map Window Centerpoint
- Geometric TIN Center
- Weighted TIN Center
- User Defined
When the left mouse button is released the image is redrawn. Any basins average files that are active will have their basin computations redone for the new TIN alignment.

Translating a TIN
To translate a TIN, select the appropriate mouse mode  either from the toolbar or context menu and then depress the left mouse button and drag the mouse. The TIN will be moved along with the mouse cursor. When the left mouse button is released, the image is redrawn. Any basin average files that are active will have their basin computations redone for the new TIN alignment.

It is sometimes convenient to be able to position a TIN by a combination of translation and rotation. When Rotation mode is selected, Translation mode becomes the secondary mode. With the left mouse button still depressed, press the right mouse button. While both buttons are depressed simultaneously, the edit action will be Translation. Release one button and the mode goes back to Rotation mode. So long as at least one button is depressed, switching between the two can be done many times.
Scaling a TIN
To scale a TIN, select the appropriate mouse mode  either from the toolbar or context menu and then depress the left mouse button at a location about halfway between the center and edge of the Map Window and drag the mouse. A rectangular box will appear on the screen where the dragging began and another in the current location giving an indication of the scaling amount. By making the rectangle smaller, the TIN will be scaled to a smaller size. Likewise, making the rectangle larger increases the TIN coverage.
Method 2 – Positioning TIN using the Positioning toolbar
The figure below shows the Positioning toolbar used to control the TIN placement. Using this toolbar, one can input the rotation, x and y displacement (translation), and scaling for a TIN. The controls on the toolbar move the TIN to the desired location.

The table below provides a description of the features available in the toolbar.
Item | Description |
1 | This is the entry field for the angle of rotation of the image. The angle of rotation is always in degrees. The spinner control moves the angle one degree at a time. Positive rotations are counterclockwise. |
2 | This is used to input the distance to move the TIN in the X direction. If the spinner is used, it moves the image one unit to at a time. What defines a unit varies based on the coordinate transform picked. If the display units are miles, every click of the spinner moves the image one mile. If the coordinate transform selected uses feet, every click of the spinner moves the TIN one foot. |
3 | This is used to input the distance to move the TIN in the Y direction. If the spinner is used, it moves the image one unit to at a time. What defines a unit varies based on the coordinate transform picked. If the display units are miles, every click of the spinner moves the image one mile. If the coordinate transform selected uses feet, every click of the spinner moves the TIN one foot. |
4 | This control is used to scale the image. The spinner scales the image using a variable factor in an exponential fashion. |
5 | After the factors are set in the various entry fields/spinners, this button must be pressed to apply the transform just input. Until this is pressed, no computations or actual recordable edit actions take place. |