Download PDF
Download page Edit Tracking Tool.
Edit Tracking Tool
The edit tracking tool allows for the user to view, modify and import/export the stack of edits performed in a given Map Window. Several types of edits are available to the user, including adding a value, multiplying by a factor, settings to a specified value, deleting points, adding points, rotating data, translating data and scaling data spatially. Each of these edits are performed in sequence, where a subsequent edit is applied to the resulting data from the previous edit. Consider the example of a TIN point with 1 inch of precipitation. If this point is multiplied by two first, and then 0.5 inches is added to the point second, the resulting value will be 2.5 inches ((1*2)+.5). Alternatively, if 0.5 inches is added to the point first, and then the point is multiplied by two second, the resulting value will be 3 inches ((1+0.5)*2). When the Edit Tracking Tool is launched, using the  button, or after an edit is performed when "Show Edit History After Edit Performed" option is true (see Global Settings), the user is presented with the editor below. This editor has a table of edits, table modification buttons, Import/Export buttons.
By default, HEC-MetVue displays the Edit Tracking Tool after edits are performed. This behavior may be disabled in the Global Settings under "Show Edit History After Edit Performed".
The Edit Tracking Tool table contains a row for each edit performed. For each edit, there are 5 columns: the function applied, the parameters of that function, the date range for which the edit applies, the spatial extent of the edit, and a checkbox to enable/disable the edit. A specific edit may be modified within the table in three ways: 1) Modifying the function parameters with the "..." button in the Parameter column, 2) modifying the date range with the ".." button in the Date Range column and 3) the Is Active checkbox. For modifying the function parameter, this is only possible for Add Z Value, Multiply Z Value, Set Z Value, Rotate TIN, Translate TIN and Scale TIN. For modifying the Date Range, this is only possible for edits that were created while using the Dynamic Time Window, and therefore time-based.
Edits that are not time-based apply to the entire time window, and the Date Range is labeled as "All Data". This distinction is convenient when importing/exporting a list of edits for repeated computations. Consider the example of forecasting scenarios, where the forecaster intends to have a scenario in which the forecasted precipitation is doubled. If the data is applied on the aggregate data, and therefore have no time window, the Multiply Z Value function with a Factor of 2 may be imported and applied for different time windows. Any modifications to a row in the Edit Tracking Tool table will result in a recompute of the currently viewed data in the Map Window.
Beyond modifying individual edits, the user may modify the stack of edits. The stack of edits in the table indicates the order of operations, as each edit is performed on the results of the previous edit. The stack of the edits may be modified with the Move Up/Down buttons, the Delete Edit button, the Clear All button, and by drag/drop of rows within the table. Additionally, the current edit is identified with the row being bolded. The user may switch the current edit in the stack by using the Undo/Redo buttons in the HEC-MetVue main window or double clicking a row in the table. Any modifications to the stack of edits in the Edit Tracking Tool table will result in a recompute of the currently viewed data in the Map Window.
An inactive edit will not be performed and cannot be made to the current edit. Inactive edits in the stack are ignored when computing the resultant data. If the Undo/Redo buttons are clicked and the previous/next edit is inactive, the current edit will skip to the previous/next active edit. If you double-click on a row that has an inactive edit it will activate that edit, then make it the current edit.
Edit History Dialog

| Item | Description |
|---|---|
| 1 | Function column. This is the function applied for the given edit. |
| 2 | Parameter column. Description of the parameters of the function applied in the given edit. In this column, when the parameters are editable, the "..." button will be enabled, and launch the appropriate editing dialog. |
| 3 | Date Range column. The date range for which this edit applies. If the edit was applied on the aggregated data, then the date range is "All Data". In this column, when the edit is time-based, the "..." button will be enabled, and launch "Edit Date Range" dialog. |
| 4 | Spatial Extent column. The edit either applies to a point, polygon or the entire TIN. If the edit is applied to a point, the coordinates of that point are reported |
| 5 | Is Active checkbox column. When checked, the edit will be applied. If uncheck, the edit will not be applied. |
| 6 | Move Up button. Moves the selected row up in the table. |
| 7 | Move Down button. Moves the selected row down in the table. |
| 8 | Delete edit button. Deletes the selected edit. |
| 9 | Clear All button. Clears all edits in the table. |
| 10 | Import Button. Imports a MetCalcalculator JSON script. |
| 11 | Export Button. Either export a text report (.txt.) of the edits performed, or a MetCalcualtor JSON script (.json). |
Edit Date Range Dialog
If the Date Range edit button is clicked in the Date Range column of the Edit Tracking Tool, the user will be presented with the following Edit Date Range dialog. This editor is useful for altering the time window of a time-based edit or toggling it between time-based and not time-based.

| Item | Description |
|---|---|
| 1 | Start Date field with date selection button. |
| 2 | End Date field with date selection button. |
| 3 | No Date Range button to make the edit not time-based. |
| 4 | OK button to apply the modifications to the edit date range. |
| 5 | Cancel button to cancel the modifications to the edit date range. |
Modify Edit Dialog
The user can modify vertical edits to the data (Multiply, Add, Set) by clicking the "..."button on the Edit Tracking Tool. If the Parameter edit button is clicked in the Parameter column of the Edit Tracking Tool, the user will be presented with the following Modify TIN Measurement Values dialog. This allows the user to change the value of the edit (for example, change the edit from doubling to tripling the data values) and altering the type of edit (Multiply, Add, Set).

| Item | Description |
|---|---|
| 1 | Multiply Measurements by a Constant Value radio button. This will make the currently selected edit a Multiply Z Value function. |
| 2 | Add Constant Value to Measurement radio button. This will make the currently selected edit a Add Z Value function. |
| 3 | Set Measurements to Specified Value radio button. This will make the currently selected edit a Set Z Value function. |
| 4 | Value text field. This is the value to be applied for this edit function parameter. |
| 5 | OK button to apply the modifications to the edit function. |
| 6 | Cancel button to cancel the modifications to the edit function. |
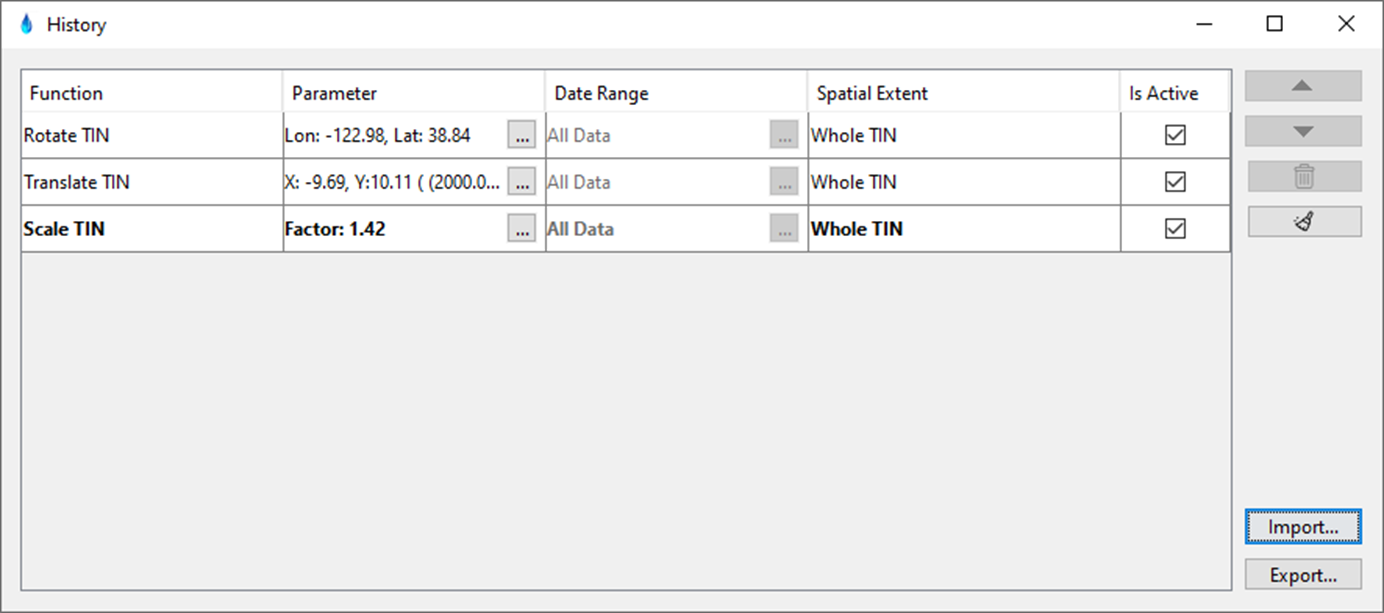
Edit History Dialog With Spatial Edits
The previous image displaying the Edit Tracking Tool displayed a mix of time-based and non-time-based edits. The image below shows spatial edits, which are incompatible with time-based edits. This image is presented to note that spatial edits will always have a Date Range of "All Data" and cannot be mixed with time-based edits.
Rotation, Translation and Spatial Scale Edit Dialog
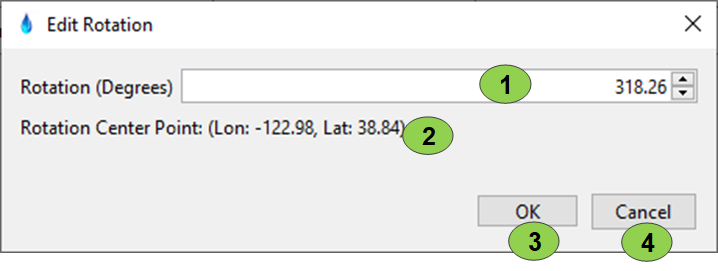
The image below shows the Edit Rotation Dialog. In this dialog, the rotation may be edited. Additionally, the rotation center point is provided in longitude/latitude for informative purposes.
| Item | Description |
|---|---|
| 1 | Rotation entry field. This allows the user to change the rotation of the data. |
| 2 | Rotation Center Point reporting, which is always in longitude/latitude. |
| 3 | OK button to apply the modifications to the Rotate TIN function. |
| 4 | Cancel button to cancel the modifications to the Rotate TIN function. |
The image below shows the Edit Translation dialog, where the X and Y translation distance are editable.

| Item | Description |
|---|---|
| 1 | Translate X entry field. This allows the user to change the translation in the X direction. |
| 2 | Translate Y entry field. This allows the user to change the translation in the Y direction. |
| 3 | OK button to apply the modifications to the Translate TIN function. |
| 4 | Cancel button to cancel the modifications to the Translate TIN function. |
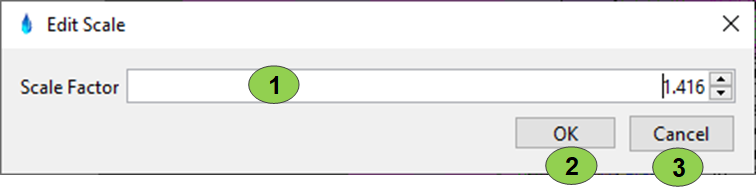
The image below shows the Edit Scale dialog, where the spatial scaling factor may be edited.
| Item | Description |
|---|---|
| 1 | Scale factor entry field. This allows the user to change the scale factor. |
| 3 | OK button to apply the modifications to the Scale TIN function. |
| 4 | Cancel button to cancel the modifications to the Scale TIN function. |
Import/Export Functionality
After applying a series of edits, there are two export options available when clicking the "Export" button: a text report and a JSON script.
The text report provides a text-based reporting of the edits performed. This text-based reporting describes each edit in a human readable format, describing edits performed on the data.
Exportin to JSON creates a script that may be imported to the Edit Tracking Tool. A common use case is real-time forecasting, where forecast scenarios will be generated for testing different possibilities. In this case, the edits will most likely be implemented with "No Time Window" as that will allow for continued use of the set of edits for future forecasts. A few likely use cases will be scaling the storm up or down vertically, adding or subtracting precipitation or temperature, rotating a storm or translating a storm.