Download PDF
Download page Developing 1D Geometric Data with RAS Mapper.
Developing 1D Geometric Data with RAS Mapper
Data Files
You will be working with a section of the Tuolumne River near Modesto, CA. The data for this tutorial is provided in the zip file.

Objective
In this workshop, you will use HEC-RAS to create a new RAS Terrain and RAS Layers necessary to create a 1D river hydraulics model.
Background
The workshop requires you to create geometry from scratch. The terrain models for the workshop are provided and you will start by importing them to a RAS Terrain. You will be working with the Baxter dataset to create a 3 reach model similar to that shown below (but you don't need so many cross sections!). 
Geometry Development
You will be starting from scratch with a new HEC-RAS project.
Create a new HEC-RAS Project
- Create a NEW HEC-RAS project and give it a Name.

- Open RAS Mapper and set the Projection for the project, using the Tools | Set Projection for Project menu item. Browse to the "GISData" folder in the workshop folder.
- Select the "projection.prj" file

- Press OK to close the Options window.
Import the Terrain Model
- Create a new terrain model using the Project | Create New RAS Terrain menu item.
- Click to + button to add the terrain files.
- Navigate to the "\GISData\Terrain" folder and select the 5 terrain tiles (with the .flt file extension).

- Press the Create button to import the terrain data.
- After the data has imported, double-click on the Terrain layer that was just created and spend a few minutes exploring the display options. (Keep Layer Properties open.)
- Check on the "Update Legend with View" option.
- Turn on the "Plot Contour" option. Change the contour interval.
- Check on the "Plot raster file outlines" and "Plot raster file names" options.
- Toggle the "Plot Surface" option.
- Set the Terrain display options to your liking, and continue on.
Create RAS Geometry File and Layers
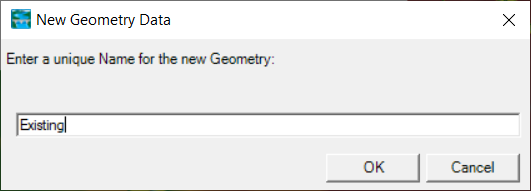
- In RAS Mapper, right-click on the Geometries node and choose Add New Geometry. Enter a name for the geometry and hit OK.
- Edit the Geometry. The pencil icon is a shortcut.
Create the River Network
- Click on the Rivers node.
- Draw the river network (as shown above) with the Baxter River and Tule River coming together. In HEC-RAS, river reaches are drawn from upstream to downstream, in the positive flow direction.
- Left-click to add a point to a line, double-click to end a line.
- Right-click to re-center the map display.
- Use the Shift key to Pan, use the Mouse Wheel to Zoom in and out.
- Draw the Baxter River first. When finished drawing a river reach you will be prompted for a name.
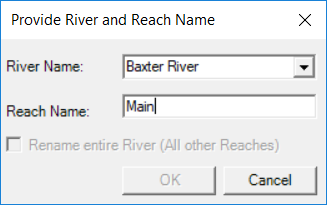
- Draw Tule Creek and end it "on top" of the Baxter River.
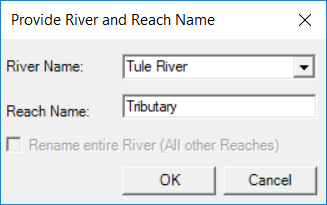
- A junction will be formed when you end a river reach segment on an existing river reach. Multiple dialogs will prompt you to (a) split the river reach, (b) rename the lower reach, and (c) provide a junction name.
-
- Note that by default the name of the river and reach is automatically drawn at the start of each river reach. Open the River Layer Properties.


Layout Cross Sections
For this workshop we are going to ignore laying out bank lines and flow path lines and skip straight to the cross sections.
- Select the Tools | Options menu item.
- Change the "XS River Stations" Units to Miles and press the OK button.
- Click on the Cross Sections node.
- Create a dozen (or so) cross sections on each river reach to reasonably represent 1D river/floodplain flow. Cross sections should be created left to right when looking downstream!
- After you have created a cross section, Plot the elevation profile.

Note that the cross section already has a River Station assigned to it.
River station labels are on by default and are calculated in feet (default), but can be changed to miles in the RAS Mapper Options.
Because a bank station line has not yet been drawn in this example, bank stations are place at the ends of the cross sections.
- Create another cross section. Note that the Profile Plot automatically updates!
- When FINISHED created features, select the Geometries Node | Stop Editing menu item. Select Yes to confirm the edits.

Modify the Cross Section Data
- Start Editing the Geometry in RAS Mapper.
- Select the Cross Sections layer.
- Select a cross section.
- Plot the Elevation Profile.
- Start editing the cross section (with a double-click).
- Grab one of the end points and move it to make the cross section wider and/or change how it crosses the floodplain.
- Observe what happens to the Profile Plot.

Note that the Terrain no longer matches the cross section Profile. This is because the cross section is considered an "existing cross section" and we don't want RAS Mapper to unintentionally overwrite data. - Double-click to finish the cross section.
- Update the cross section by right-clicking on the cross section and selecting Update Cross Section | Elevation Profile from Terrain.
- Plot the cross section to see if the terrain matches the profile plot.
Auto Update Geometry
- Make sure you are Editing the Geometry in RAS Mapper.
- Select the Geometry layer, right-click and choose the "Auto Update Geometry" option.
- Click the "Check All Properties" button to turn on updating for each property.

- Plot a cross section.
- Edit a cross section by moving it around and note the behavior.
The profile will be updated to reflect the ground surface from the Terrain layer.
- Edit the stream centerline to change the length of the river between cross sections.
The cross section river stations are updated to reflect the new stream centerline when the geometry is saved.
- Right-click on the Geometry and choose the "RAS Geometry Properties" menu item.
Creak Bank Lines
- Click on the Bank Lines node.
- Create a line for the Left Bank and Right Bank for each River.
Create Flow Path Lines
- Click on the Flow Path Lines node.
- Create a line for the Left Overbank and Right Overbank flow for each River.
Add Manning n value Information
- Select the Project | Create New RAS Layer | Land Cover Layer menu item
- Browse to the "GISData\LandCover" folder and select the NLCD data.

- Press Create.
- Right-click on the LandCover layer and select the Edit Land Cover Data Table menu item
- Provide Manning's n value data in the table provided.
- Verify the LandCover layer is associated with the Geometry using the Project | Manage Geometry Associations menu item.

Extract Manning's n Values
- Start Editing the Geometry
- Update the Manning's n values using the Update Cross Sections | Manning's n Values menu item on the Cross Section Layer.

- Stop Editing.
Geometry Evaluation
- Close RAS Mapper
- Open the Geometric Data Editor
- Open the Geometry file you just created.
- Investigate each cross section.
Geometry Improvement
- As time allows, improve your geometry. You can do this cross section by cross section from the Geometric Data Editor or from RAS Mapper.
- Suggestions include:
- Improved Manning's n Values
- Ineffective Flow Area