Data Files

Data for the tutorial is provided below.

Dam Breach Model Refinement for Levees.zip

Objective

This workshop will guide students on using HEC-RAS to:

  • Reinforce the modeling process of analyze, refine, run
  • Learn how to use the NLD download tool
  • Understand using Terrain Modifications

Background

The town of Lock Haven is situated on the north bank of Bald Eagle Creek in central Pennsylvania. Lock Haven sits behind a levee system that was designed to provide protection. You will simulating a Sunny Day failure event. Will the Levee System protect Lock Haven?

Open the HEC-RAS Project

  1. Open RAS
  2. Open the "BreachRefinementWorkshop.prj" RAS project file.
  3. Open the Unsteady Flow Analysis window and press Compute the existing plan.
  4. Open RAS Mapper
  5. Investigate the results


Question: When does the town of Lock Have get inundated?

Download NLD data

  1. Zoom to Lock Haven
  2. Download NLD data
  3. Select Project | Download Data | National Levee Database Features (NLD) menu item
  4. Press the Query Products button (using your Current Zoom Extents)
  5. Press the Download button

The NLD data will be added to RAS Mapper in the Map Layers group

  1. Press Close
  2. Turn On the NLD group layer and the RAS Merged Alignments layer to verify the data were downloaded.

Use NLD with new Terrain

  1. Right-click on the Terrain and choose Clone Terrain
  2. Provide a Name
  3. Turn Off the old terrainn and Turn On the new Terrain
  4. Right-click on the new Terrain and choose Add New Modification Layer | Lines | High Ground
  5. Provide a name the Levees modification
  6. Right-click on the Levees modification and choose Import Features
  7. Navigate to the "./Downloads/NLD" folder and select the RAS Merged Alignments shapefile
  8. Select the Levees of interest (by default they are all selected)
  9. Press the Import button
  10. Verify that the Terrain was updated with the Levee Elevations.
  11. Stop Editing the Terrain Modifications

Modify Geometry with Breaklines

  1. Right-click on the Geometry and choose Save As
  2. Provide a new Name ("Refined) – this will the Geometry you edit
  3. Associate the Refined Geometry with the Terrain.NLD (cloned terrain) and press the Close button
  4. Start Editing the Refined Geometry
  5. Select the Breaklines layer and Import the Levee Alignment
  6. Improve (and clean up) the levee lines to that they smoothly transition
  7. Right-click on the Breaklines layer and Enforce All Breaklines
  8. Inspect
  9. Refine
  10. Stop Editing when "happy" with your geometry (or you run out of time)
  11. Close RAS Mapper

Create a new Plan and Simulate

  1. Open the Unsteady Flow Analysis window
  2. Save Plan As a new plan named Refined
  3. Select the Refined Geometry
  4. Compute

Review Results

  1. Open the Unsteady Flow Analysis window
  2. Save Plan As a new plan named Refined
  3. Select the Refined Geometry

Review Results

After running both plans, review the output and answer some questions (for both plans).

Plotting the water surface in the river, just upstream of the town shows that it takes about 4 hours for the floodwave to reach the levee system.

For the base run, the town starts to get wet immediately.

For the refined model run with the levee represented, the town is not inundated.

Max depths for the base run are around 12ft deep.

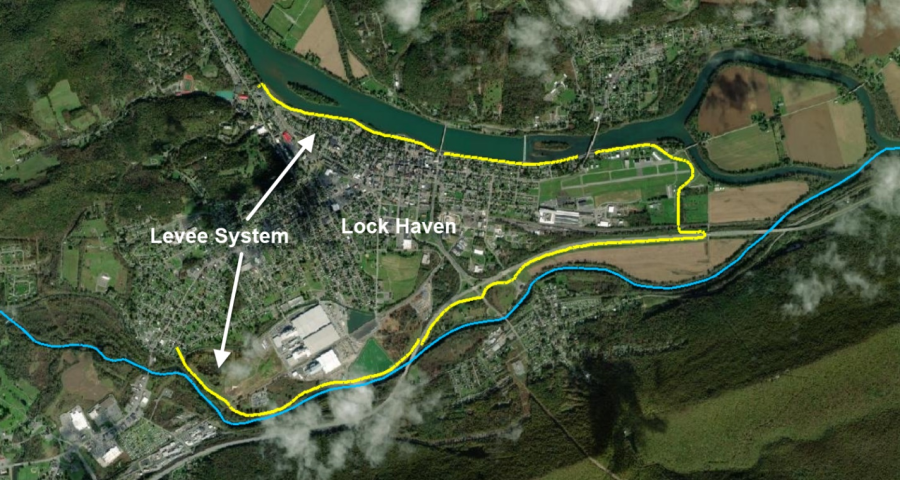
No water overtops the levee for the refined run. If the levee was overtopped, you would need to insert a 2D Connection for the locations where you wanted flow computed.  You could then use the hydrograph plot to view the results.

If you see water in the 2D Flow Area, verify that the levee is properly imposed on the 2D cell faces. The lower portion of the levee systems is complicated and may need attention!