Download PDF
Download page Loading Terrain Data and Making the Terrain Model.
Loading Terrain Data and Making the Terrain Model
The next step is to load the terrain data that will be used in creating the terrain model for HEC-RAS. To develop a new terrain data set (terrain model), from the RAS Mapper main window (Figure 2-1), right click on the Terrains layer and from the shortcut menu select Create New RAS Terrain. The New Terrain Layer dialog (Figure 2-3) opens. This dialog allows the user to provide a name for the new Terrain Layer (Filename field, the default name is “Terrain”); select a directory for storing the terrain (Folder button); define the elevation precision of the new terrain data layer (Rounding (Precision) field, 1/32 is the default for English units); and select the files to be used in building the new terrain layer (Plus (+) button).
At this time, RAS Mapper can import terrain data that is in the floating-point grid format (*.flt); GeoTIFF (*.tif) format; ESRI grid files; and several other formats (for example, a USGS DEM file). A list of file formats supported by the RAS Mapper software is contained in Appendix B of this manual. NOTE: Limited testing of the terrain file formats listed in Appendix B has been conducted by HEC; however, the GDAL library being utilized by RAS Mapper identifies the file formats listed in Appendix B, which are supported by GDAL. However, the data being imported must be in a gridded format, in order to be used to make a terrain model.
Floating point grids consist of a main file with the *.flt file extension, and they also have a *.hdr file, and possibly a *.prj file that goes along with it. Note: if the *.flt file is not in the same projection as what has been set in RAS Mapper, then the user must have a *.prj file that describes the projection of the *.flt file). ESRI grid files will have *.adf file extensions. Note: there are several *.adf files that make up an ESRI grid. Pick any one of them and the program will process all of them as needed.
Add Input Terrain Files to the New Terrain Layer dialog by clicking the Add Files button (Figure 2-3), to open a browser window. Select the appropriate terrain grid or grids (more than one grid can be used simultaneously to form a tiled terrain model) and click Open. The selected gridded file(s) are added to the New Terrain Layer dialog (Figure 2-3).
From the Output Terrain File section, define the elevation precision of the new terrain data layer (Rounding (Precision) field (1/32 is the default for English units), and select a directory for storing the terrain (Folder ![]() button).
button).

Once the grid files are selected, and placed in the appropriate priority order, click the Create button to create the new Terrain Layer and add the terrain to the RAS Mapper map window. RAS Mapper will convert the grids into the GeoTIFF (*.tif) file format. The GeoTIFF file structure supports tiled and pyramided data. Tiled data uses less area of the terrain by removing the “NoData” values, while pyramided data stores multiple terrain layers of varying resolutions. Additionally, the GeoTIFF files are automatically stored in a compressed form (using the zip format), which makes the file storage much smaller. In general, the GeoTIFF files will be 2 to 20 times smaller than the original FLT or ESRI grid files. The GeoTIFF file format allows for smaller storage space, faster computational speed (in generating flood maps), as well as “dynamic mapping” of the results (depth grids that are created on the fly in memory, as the user zooms in or zooms out, pans, or animates the flood maps).
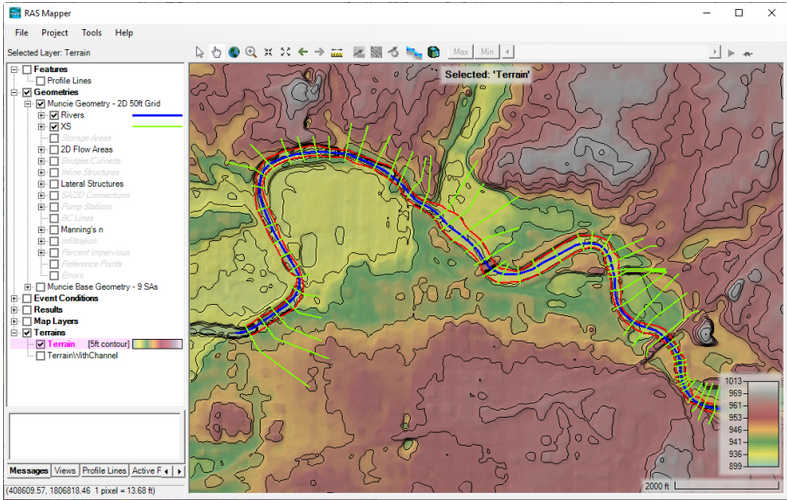
Once the GeoTIFF files are created, RAS Mapper also creates a *.hdf file and a *.vrt file. The *.hdf (Hierarchical Data Format) file contains information on how the multiple GeoTIFF files are stitched together. The *.vrt (Virtual Raster Translator) file is an XML file that contains information about all of the raster files (*.tif). The user can drag and drop the *.vrt file onto an ArcGIS project and ArcGIS will know about all of the raster files that make up the terrain layer. Additionally, when the raster files are plotted in ArcGIS the same scale and color ramp will be used. Once RAS Mapper has completed the conversion of the files to GeoTIFF and created the HDF and VRT file, the new terrain layer will be visible in the RAS Mapper map window (show below).
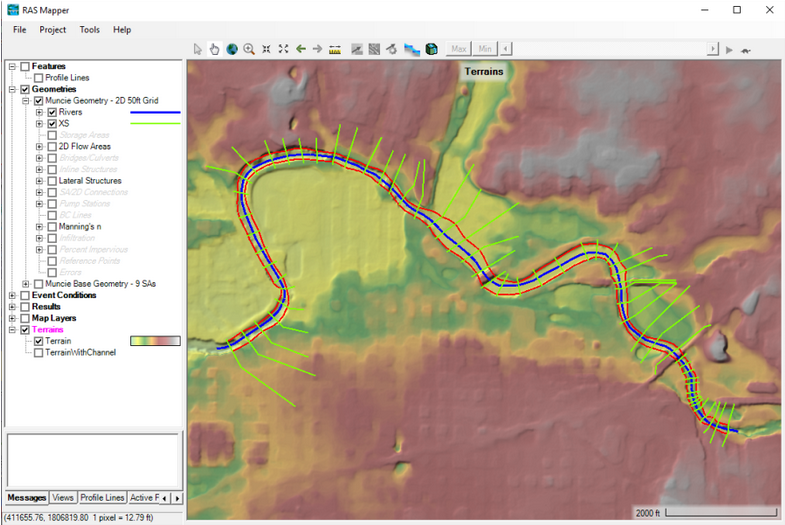
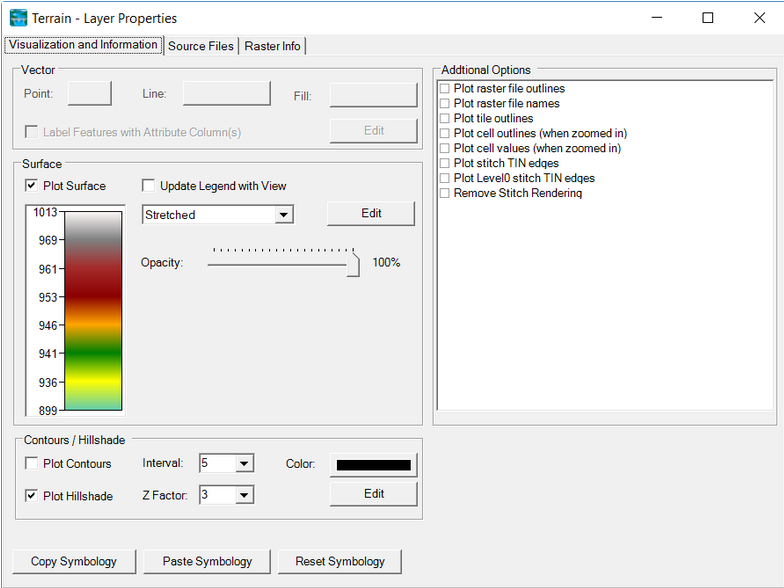
Once the terrain model is created the user can enhance the look of the terrain data by right clicking on the terrain layer and selecting Image Display Properties. The Image Display Properties window (Figure 2-5) allows the user to: select and control the Surface Color Ramp; Transparency; Create and plot Contour Lines; and shade the terrain using a Hill Shading algorithm (Hill Shading makes the visualization of the terrain much more realistic and semi 3D).
An example of terrain data with some of the layer properties enhancements (Hill Shading and Contour Lines) turned on is shown in Figure 2-6.