Download PDF
Download page Using Cross Section Data to Modify/Improve the Terrain Model.
Using Cross Section Data to Modify/Improve the Terrain Model
One of the major problems in hydraulic modeling is that terrain data does not often include the actual terrain underneath the water surface in the channel region. However, RAS Mapper can be used to create a terrain model of the channel region from the HEC-RAS cross sections and the Cross-Section layer’s Interpolation Surface. The created channel terrain model can then be combined with the general surface terrain model (that does not accurately depict the terrain below the water surface) to create an improved terrain model for hydraulic modeling and mapping.
Note: RAS Mapper now has a wide set of vector-based terrain modification tools that can be applied to any HEC-RAS terrain model. To learn about the vector-based terrain modification tools, and how to use them, please see the HEC-RAS Mapper User's manual.
The following sections provide the instructions for creating the channel terrain model using the HEC-RAS cross sections layer and interpolation surface cross sections sublayer, and for adding the created channel terrain to the general surface terrain model.
Creating a Terrain Model of the Channel
From RAS Mapper, turn on the Geometry layer for the 1D cross section geometry data to be used in creating the channel terrain model. Also turn on the following sublayers: River (stream centerline); River - Bank Line; XS (cross sections); and XS - Interpolation Surface. Review the stream centerline (River); Bank Lines, XS (cross sections); and the XS Interpolation Surface to ensure they are correct, and what the user wants for a new channel terrain model.
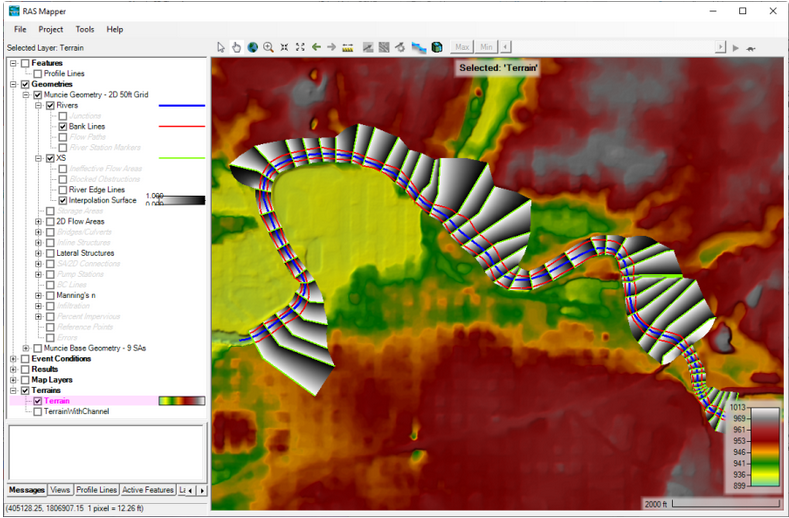
Once the geometry layers are completed, the channel terrain model is created by right clicking on the Geometry layer (parent name) and selecting Export Layer, then Create Terrain GeoTIFF from XS's (channel only). Alternatively, the user can make a terrain model out of the entire cross section region (channel and overbank area), but if the base terrain model has good overbank terrain information, the user will not want to do that. Once the Export option is selected, a file selector will appear, in which the user will need to give the new terrain model a name, and choose a directory to put it in. See the file selector in the figure below.
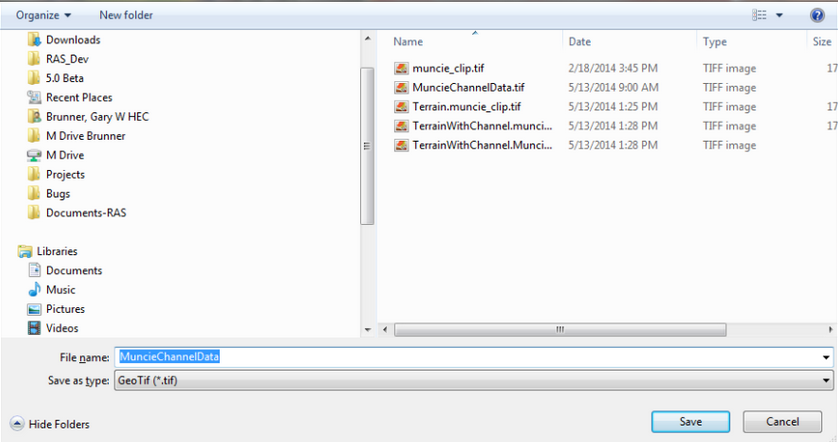
Once a directory is chosen and a filename is entered, click the Save button to create the channel terrain model. An HEC-RAS Mapper Export Terrain message window will open and ask the user to enter the raster cell size to use for the created channel terrain model. For example, if the user enters “2.0”, then the created channel terrain model will have grids that are 2 ft x 2 ft. RAS Mapper creates the terrain model by taking the elevation data from the cross sections and using the interpolation surface to interpolate an elevation for each grid cell between two cross sections. When the user selects the Export Layer | Create Terrain GeoTIFF from XS’s (Channel Only) shortcut menu command, then this new surface is clipped at the main channel bank stations and written as a terrain grid in the GeoTIFF file format.
Making a Combined Channel and Overbank Terrain Model
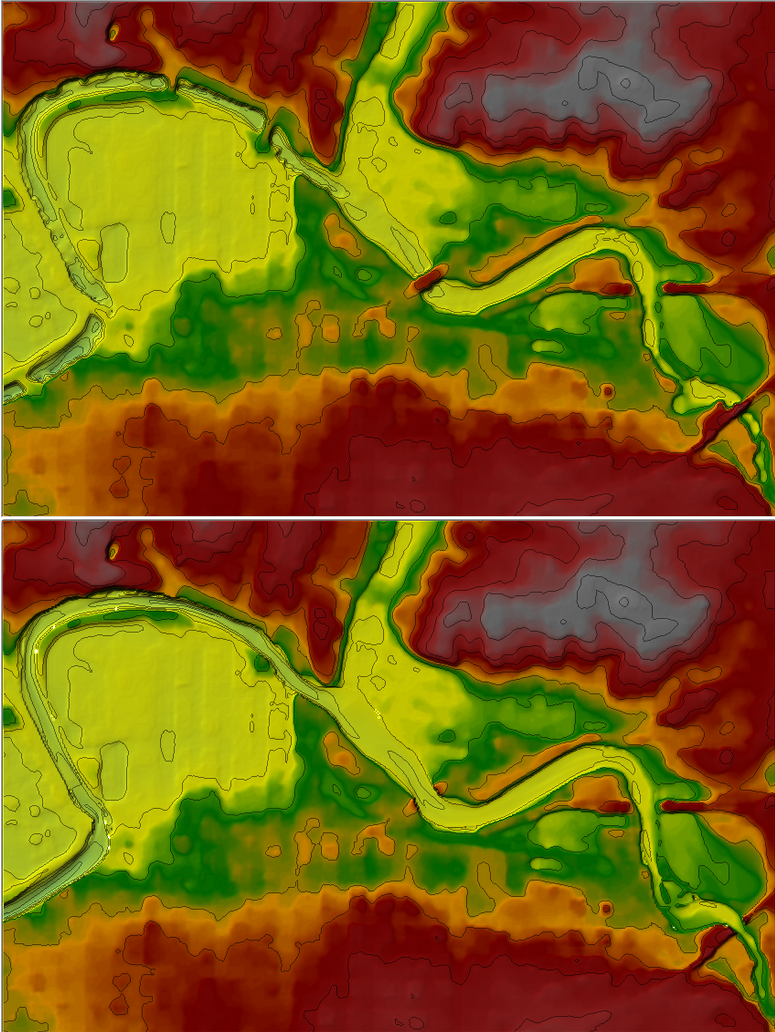
Once the user has created a channel terrain model, a new combined terrain model can be made from the base terrain model (the terrain with the overbank/floodplain data) and the newly created channel-only terrain model. To make the new combined terrain model, from the RAS Mapper menu bar, select the Tools | New Terrain menu item. The New Terrain Layer dialog opens (Figure 2-3). Note, this step is the same as previously described for creating a terrain model in RAS Mapper; however, the files used to create this terrain model will be the previously created GeoTIFF of the base terrain data, and the newly created GeoTIFF of the channel-only data. sectionOnce the New Terrain option is selected, the window to make a new terrain layer will appear (Figure 2-3). Enter a new Name for the new terrain model (“TerrainWithChannel” was used in this example). Select the folder for the new terrain model to be written to. Select the precision of the new terrain model, keeping in mind the precision should not be finer than the terrain files used to create this new terrain model. Then press the Plus (+) button and select the base terrain models GeoTIFF file, and the channel only terrain models GeoTIFF file. Make sure that the new channel-only terrain model has a higher priority than the base terrain model (i.e. make sure it is first in the list of the added terrain files). Then press Create button and a new combined terrain model will be created and added to the RAS Mapper project. See the original (terrain model without cross section data included) and the new (terrain model with cross section data included) terrain models in the figure below.