Download PDF
Download page Bridge Scour - Example 11.
Bridge Scour - Example 11
This example will demonstrate the use of HEC-RAS to perform a bridge scour analysis. To perform the analysis, the user must first develop a hydraulic model of the river reach that contains the bridge. This model should be calibrated to the fullest extent possible in order to accurately determine the hydraulics of the river reach. Once this model is developed, the bridge scour computations can then be performed.
The scour computations in HEC-RAS are comprised of three components: contraction scour, pier scour, and abutment scour. The scour equations for these components are based upon the methods outlined in Hydraulic Engineering Circular No. 18 (FHWA, 1995). The program does not have the capability to perform long-term aggradation or degradation. The user must determine the long-term effects before applying the bridge scour computations in HEC-RAS. The procedures for performing long-term effects are discussed in the HEC No. 18 publication.
This example will focus upon the analysis of the bridge scour. The modeler is referred to chapter 6 of the User's Manual and to chapter 5 of the Hydraulic Reference Manual for additional discussion on modeling bridges. Additionally, the modeler is referred to chapter 12 of the User's Manual, chapter 10 of the Hydraulic Reference Manual, and to HEC No. 18 for further discussion on the scour computations.
This example is adapted from the example problem contained within the HEC No. 18 publication. To review the data files for this example, from the main HEC-RAS window, select File and then Open Project. Go to the directory in which you have installed the HEC-RAS example data sets. From the "Applications Guide\Example 11 – Bridge Scour" subdirectory, select the project labeled "Bridge Scour - Example 11." This will open the project and activate the following files:
Plan: "Scour Plan 1"
Geometry: "Base Geometry"
Flow: "100-Year Discharge"
Hydr Design: "Hydraulic Design Data"
Geometric Data
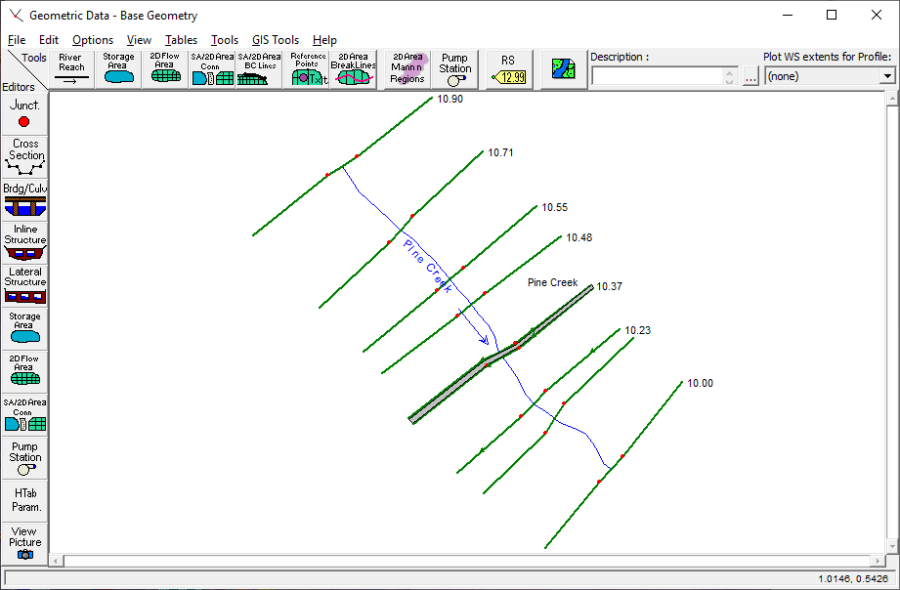
To view the geometric data for the river system, from the main program window select Edit and then Geometric Data. This will activate the Geometric Data Editor and display the river system schematic as shown in the figure below. The schematic displays the nine river stations along the reach of Pine Creek, with river station 10.90 as the upstream section. The user can view the cross section data for each river station by selecting the Cross Section icon on the left side of the Geometric Data Editor.
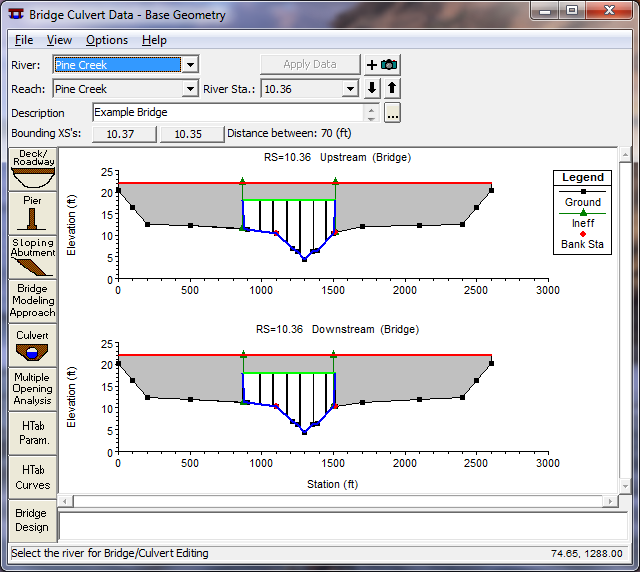
Along this reach of Pine Creek, a bridge was entered at river station 10.36. The bridge data were entered by selecting the Brdg/Culv icon on the left side of the Geometric Data Editor. This activated the Bridge/Culvert Data Editor as shown in the figure below. Then, the bridge information for the deck/roadway, piers, sloping abutments, and bridge modeling approach were entered by selecting the appropriate icons on the left side of the Bridge/Culvert Data Editor. The bridge opening between the sloping abutments is approximately 600 feet wide and the bridge is supported by six piers, each with a width of 5 feet. The high and low cord values for the bridge deck are 22 and 18 feet, respectively. The user can select the appropriate icons to review the bridge data.
After all of the geometric data had been entered, the editors were closed and the geometry was saved as "Base Geometry." Next, the steady flow data were entered.
Steady Flow Data
To enter the steady flow data, from the main program window Edit and then Steady Flow Data were selected. This activated the Steady Flow Data Editor and one profile with a flow value of 30000 cfs was entered. This flow rate represents the 1 percent chance event (100-year discharge) for the river reach. Next, a downstream boundary condition was entered as Normal Depth with a slope of 0.002 ft/ft. Then, the flow data were saved with a title of "100-Year Discharge."
Steady Flow Analysis
After the geometric and steady flow data were entered, the steady flow analysis was performed. First, Run and then Steady Flow Analysis were selected from the main program window. Then, a Short ID was entered as "Plan 01" and a subcritical analysis was selected. Next, Options and then Flow Distribution Locations were selected from the Steady Flow Analysis Window. This activated the Flow Distribution Editor as shown in the following figure.
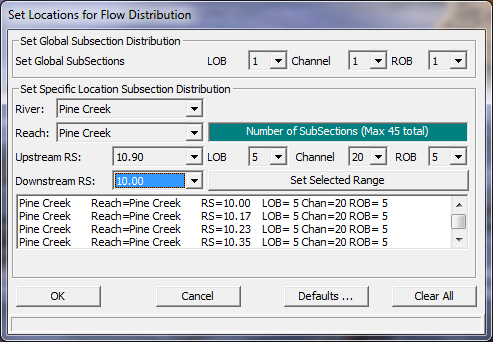
To perform the bridge scour calculations, the program requires detailed values of the depth and velocity within the cross sections located just upstream from the bridge (cross section 10.37 for this example) and at the approach section (cross section 10.48). Therefore, the modeler is required to set the flow distribution option for these two cross sections. For this example, the flow distributions were selected for the entire river reach. As shown in the figure above, the left and right overbanks were divided into 5 subsections each, and the main channel was divided into 20 subsections. This will allow the program to produce detailed results of the distribution of depth and velocity at the cross sections.
The number of subsections is dependent upon such factors as the cross section geometry, the bridge opening width, and the number of piers. The modeler should perform the hydraulic calculations with different numbers of subsections to evaluate the impact on the bridge scour results. It is recommended to use fewer subsections, however, an adequate number of subsections is required to determine the hydraulic properties. For this example, the bridge scour calculations were also performed using 20 subsections for the main channel, and no appreciable changes were observed in the scour results. For a further discussion on the flow distribution option, the modeler is referred to chapter 7 of the User's Manual and to chapter 4 of the Hydraulic Reference Manual.
Finally, the flow distribution editor was closed and the data were saved as a plan entitled "Scour Plan 1." The COMPUTE button was then selected to execute the analysis.
At this point, the modeler should review the output from the hydraulic analysis and calibrate the model. It is important to obtain a good working model of the river system before attempting to perform a bridge scour analysis. For this example, the hydraulic analysis included the evaluation of the expansion and contraction reach lengths according to the procedures as outlined in the Hydraulic Reference Manual. Finally, after a working model has been developed, the user should evaluate the long-term aggradation or degradation for the river reach and incorporate this analysis into the working model.
Hydraulic Design - Bridge Scour
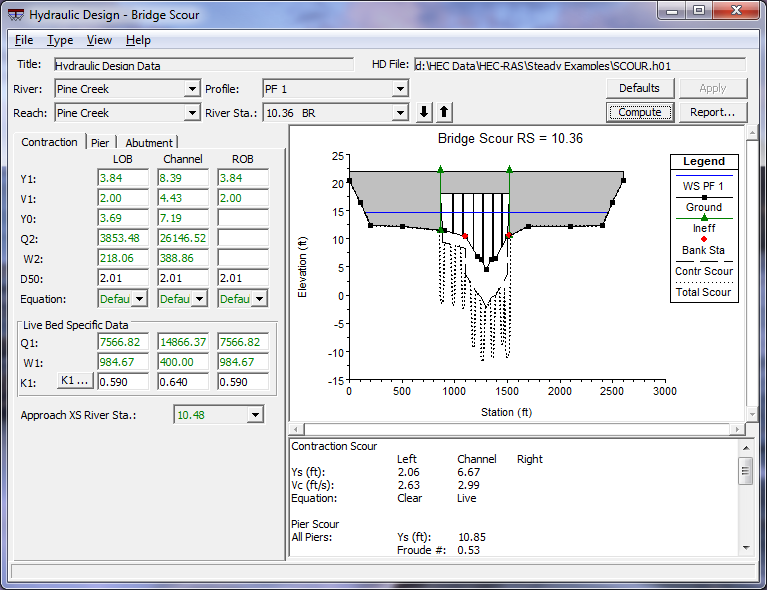
After a working model of the river reach is developed and the long-term effects for the river system are evaluated, the modeler can perform the bridge scour computations. The scour computations are performed by selecting Run, Hydraulic Design Functions, Functions, and then Scour at Bridges. This will activate the Bridge Scour Editor as shown in the figure below.
The top of the editor is used to select the River, Reach, River Station, and Profile number for the scour analysis. For this example, the river and reach is Pine Creek, the bridge is located at river station 10.36, and the scour analysis was for the first profile.
The remaining portion of the editor is divided into three areas: input data tabs, a graphic, and a results window. There are three tabs, one for each of the three types of scour computations: contraction, pier, and abutment. The graphic displays the bridge cross section (inside upstream). When the Compute button is selected, the scour results will be displayed graphically on the cross section and in tabular format in the results window. The following sections describe the parameters for each of the three data tabs.
Contraction Scour
Contraction scour occurs when the flow area of a stream is reduced by a natural contraction or bridge constricting the flow. There are two forms of contraction scour: live bed and clear water. The equations for the contraction scour are presented in chapter 10 of the Hydraulics Reference Manual and the variables for the equations are listed on the left side of the contraction tab, as shown in the figure above. Additionally, the contraction tab is divided into three columns: for the LOB (left overbank), main channel, and ROB (right overbank). This allows the program to calculate the contraction scour for each of the three areas of the cross section.
When the Bridge Scour Editor is activated, the program will search the output file from the hydraulic analysis and fill in the values for the variables on the contraction tab with the appropriate results, as shown in the figure above. (Note: As shown in the figure, the values for Y0, Q2, and W2 are zero for the ROB because the right sloping abutment extended into the main channel.)
The user can override any of these values by simply entering in a new value at the appropriate location. For the contraction scour analysis, the user is only required to provide the D50 mean size fraction of the bed material, the water temperature for the K1 factor, and select the equation to be used for the analysis.
For this example, the D50 was entered as 2.01 mm, for each of the LOB, main channel, and ROB. To enter the water temperature, the K1 icon was selected and this activated the K1 Data Editor as shown in the figure below. As shown, the water temperature was entered as 60oF and then the program automatically determined that the K1 value was 0.59, 0.59, and 0.59 for the LOB, main channel, and ROB, respectively. This editor was then closed.
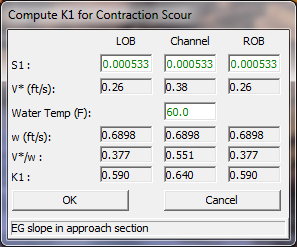
Finally, the down arrows adjacent to Equation were selected and the default option was chosen. This informed the program to use either the clear water or the live bed scour equation as determined from equation 10-1 in the Hydraulic Reference Manual.
To perform the contraction scour computations, the Compute button at the top of the editor was selected. When the calculations were completed, the results appeared in tabular form in the lower right corner of the editor and in graphical form on the bridge cross-section plot, as shown in the first figure above.
As a review of the results for the contraction scour, the critical velocity (Vc) for the LOB was determined to be 2.63 ft/s, from equation 10-1. This value is greater than the velocity at the approach section (V1 = 2.00) in the LOB; therefore the clear water scour equation was used for the LOB, as listed in the summary table. Comparatively, the live-bed scour equation was used for the main channel because the critical velocity (Vc = 2.99) was less than the approach section velocity (V1 = 4.43), in the main channel. Finally, the contraction scour depth (Ys) was determined to be 2.07 and 6.67 feet for the LOB and main channel, respectively. As a final note, there was no contraction scour in the ROB because the right abutment extended into the main channel. These contraction scour depths are also shown on the graphic display of the bridge cross section in the first figure.
Pier Scour
To enter the data for the pier scour analysis, the Pier Tab was selected. This tab is shown in the figure below. For the pier scour analysis, the modeler has the option of using either the CSU or the Froehlich equation. As for the contraction scour tab, the program will automatically fill in the values for the variables from the results of the hydraulic analysis. The user may replace any of these values by changing the value in the appropriate field.
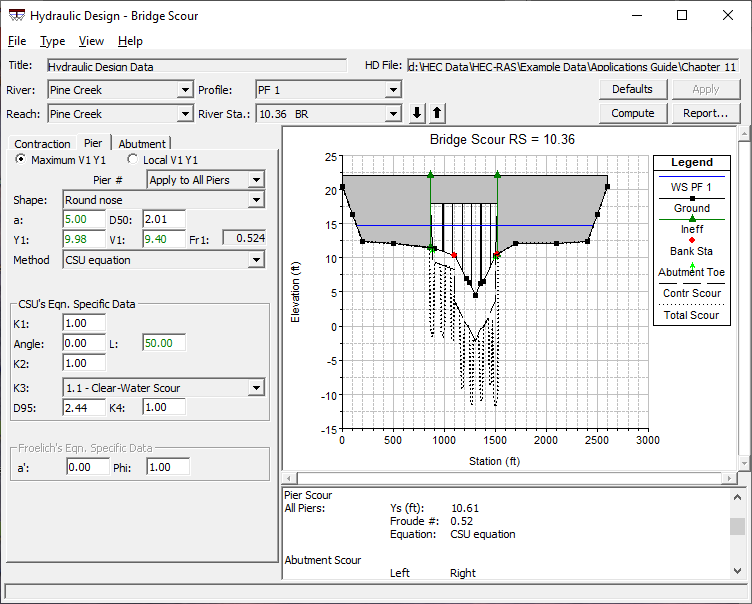
For this example, the Maximum V1 Y1 option was selected to inform the program to use the maximum value of the depth and velocity values, as opposed to the values upstream from each pier. Then, Method was selected as the "CSU equation." Next, the Pier # option was selected as "Apply to All Piers" to inform the program that the data will be used for all of the piers. (The user has the option of entering the data for each individual pier.)
Next, the Shape of the piers was selected as "Round nose" which set the K1 value to be 1.00. Then, the D50 was entered as 2.01 mm. The angle was set to be 0 degrees which set the K2 value to be 1.00. Next, the bed condition was selected as "Clear-Water Scour" (this set K3 = 1.1) and the D95 was entered as 2.44 mm.
This completed the required user input and then the Compute button was selected. The results were then displayed graphically and in the summary table and showed that the pier scour depth (Ys) was 10.61 feet, as shown in the figure above. (Note: When the compute button was selected, the program automatically computed all 3 scour depths: contraction, pier, and abutment.)
Abutment Scour
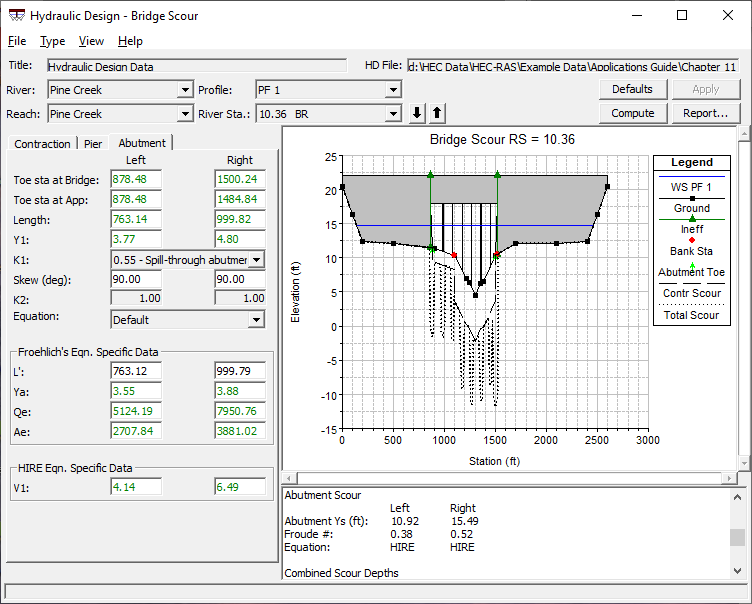
To enter the data for the abutment scour, the Abutment Tab was selected and is shown in the figure below. For the abutment scour computations, the program can use either the Froehlich or the HIRE equation. The variables for the equations appear on the left side of the tab and their values for the left and right abutment were automatically obtained from the hydraulic analysis results.
To perform the abutment scour analysis, the user must enter the abutment shape, the skew angle, and select the equation to be used. For this example, the shape (K1) was selected as "Spill-through abutment." This set the K1 value to be 0.55. Then, the Skew angle was entered as 90 degrees and this set K2 to be 1.00, for both the left and right abutment. Finally, the Equation was selected as "Default." With this selection, the program will calculate the L / y1 ratio to determine which equation to use. The modeler is referred to chapter 10 of the Hydraulic Reference Manual for a further discussion on the scour equations.
This completed the data entry for the abutment scour and the Compute button was selected. The results were then displayed on the graphic and in the summary table, as shown in the figure below. The results show that the HIRE equation was used for both the left and right abutment and the magnitude of the scour was 10.92 and 15.49, respectively. Additionally, the summary table displayed the values of the Froude numbers used for the calculation.
Total Bridge Scour
The total bridge scour is the combination of the contraction scour and the local scour (pier or abutment). To review the total scour, the user can toggle to the bottom of the summary table. For this discussion, a portion of the summary table is shown as Table 11.1. This table was obtained by selecting Copy Table to Clipboard under the File menu.
| Contraction Scour | |||
|---|---|---|---|
| Left | Channel | Right | |
| Ys: | 2.06 | 6.67 | |
| Eqn: | Clear | Live | Default |
| Pier Scour | ||
|---|---|---|
| All Piers: | Ys= | 10.85 |
| Eqn= | CSU equation | |
| Abutment Scour | ||
|---|---|---|
| Abutment Ys: | 10.92 | 14.88 |
| Equation | HIRE | HIRE |
| Combined Scour Depths | |
|---|---|
| Pier Scour + Contraction Scour | |
| Left Bank: | 12.67 |
| Channel: | 17.28 |
| Left abut + contr: | 12.98 |
| Right abut + contr: | 22.16 |
The first three portions of the table display the results of the contraction, pier, and abutment sour, as discussed previously. The final portion of the table displays the combined scour depths. For this example, the pier and contraction scour was 12.67 feet (= 10.61 + 2.06) for the left bank and 17.28 feet (= 10.61 + 6.67) for the main channel. Additionally, the total left abutment and contraction scour was 12.98 feet (= 10.92 + 2.06) and the right abutment and contraction scour was 21.55 feet (= 14.90 + 6.67). The contraction scour for the right abutment was the contraction scour for the main channel because the right abutment extended into the main channel.
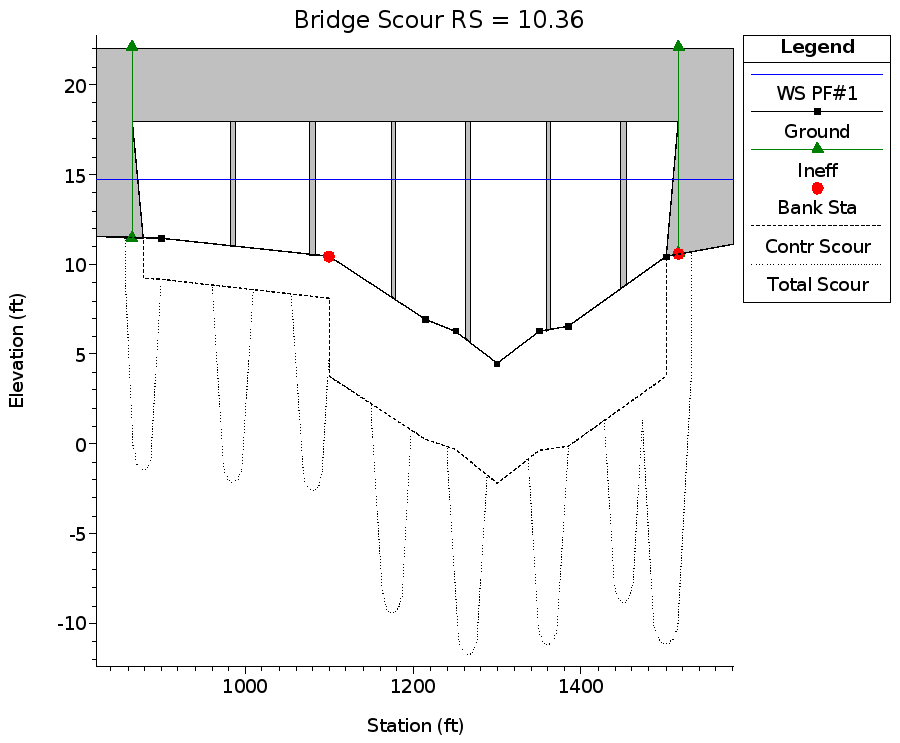
Finally, the total scour is displayed graphically, as shown in the figure below. (Note: The graphic has been zoomed in to see more detail.) As shown in the legend, the long dashed line represents the contraction scour and the short dashed line portrays the total scour. This graphic was obtained by selecting Copy Plot to Clipboard from the File menu.
Summary
To perform the bridge scour computations, the user must first develop a model of the river system to determine the hydraulic parameters. Then, the program will automatically incorporate the hydraulic results into the bridge scour editor. The user can adjust any of the values that the program has selected. For each particular scour computation, the modeler is required to enter only a minimal amount of additional data. The results for the scour analysis are then presented in tabular form and graphically. Finally, the user can select Detailed Report from the Bridge Scour Editor to obtain a table displaying a full listing of all the input data used and the results of the analysis.
