Download PDF
Download page Multiple Openings - Example 5.
Multiple Openings - Example 5
This example demonstrates the analysis of a multiple opening. An opening is comprised of a bridge, a group of culverts, or a conveyance area (open channel flow other than a bridge or culvert). The program can analyze up to seven openings occurring at the same river station, and any number of bridge and culvert openings can be used. However, the program is limited to a maximum of two conveyance-type openings.
Data entry for a conveyance-type opening and a bridge opening are similar to the procedures used for Example 1 and Example 2, respectively. Entering data for a culvert group is similar to the procedures used for Examples 3 and 4. Therefore, it is recommended that the modeler be familiar with Examples 1 through 4 before continuing with this example.
To activate the data files for this project, from the main HEC-RAS window, select File and then Open Project. Go to the directory in which you have installed the HEC-RAS example data sets. From the "Applications Guide\Example 5 – Multiple Openings" subdirectory, select the project labeled "Multiple Openings - Example 5." To begin this example, the final results from the pressure/weir flow bridge analysis of Example 2 were used as the base starting conditions. These data files are included with this example as:
Plan: "Base Conditions"
Geometry:"Beaver Cr. + Single Bridge"
Flow: "Beaver Cr. - 3 Flows"
During the maximum flow event of 14000 cfs for Example 2, the flow overtopped the roadway. For this current example, additional openings of a culvert group and a relief bridge were provided so that the flow did not overtop the roadway. These additional openings were included with the existing bridge opening at the same river station.
To perform this current example, the geometry file "Beaver Cr. + Single Bridge" was activated. Then, the procedures as outlined in this example were performed. Finally, the geometry was then saved as "Culvert Group + Relief Bridge." This geometry file and the steady flow data file "Beaver Cr. - 3 Flows" were then saved as a new plan entitled "Modified Conditions." This final plan, with the multiple opening geometry, is included with the project.
 Example 5 - Multiple Openings.zip
Geometric Data
To perform the analysis, the geometric data were entered first. This data consists of the river system schematic, the cross section geometry, and the placement of the cross sections in relation to the bridge and culverts. Each of these geometric data components are described in the following sections.
River System Schematic
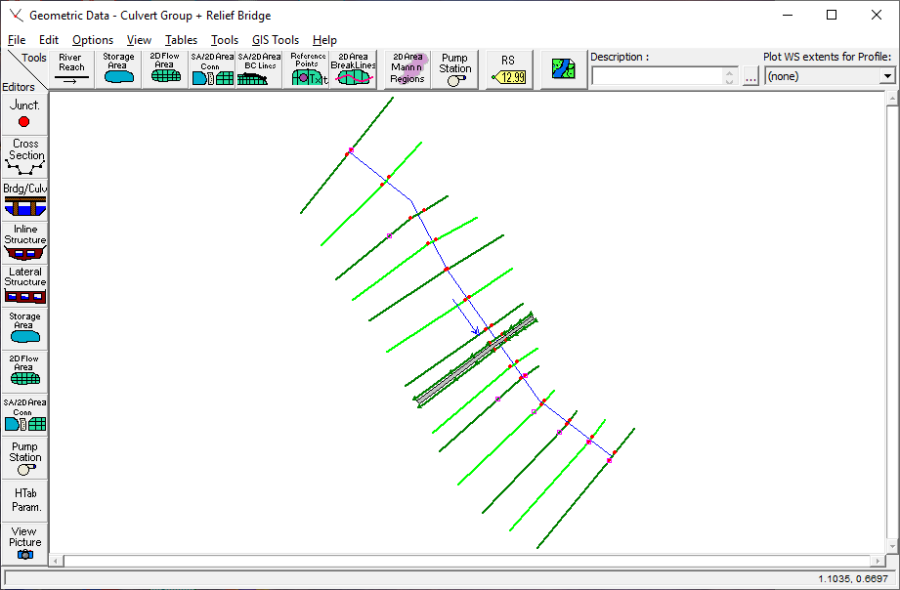
From the main program window, select Edit and then Geometric Data. This will display the river system schematic as shown in the figure below. The river reach is defined by 12 river stations with river mile 5.0 as the downstream cross section, as developed during Example 2. Additionally, there is a bridge at river station 5.40, which is exactly as described during Example 2.
Cross Section Geometry
The cross section geometry consists of the cross section X-Y coordinates, reach lengths, Manning's n values, main channel bank stations, contraction and expansion coefficients, levees, etc. Each of these items are exactly as described for the cross sections in Example 2. (Note: The ineffective flow areas will be adjusted subsequently.)
Placement of the Cross Sections
The placement of the cross sections in reference to a bridge or culvert opening is crucial for the accurate calculation of the energy losses through the structure. As described during Example 2, the expansion and contraction reach lengths were adjusted to properly locate the cross sections in the vicinity of the bridge. For this current example, the expansion and contraction reach lengths will be adjusted to account for the inclusion of a culvert group and a flow relief bridge. This adjustment of the reach lengths was performed after the bridge and culvert data were entered and will be discussed in a subsequent section of this current example.
Bridge Geometry
The bridge geometry is composed of the deck/roadway data, the pier and abutments, and the bridge modeling approach. Each of these items will be discussed in the following sections.
Deck/Roadway Data
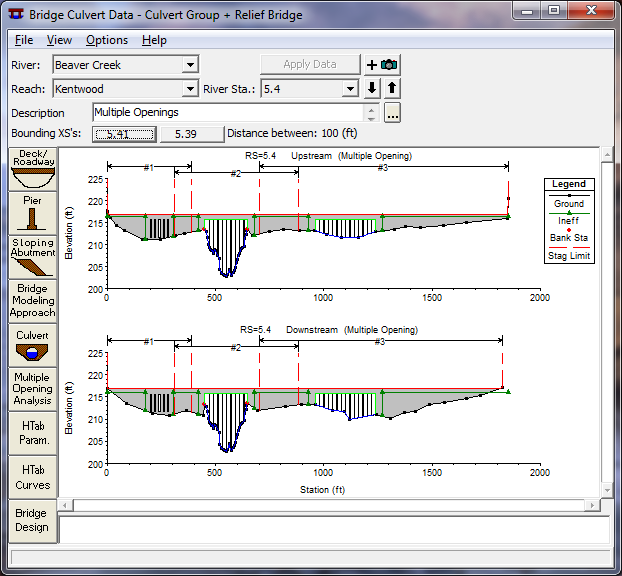
From the Geometric Data Editor, select the Brdg/Culv icon. This will activate the Bridge/Culvert Data Editor as shown in the top figure shown below. During Example 2, the reach of "Kentwood" was selected and a bridge was placed at river station of 5.40. Then the deck/roadway data were entered by selecting the Deck/Roadway icon on the left side of the editor. The deck and roadway data for the main bridge are identical to the data entered for Example 2.
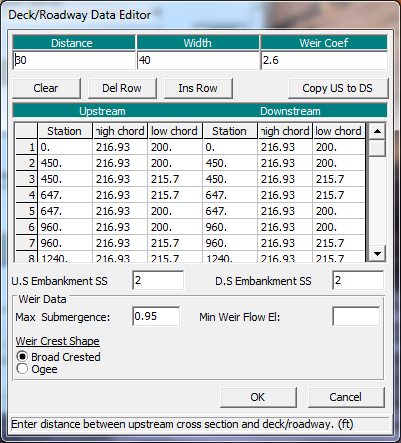
For the current example, a flow relief bridge was added at river station 5.40. To add this bridge, first the bridge deck and roadway data were entered by selecting the Deck/Roadway icon. This activated the Deck/Roadway Data Editor as shown the bottom figure. The additional high and low cord information for the second bridge was then added to provide for an opening for the second bridge. This was accomplished by scrolling down to the end of the existing data and then entering the stations and elevations for the high and low cords of the second bridge. The data appears in the bottom figure, showing the bridge opening from X-coordinates of 960 to 1240, with the low and high cords of 215.7 and 216.93 feet, respectively. (These values are the same as used for the first main bridge.) After the data were entered, the editor was closed. It should be noted that the distance, width, weir coefficient, and other parameters of the Deck/Roadway Data Editor will be the same for the second bridge as for the first bridge.
Piers and Abutments
The next step was to enter the pier data. This was accomplished by selecting the Pier icon on the left edge of the Bridge/Culvert Data Editor (the editor shown in the top figure above). During Example 2 for the first bridge, each of the nine piers was entered with a starting elevation of 200 feet and an ending elevation of 216 feet, and a width of 1.25 feet. The piers were located starting at a centerline station of 470 and were placed at a distance of 20 feet on center, yielding an ending centerline station of 630. To add the piers for the second bridge, for this current example, the Pier icon was selected and the Add button was chosen. This created a new pier (#10) and the centerline station was set at 980. The starting (200 feet) and ending (216 feet) elevations for this pier were the same as for the other piers. As before, the elevations were chosen to be below the ground level and inside the bridge decking. The program will automatically remove the pier area below the ground and inside the decking. Finally, the Copy button was selected to enter a total of 13 additional piers, 20 feet on centers, ending at a centerline station of 1220. (The bridge opening ended at an X-coordinate of 1240 feet.) This completed the addition of the new piers for the flow relief bridge.
Finally, any sloping abutments should now be entered for the analysis by selecting the Sloping Abutment icon the left side of the Bridge Culvert Data Editor. For this example, the bridge geometry did not include sloping abutments.
Bridge Modeling Approach
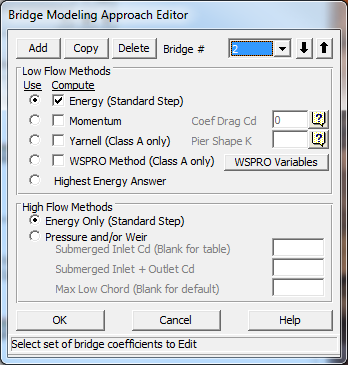
From the Bridge/Culvert Data Editor, select the Bridge Modeling Approach icon. This will activate the Bridge Modeling Approach Editor. For a multiple opening analysis, if only one bridge modeling approach is developed, then the program will default to use that approach for all of the bridges. Alternatively, the user can develop an approach (coefficient set) for each of the bridges in the river station. For this current example, the Add button was selected at the top of the editor for the main bridge (as developed during Example 2) and this created a second bridge modeling approach, which is shown in the figure below. The data entered for this second bridge modeling approach are shown in the figure below.
This completed the input required for the bridge geometry and the OK button was selected at the bottom of the editor. Next, the culvert geometry was entered.
Culvert Geometry
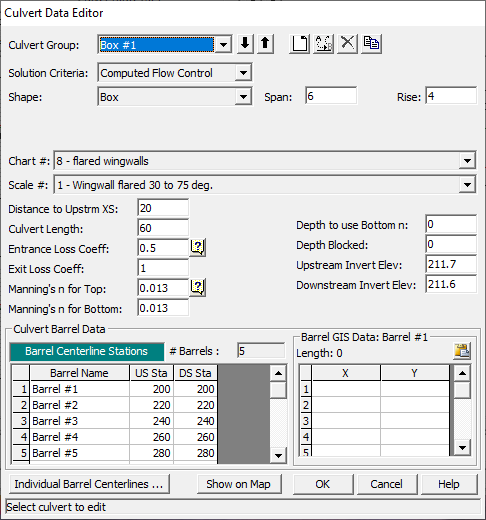
o enter the culvert geometry, the Culvert icon was selected from the Bridge/Culvert Data Editor. This activated the Culvert Data Editor as shown in the figure below. The procedure for entering the culvert data is similar to the procedures as used during Examples 3 and 4. The following is a brief summary of the steps used to enter the culvert data for this current example.
The first culvert ID will automatically be set to "Culvert #1." This was changed to "Box #1" by selecting the Rename button. Then the Solution Criteria was selected as "Highest Upstream Energy" and the Shape "Box " was selected. A rise of 4 feet and a span of 6 feet were then entered. Chart number 8 and Scale number 1 were selected to describe the FHWA standard culvert parameters. Additionally, the Distance to Upstream XS was entered as 20 feet, Length was measured to be 60 feet, the Manning's n - Value was set at 0.013, and the Entrance and Exit Loss Coefficients were set at 0.5 and 1.0, respectively. The upstream and downstream Invert Elevations and the upstream and downstream Centerline Stations were entered for each of the 5 identical barrels, as shown in the figure, and the # identical barrels displayed a value of 5.
It should be noted that if the multiple opening analysis had been configured as a bridge in between two culvert groups, then the two culvert groups should be entered as separate culvert types. This will enable the program to distinguish between the different opening locations. Upon entering the culvert information, the OK button was selected to exit the culvert editor.
Finally, the user should highlight the piers and bridge openings from the View menu of the Bridge/Culvert Data Editor. Then, zoom in to view each of the bridge openings and the culvert barrels. This will enable the user to view any inconsistencies that may have developed during the data entry. This completed the data entry for the culverts. Next, the openings were defined for the multiple flow analysis.
Multiple Openings
For the multiple opening analysis, the user must define the stagnation limits for the flow separation into each of the openings. After these limits were defined, the ineffective flow areas and the Manning's n values were adjusted to account for the multiple openings. Each of these is discussed in the following sections.
Stagnation Limits
As the flow approaches the river station that contains a multiple opening, the total flow will divide upstream from the multiple openings so that a portion will enter into each opening. Therefore, to perform the multiple opening analysis, the user must enter a left and right station for each opening which defines the X-coordinate range of the flow separation. The specific X-coordinate where the flow separates is called the stagnation point and this stagnation point is either determined by the program or set by the user. To perform the multiple opening analysis, from the Bridge/Culvert Data Editor, select the Multiple Opening Analysis icon. This will activate the Multiple Opening Analysis Data Editor as shown in the following figure.
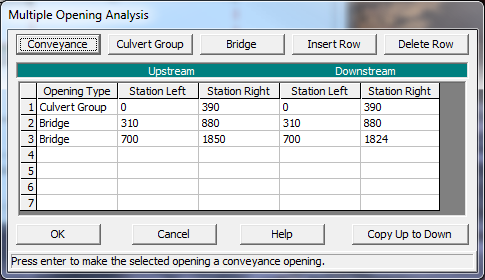
First, the order of the openings are established from left to right as looking in the downstream direction. For this example, there were three openings: a culvert group, the main bridge opening, and then the relief bridge opening. To enter the data, the field under "Opening Type" and adjacent to number 1 was selected. Then, the Culvert Group icon was selected, because the first opening type was a culvert. This placed the description "Culvert Group" in the first row, under the heading "Opening Type."
Next, the upstream left and right stagnation limits were entered for the culvert group. These left and right stations will be used to determine where the flow separated between the culvert group and the bridge. For this example, the left and right stagnation limits were established as 0 and 390. Additionally, the downstream left and right stagnation limits were also entered as 0 and 390. The downstream stations define the X-coordinate limits where the flow from consecutive openings will rejoin.
Next, the field under "Opening Type" and adjacent to row number 2 was selected. Then, the Bridge icon was selected and the description "Bridge" appeared as the second opening type. The left and right stagnation limits were entered for the bridge as 310 and 880 for both the upstream and downstream side. Finally, the third opening was selected as "Bridge" and the data entered as shown in the figure above.
As can be seen in the figure above, the right stagnation limit for the culvert group was set at 390 and the left stagnation limit for the main bridge was set at 310. This created an overlap area from 310 to 390. Since this overlap exists, the program will determine the actual location of the stagnation point (the flow separation point) between the culvert and the main bridge. By entering the data in this fashion, the stagnation point was then allowed to vary for each flow profile, within the limits from 310 to 390. Conversely, if the right stagnation limit of an opening coincides exactly with the left stagnation limit of the next opening, then the user has defined a specific stagnation point and this point will be fixed for all flow profiles. For a conveyance type opening, in the current version of the program, a fixed stagnation point must be used on both sides of the opening. For a further discussion on multiple opening analyses, refer to Chapter 6 of the User's Manual and Chapter 7 of the Hydraulic Reference Manual.
Once all of the data were entered into the Multiple Opening Analysis Data Editor, the OK button was selected. Then the locations of the stagnation limits can be viewed in the display of the Bridge/Culvert Data Editor as shown in . The limits selected for the stagnation points for each opening are shown above the two cross section plots.
For guidance on selecting the stagnation limits, there are two main objectives. First, there is a physical limit. This implies that there might exist a physical attribute of the openings on the cross section that can be used to determine the stagnation limits. For example, the left stagnation limit for the culvert was set at the left edge of the cross section. Additionally, the right stagnation limit for the culvert cannot be placed in the main bridge opening. This would imply that the flow in front of the bridge would go over to the culvert and this is not a practical. Therefore, a physical right stagnation limit for the culvert would be the left side of the main bridge opening.
Secondly, for guidance on selecting the stagnation limits, there exists practical limits. For example, the flow in the cross section in between the culvert and the main bridge must separate at some point to travel into either opening. Since the bridge opening is larger than the culvert opening, more of the flow will probably go towards the bridge opening. Therefore, the right stagnation limit for the culvert should not be set all the way over to the left edge of the main bridge opening. The right limit for the culvert should be located at a practical limit before the bridge opening. This practical limit can be determined by analyzing the amount of conveyance in the area between the culvert and the bridge, and then developing a reasonable estimate of where the stagnation limit should be placed.
Finally, it is recommended that the user allow the stagnation points to migrate (where possible) rather than enter specific fixed stagnation points. This is important when evaluating several flows during the same run. Conversely, if the stagnation limits are allowed to migrate over a large distance, the program may experience difficulty in converging to a solution. When this occurs, the overlaps of the stagnation limits should be reduced.
Ineffective Flow Areas
Before a steady flow analysis was performed, the ineffective flow areas were located. From the Geometric Data Editor, select the Cross Section icon and then toggle to river station 5.41. This is the river station immediately upstream of the multiple opening. For this example, blocked ineffective flow areas were set as shown in the figure below.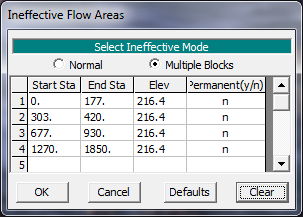
Four ineffective flow area blocks were established at this river station. These were located: to the left of the culvert group, in between the culvert group and the main bridge, in between the main bridge and the relief bridge, and finally to the right of the relief bridge. It should be noted that during a multiple opening analysis, the ineffective flow areas need to be described using the block method, not the normal method. The block method allows the user to enter ineffective flow areas in between the openings. Finally, ineffective flow blocks were defined at river station 5.39 (located downstream of the multiple opening). These ineffective blocked areas are shown as connected green lines on the Bridge/Culvert Data Editor (seen in Bridge Geometry in Example 5).
The ineffective flow areas could have been entered along with the cross section geometry (X and Y - coordinates, etc.); however, for this example, the locations for the culvert group and relief bridge were established first. Then, the locations of the ineffective flow areas were more readily ascertained from the locations of the culverts and bridges.
Manning's n Values
Due to the inclusion of the culverts and relief bridge, the Manning's n values in the overbank areas in the vicinity of the bridge were adjusted. It was assumed that during installation of these relief openings, portions of the densely forested overbank areas would be cleared for construction access and to allow the flow to enter the culverts and relief bridge. Therefore, the n values in the overbank areas at river stations 5.41, 5.39, and 5.33* were adjusted to an appropriate value to represent the expected conditions.
Cross Section Locations
As discussed previously, the placement of the cross sections in reference to a bridge or culvert opening is important for the accurate calculation of the energy losses through the structure. For this example, it will be considered that the majority of the flow will travel through the main bridge opening at the multiple opening river station. Therefore, the expansion and contraction reach lengths for the high flow event will be determined based on the main bridge opening. The following sections describe the procedures used to determine the expansion and contraction reach lengths as well as the expansion and contraction coefficients.
Expansion Reach Length
To determine an initial estimate for the expansion reach length, the procedures as outlined in the USACE research document \[HEC-1995\] will be implemented. These procedures are discussed in Appendix B of the *Hydraulic Reference Manual{*}. First, the expansion ratio (ER) was estimated using the expansion ratio table (Table B.1). To determine the ER, the following parameters were necessary:
| b=200 \ ft \\ B = 850-310=540 \ ft \\ b/B=200/540=0.36 \\ S=8 \ ft/mi \\ n_{ob}/n_c = 1.75 \\ L_{obs} = \left[ \left(450-310 \right) + \left(850-647 \right) \right] = 170 \ ft |
where
b = main bridge opening width, ft
B = floodplain width contributing to flow through the main bridge, ft
S = slope, ft/mi
n_{ob} = Manning's n value of the overbanks
n_c = manning's n value of the overbanks
L_{obs} = average obstruction reach length for the floodplain width contributing flow through the bridge, ft
The main bridge opening width, b, is obtained from the bridge geometric data and was determined to be 200 feet. The floodplain width for this scenario, B, will be the width of flow that contributes to the main bridge opening and is the distance from the left stagnation point to the right stagnation point of the main bridge opening. Since these stagnation points were entered as floating values, an approximate location was assumed for this initial determination of the expansion reach length and the value was estimated as 540 feet. Additionally, the average length of the side obstructions, was estimated at 170 feet. This value was determined by only considering the floodplain width between the left and right stagnation points for the main bridge. Finally, the b/B ratio and the slope of the river reach are used to determine an initial estimate of the expansion ratio from the "Ranges of Expansion Ratios," Table B.1 in Appendix B of the *Hydraulic Reference Manual{*}. From the table, the ER was found to range from 1.3 - 2.0. An average value of 1.7 was used and this resulted with an expansion reach length, L_e, of:
| L_e = \left( CR \right) \left( L_{obs} \right) = \left( { 1.7 \right) \left( 170 \right) = 290 \ ft |
For this example, the expansion reach length is the main channel distance from cross section 5.39 to cross section 5.24* which equals 778 ft. Therefore, an additional cross section was added at a distance of 290 feet downstream from cross section 5.39 based on the estimated expansion reach length as determined above.
To insert the additional cross section, field data should be used. If this is not available, then the user can utilize the interpolation routines. Then, the interpolated cross section should be compared with the existing geometry and topographic maps. For this example, the interpolation method was utilized to obtain a cross section at a distance of 290 feet downstream from river station 5.39. To perform this interpolation, it would be necessary to interpolate between river stations 5.39 and 5.24*. However, the program will not allow for interpolation between an existing river station and a previously interpolated section. Therefore, the interpolation would be required from river station 5.39 to river station 5.13. Since this was a very long river reach, an alternative approach was employed by obtaining data from the USGS Atlas No. HA-601 (This atlas provided the data for Example 2.). From the atlas, the data for river station number 5.29 was entered into the existing geometry data file. Then, an interpolation was performed between river stations 5.39 and 5.29.
The interpolation procedure was performed by opening the Geometric Data Editor, then selecting the Cross Section icon, Options, then Add a new Cross Section. River station 5.29 was entered as the new location for the cross section and the data for river station 5.29 were entered, with the downstream reach lengths being from river station 5.29 to 5.13*. Since river station 5.29 was added, the existing reach lengths for river stations 5.39 were adjusted to 320, 500, and 580 feet for the LOB, main channel, and ROB, respectively. Then, from the Geometric Data Editor, the following was selected: Tools, XS Interpolation, Between 2 XS's. The upper river station was set to be 5.39 and this caused the lower river station to be 5.29. A maximum distance of 100 feet was entered and the interpolation was performed. This yielded 4 new river stations between 5.39 and 5.29, each 100 feet apart. The interpolated river stations of 5.37*, 5.35*, and 5.31* were deleted and the program adjusted the reach lengths accordingly. This produced the river station 5.33*, located 300 feet downstream from river station 5.39. For further discussion on the interpolation procedures, refer to Chapter 6 of the User's Manual and Chapter 4 of the Hydraulic Reference Manual. The goal was to obtain a river station 290 feet downstream from 5.39, and this distance of 300 feet was determined to be appropriate for an initial location.
Contraction Reach Length
To determine an initial estimate for the contraction reach length, a similar procedure as for the expansion reach length was used. From Table B.2 "Ranges of Contraction Ratios," it was determined that the contraction ratio (CR) ranged from 0.8 to 1.4. An average value of 1.1 was selected and this yielded a contraction reach length, L_c , of:
| L_c = \left(CR \right) \left(L_{obs} \right) = \left(1.1 \right) \left(170 \right) = 190 \ ft |
For the current example, the contraction reach length is the distance from river station 5.49* to river station 5.41, a main channel distance of 478 feet. Therefore, a new cross section, located a distance of 190 feet upstream from river station 5.41 was inserted. The data for this new cross section was obtained from the USGS atlas, namely river mile 5.44. This river station is located 170 feet upstream from river station 5.41 and was considered appropriate for an initial estimate of the contraction reach length. Finally, the reach length values for river station 5.61 were adjusted to account for the inclusion of the new cross section.
Coefficients of Expansion and Contraction
The coefficients of expansion and contraction are used by the program to determine energy losses due to the change in cross sectional area of the flow. In the vicinity of the bridge and culvert openings, the expansion and contraction coefficients were chosen as 0.5 and 0.3, respectively. These values represent coefficients in a range between a typical bridge section and an abrupt transition. In the areas throughout the remaining portion of the river reach, the expansion and contraction coefficients were set at 0.3 and 0.1, respectively. All of these values are initial estimates and should be reviewed by the user to determine their impact on the resulting water surface elevations.
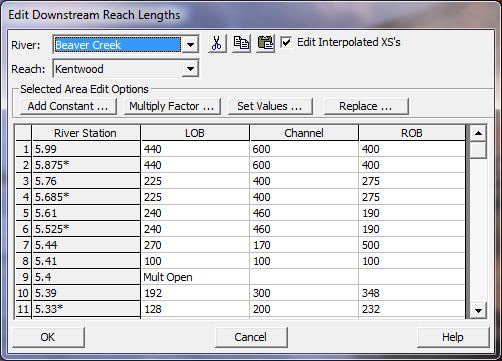
After the expansion and contraction reach lengths were modified and the expansion and contraction coefficients were determined, the adjusted geometry was saved as a file entitled "Culvert Group + Relief Bridge." Then, this geometry file and the steady flow data file were saved as a new plan entitled "Modified Conditions." By saving new files, the original data set obtained from Example 2 remained unchanged and this will allow for a comparison between the multiple opening data and the data that contained just the single bridge geometry. Finally, by activating the new adjusted geometry plan, the user can view the reach lengths by activating the Geometric Data Editor, and then selecting Tables, and Reach Lengths. This table is shown in the figure below. Similarly, the coefficients can be viewed by selecting Tables and then Coefficients.
Steady Flow Analysis
After all of the geometric data were entered, the steady flow data file was created. From the main program window, select Edit and then Steady Flow Data. Three profiles were selected to be calculated with flows of 5000, 10000, and 14000 cfs. Then, the downstream boundary conditions were established as 209.5, 210.5, and 211.8. This steady flow data file is identical to the file produced during Example 2, and was used for this example. The user is referred to Example 2 for a further discussion on developing this steady flow data file.
Finally, the steady flow analysis was performed. From the main program window, Run and then Steady Flow Analysis was selected. A short identification for the plan was entered as "Mult Open." A subcritical flow regime was selected and the analysis was performed by selecting COMPUTE.
Multiple Opening Analysis
This example demonstrates the use of the HEC-RAS program to analyze multiple openings that occur at the same river station. Therefore, this analysis will concentrate on the review of the multiple opening output. For a detailed discussion on the review of the individual culvert and bridge openings, refer to Example 2 for the bridge analysis and to Examples 3 and 4 for the culvert analysis. This analysis will review: the evaluation of the expansion and contraction reach lengths; the water surface profiles; and finally the multiple opening profile table.
Cross Section Placement Evaluation
After the analysis was performed, the expansion and contraction reach lengths were evaluated using the regression equations outlined in the recent USACE document \[HEC-1995\] and which also appear in Appendix B of the *Hydraulic Reference Manual{*}. These reach lengths were evaluated for the main bridge opening during the largest flow event. However, the results from the regression equations did not provide reasonable results for the current example. One of the problems that arose was that the computed contraction reach lengths were longer than the expansion reach lengths. This is not reasonable because typically, the contraction reach length is shorter than the expansion reach length. This computed result may have arisen because the data for the example are not within the range of data used to develop the regression equations. The alternate equations, provided by the document, also produced inconsistent results. The regression equations were developed based on single bridge opening data sets. Therefore, they may not apply for a multiple opening bridge. The modeler should always use engineering judgment to the results obtained from these equations.
For this example, the reach lengths estimated at the beginning of the example will be used for the final analysis. These reach lengths were based on average expansion and contraction ratios for the main bridge opening. It was considered that these ratios provided a reasonable basis for estimating the expansion and contraction reach lengths. It should be noted that these reach lengths were significantly less than the reach lengths used in Example 2, with just the main bridge opening. With the multiple openings, the flow does not have to contract and expand as much as it would for a single opening.
Water Surface Profiles
From the main program window, select View and then Water Surface Profiles. This will result in the display shown in the figure below. The figure shows the three water surface profiles for the three flows of 5000, 10000, and 14000 cfs. By zooming in on the multiple opening location, it can be seen that the water surface for the high flow did not over top the bridge decking and this was the original goal for installing the relief bridge and culvert group.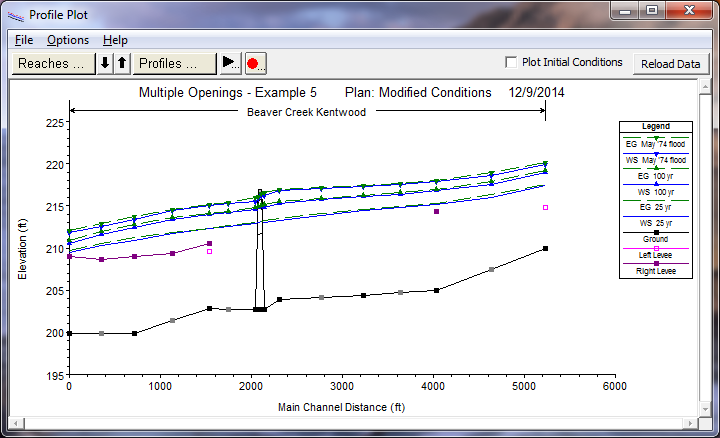
Multiple Opening Profile Table
To review the multiple opening profile table, from the main program window select View, Profile Table, Std. Tables, and then Multiple Opening. This will display the table shown in the figure below. (Note: The table columns widths in the figure below were reduced to display the full table contents in the figure. Therefore, the column headings may not reflect the full descriptions.)
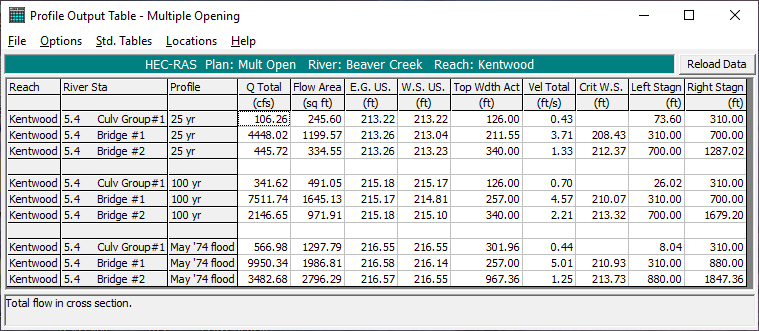
As shown in the figure above, the rows in the table are divided into three groups, one for each profile. The first three rows are for the first flow of 5000 cfs, the second group is for the flow of 10000 cfs, and the third group is for the flow of 14000 cfs. The second column in the table displays the river stations and the type of the multiple opening, in the order as they were entered in the Multiple Opening Analysis Data Editor. The third column displays the total flow rate through each of the opening types. For example, during the first flow profile (5000 cfs), there was 106 cfs flowing through the culvert group, 4448 cfs through the main bridge, and finally 446 cfs through the relief bridge. The sum of these values equals 5000 cfs.
The fifth column displays the calculated upstream energy gradeline elevation for each opening. During the multiple opening analysis, the program performs an iterative procedure to balance the upstream energy for all the openings. To do this, the program starts with an initial flow distribution through each opening and then calculates the upstream energy for each opening. If the energy values are within a specified tolerance (0.05 ft), then the solution is final. If the energy values for each opening are not within the specified tolerance, then a new flow distribution is estimated and the procedure is repeated, up to a maximum of 30 iterations. To determine the ranges for the flow distribution, the stagnation limits are used. For a further discussion on the multiple opening solution scheme, the user is referred to Chapter 6 of the User's Manual and Chapter 7 of the Hydraulic Reference Manual.
In reviewing the calculated energy gradeline values, it can be seen that for the three flow profiles, the energy gradeline elevations were balanced within the specified default tolerance of 0.05 feet. With these energy gradeline values, the program then calculates an upstream water surface elevation for each opening by subtracting the velocity head from the energy gradeline. These water surface elevations are displayed in the sixth column.
Finally, the last two columns of the multiple opening profile table display the calculated left and right stagnation points. These stagnation points are the flow distribution limits that were determined by the program in order to balance the upstream energy gradelines. For the first flow profile, it can be seen that the flow distribution was established from upstream X-coordinates of 73.6 to 310 for the culvert, from 310 to 700 for the main bridge, and from 700 to 1287.02 for the relief bridge.
For the culvert, the program used a left stagnation point of 73.6 feet. This value is the X-coordinate where the culvert water surface elevation of 213.22 intersected the left side of the cross section. The right stagnation point for the culvert was determined to be 310 feet. Therefore, in order to balance the upstream energy gradelines, the program determined that the flow rate through the culvert required an upstream conveyance that encompassed cross section station 73.6 to 310.
Similarly, for the first flow profile, the program determined that the flow through the main bridge opening would be from an upstream X-coordinate of 310 to 700 and the flow rate through the relief bridge would be from upstream X-coordinates of 700 to 1287.02. The value of 1287.02 is the X-coordinate where the relief bridge water surface elevation of 213.26 coincided with the right edge of the cross section.
Upon reviewing the left and right stagnation points for the third flow profile, it can be seen that the stagnation point between the culvert and the main bridge is a value of 310 feet as opposed to the previous value of 390. Therefore, in order to balance the upstream energy grade line elevations for the three openings, a greater portion of the total flow was required to travel through the main bridge opening during this higher flow event. Similarly, the left culvert stagnation point and the right relief bridge stagnation point have changed to reflect that the higher water surface elevations are approaching the limits of the cross section width.
Finally, the Multiple Opening Profile Table provides additional information such as the total cross sectional flow area and the top width of the effective flow. The descriptions for the column headings will appear in the dialog box at the bottom of the table when an entry in the specific column is selected.
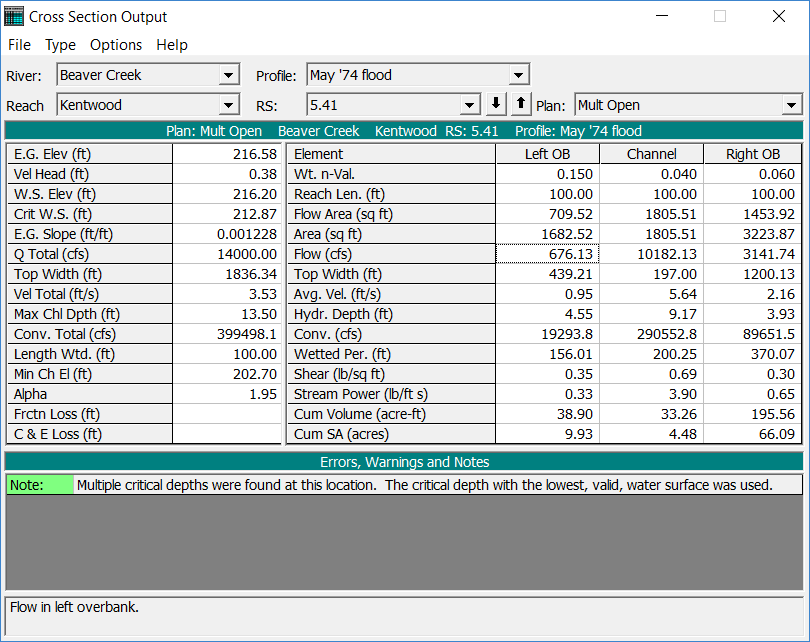
As discussed previously, the energy gradeline elevations shown in the Multiple Opening Profile Table are the energy values for each of the openings, upstream of the openings. However, since the program is a one dimensional model, the program must determine only one energy grade line value to use at the upstream cross section. To determine this energy value, the program uses a flow weighting method to determine the average energy at the upstream cross section. Then, this average energy is used to calculate one water surface elevation for the entire upstream cross section. To review the energy gradeline and water surface elevations that were used as the final answer for the upstream cross section, from the main program window select View, Cross Section Table, Type, and then Cross Section. Toggle to river station 5.41 (the upstream cross section for this example) and select profile 3. This will display the table as shown in the figure below.
For the third flow profile, the program calculated that the upstream energy gradeline elevations for the culvert, main bridge, and relief bridge were 216.55, 216.58, and 216.57 feet, respectively, as shown in the Multiple Opening Profile Table. However, as described above, the program can only use one energy grade line elevation at the upstream cross section. The flow weighted upstream energy gradeline elevation used for cross section 5.41 is shown in the figure below to be 216.58. Additionally, the program had calculated the upstream water surface elevations for each of the three openings as 216.55, 216.14, and 216.55, respectively, as shown in the Multiple Opening Profile Table. However, the program can only use one water surface elevation at the upstream cross section. To obtain this one water surface elevation, the program used the average energy value, subtracted the average velocity head for the entire cross section of 0.38, and determined that the upstream water surface elevation was 216.20, as shown in the figure below. This water surface elevation is calculated from the average energy of the upstream section. The actual water surface elevations at the bridge are more likely reflected by the values as shown in the Multiple Opening Profile Table.
As a final component of the analysis, the flow distribution for the three openings was compared to the flow in the LOB, main channel, and ROB at the river stations upstream and downstream of the openings. From the Multiple Opening Profile Table (see the figure above), the flow for the third profile through the culvert, main bridge, and relief bridge were 566.98, 9950.34, and 3482.68 cfs, respectively. Since the culvert group is located in the LOB, the main bridge is located over the main channel, and the relief bridge is located in the ROB, these flow values should approximate the flows in the LOB, main channel, and ROB at river stations 5.41 and 5.39. As shown in the figure below, the flows for the third profile in the LOB, main channel, and ROB were 676.13, 10182.13, and 3141.74 cfs, respectively. Similarly, the flows at river station 5.39 were 705.59, 9931.67, and 3362.74 cfs. These flow distributions are similar and reflect the transition of the flow rates across the cross sections.
Summary
The geometry of Example 2 was modified to prevent weir flow from occurring over the main bridge decking. This was accomplished by defining a culvert group and a relief bridge on the left and right side of the main bridge, respectively. These additional openings lowered the water surface upstream of the bridge so that weir flow did not occur. The figure below shows a comparison of the third water surface profile for the multiple opening and for the original river reach with just the main bridge. To develop the figure, select View and then Water Surface Profiles from the main program window. Then select Options and Plans and choose both of the plans. Finally, Options and Profiles were chosen and only the third profile was selected to be plotted. This resulted in the display shown in the figure below, which clearly shows that the modified conditions decreased the upstream water surface profile so that no weir flow occurred.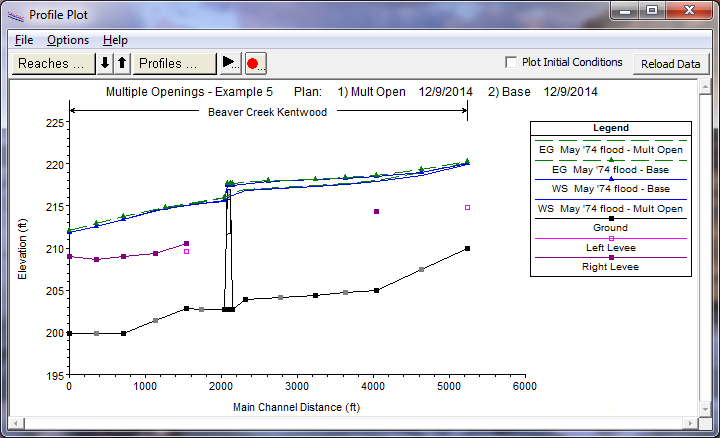
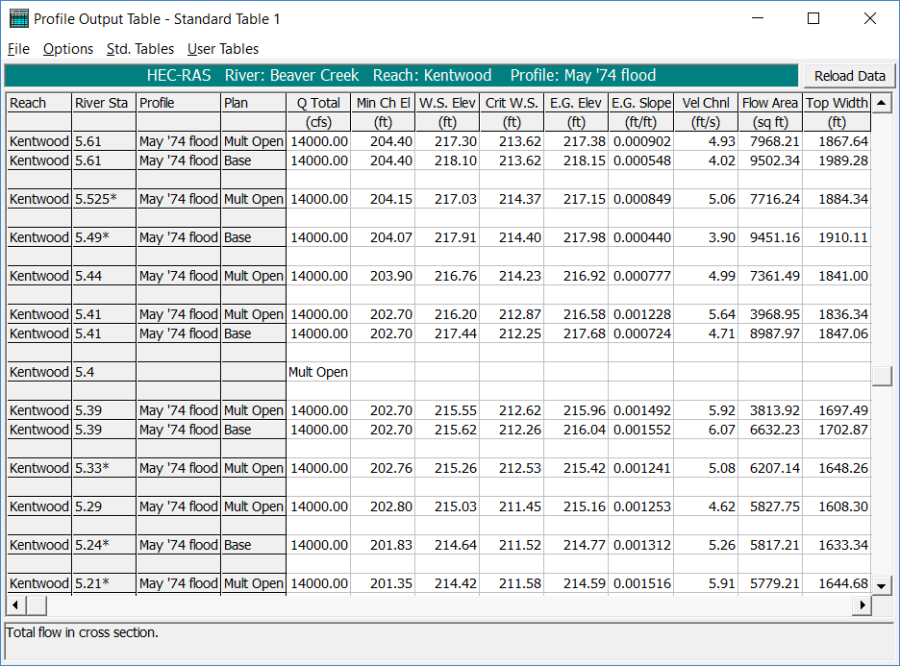
After the analysis was performed, the user can review the flow parameters for the culvert and the relief bridge and adjust the size of these openings to develop the most practical alternative to prevent the weir flow from occurring. To compare the results in tabular format, from the main program window select View and then Profile Table. Standard Table 1 was then selected from the Std. Tables menu. Finally, both of the plans and only the third profile were selected from the Options menu and this resulted in the table as shown in the figure below.
By comparing the values in the table, the user can obtain required information to assist in the determination of any changes that may be necessary. For example, as can be seen in the figure below, the change in the water surface elevation at river station 5.41 was 1.23 feet (from 217.43 to 216.20 feet). The modeler can use this information to determine if any additional decrease is necessary.
