Download PDF
Download page Stream Junction - Example 10.
Stream Junction - Example 10
This example was performed to demonstrate the analysis of a stream junction. The program can analyze 12 different types of junctions. These 12 types of problems are obtained by combining the 3 flow regimes (subcritical, supercritical, and mixed) with the 2 geometric configurations (combining or splitting) and the 2 analysis methods (energy and momentum). For this example, a subcritical flow combining junction was analyzed using both the energy and the momentum methods.
The discussion of this example will focus on the analysis of the stream junction. The modeler is referred to Chapter 4 of the Hydraulic Reference Manual for additional discussion on modeling stream junctions. For looped networks, the modeler is referred to Example 8.
To review the data files for this example, from the main HEC-RAS window, select File and then Open Project. Go to the directory in which you have installed the HEC-RAS example data sets. From the "Applications Guide\Example 10 – Stream Junction" subdirectory, select the project labeled "Stream Junction - Example 10." This will open the project and activate the following files:
Plan: "Junction - Energy"
Geometry:"Base Geometry - Energy Junction"
Flow: "10 Year Profile"
 Example 10 - Stream Junction.zip
Geometric Data
The geometric data for this example consists of the river system schematic, the cross section placement, the cross section data, and the stream junction data. Each of these components are discussed below.
River System Schematic
To view the river system schematic, from the main program window select Edit and then Geometric Data. This will activate the Geometric Data Editor and display the river system schematic as shown in the figure below. The schematic shows the layout of the two rivers (Spring Creek and Spruce Creek) broken into three reaches: Upper Reach, Lower Reach, and Spruce Creek. The Upper and Lower Reach of Spring Creek are divided at the junction with Spruce Creek. This junction occurs at the city of Pottsville.
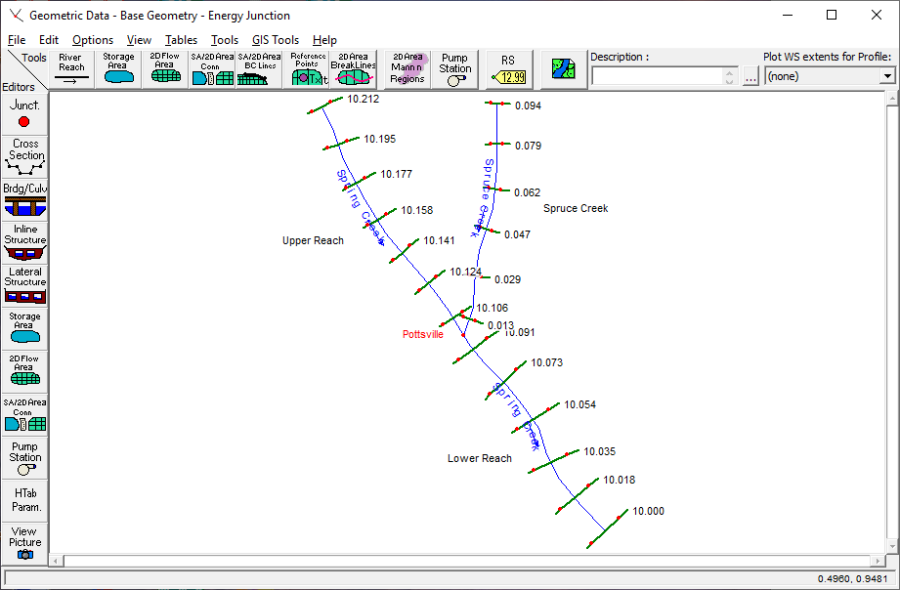
To create the river system schematic, the River Reach icon was selected and a line was drawn in the downstream direction. Then, the program requested the name of the river and reach. The titles "Spring Creek" and "Upper Reach" were entered respectively. Then the River Reach icon was selected again and the "Lower Reach" was sketched. The program requested titles for this river reach and then prompted for a title of the stream junction. The name "Pottsville" was entered for the stream junction title. Finally, the River Reach icon was selected a third time and the Spruce Creek tributary was drawn and labeled. This created the river system schematic as shown in the figure above (without the river stations). The cross section data for the river stations were entered next and are described subsequently.
Cross Section Placement
The location of the cross sections in relation to the stream junction are crucial for an accurate calculation of the energy losses and the water surface across the junction. There are three criteria that can be used as guidelines for the placement of the cross sections. First, the cross sections should be placed close to the stream junction. This will allow for a more accurate evaluation of the energy losses when performing an energy analysis. For a momentum analysis, the program assumes that the water surface at the two upstream sections of the junction are equal. Therefore, to minimize the error associated with this assumption, the cross sections should be closely spaced around the junction.
The second criterion is that the data used for the cross sections does not overlap. The cross section data is acquired from a line perpendicular to the flow lines. If these lines of cross-section data intersect upstream of the junction, then the flow area may be accounted for twice and produce incorrect results. As shown in the schematic in the figure below, the cross sections 7 and 1 for the Upper Reach and Spruce Creek would not be portraying accurate flow cross section data. Part of the flow area would be accounted for twice and, additionally, the cross sections would not contain the flow in the overbank areas. The cross sections numbered 8 and 2 would more accurately portray the flow situation because they do not intersect and the entire flow area is contained within the cross section data.

Finally, a third criterion is concerned with the fact that the program is a one- dimensional model. Therefore, the cross sections should be located in regions where the flow direction is perpendicular to the section. For example, as shown in the figure above, the cross section number 6 should be placed adequately downstream from the junction so that the flow is predominately in the downstream direction. This cross section should not be placed in the junction where the turbulent mixing of the flow is occurring. However, as discussed previously, the cross sections should be placed close to the stream junction to accurately evaluate the energy losses across the junction and to provide a reasonable result for the momentum method, which equates the two upstream water surface elevations. Observations of water surface elevations at high flows can assist the modeler in determining the appropriate locations for the cross sections.
Cross Section Data
To enter the cross section data, from the Geometric Data Editor select the Cross Section icon on the left side of the window. This will activate the Cross Section Data Editor as shown in the figure below. Cross section data were entered for each of the three river reaches for this example. The top portion of the editor shows the river, reach and the river station. The river stations correspond to the river miles of the specific river reach. Additionally, a description was entered for each river station.
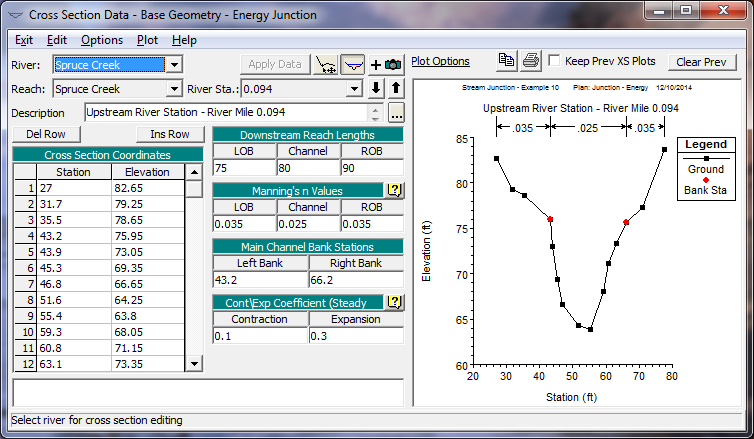
The left side of the editor is where the station and elevation data for the cross section coordinates were entered. The right side of the editor displays the entered values for the downstream reach lengths, Manning's n values, main channel bank stations, and the contraction and expansion coefficients. The downstream reach lengths for the last cross section of each river reach should be set at zero or left blank. Therefore, for this example, the downstream reach lengths at the river stations of 10.106, 10.000, and 0.013 for Upper Reach, Lower Reach, and Spruce Creek, respectively, were set at 0.
Finally, any levees, ineffective flow areas, blocked obstructions, etc. would be entered at this time. For this example, the flow and cross sectional data did not provide for the use of any of these options.
Stream Junction Data - Energy Method
The final component of the geometric data for this example is the stream junction data. To enter the junction data, from the Geometric Data Editor select the Junction icon on the left side of the window. This will activate the Junction Data Editor as shown in the following figure:
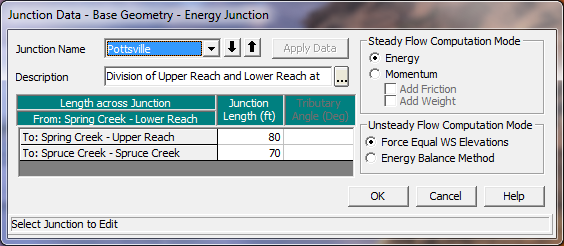
To enter the stream junction data, first one of the stream junctions was selected by depressing the down arrow adjacent to the Junction Name box. For this example, there was only one junction, which had been named "Pottsville" and this junction name automatically appeared. Next, a description for the junction was entered. The entire description can be viewed by selecting the "..." button. The "..." button can then be re-selected to exit the description display.
The next item of information required is the stream lengths across the junction. The table at the bottom left side of the editor will automatically display the names of the river reaches at the junction for which the user must enter the reach lengths. For this example, a reach length of 80 feet was entered as the distance across the junction from Upper Reach to Lower Reach. The program will then use this distance of 80 feet as the length from river station 10.106 (the downstream river station of Upper Reach) to river station 10.091 (the upstream river station of Lower Reach). Similarly, a distance of 70 feet was entered as the length across the junction from the upstream river station on Lower Reach (10.091) to the downstream river station on Spruce Creek (0.013).
The last item for the Junction Data Editor is the Steady Flow Computation Mode. The user must select either the energy or the momentum method for the steady flow computational procedure. For this example, the energy method was selected. After the discussion of the output for the energy method analysis, the momentum method will be selected and the results from the two methods will be compared. A discussion on the computational procedures for each method will be addressed during the review of the output for each method.
The selection of the energy method for the junction analysis completed the geometric input for this example. The junction editor was then closed by selecting the OK button. Finally, the geometric data was then saved by selecting File and then Save Geometric Data As from the Geometric Data Editor. The title "Base Geometry - Energy Junction" was entered for the name of the file. The next procedure was to enter the steady flow data.
Steady Flow Data
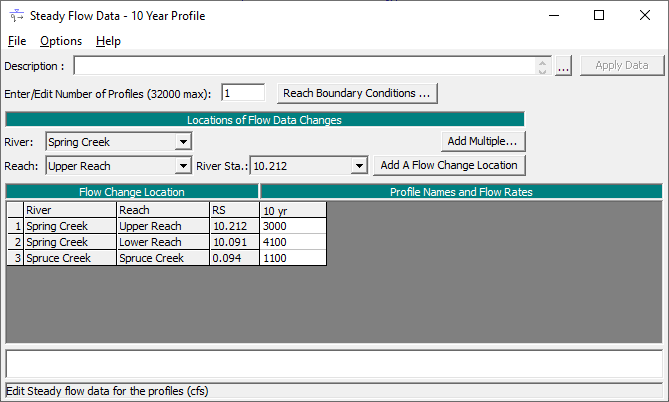
To enter the steady flow data, from the main program window select Edit and then Steady Flow Data. This will activate the Steady Flow Data Editor as shown in the top figure below. For this example, the number of profiles was selected as one. When this number was entered, the table for the steady flow data adjusted to account for the number of profiles that were selected.
Next, the flow values were entered. The user must enter a flow value at the upstream end of each river reach and the table for the flow data will automatically display the upstream river stations for each river reach. The values of 1100, 3000, and 4100 were then entered as the flow values at the upstream river stations for Spruce Creek, Upper Reach, and Lower Reach, respectively.
After the steady flow values were entered, the boundary conditions were then assigned. This was performed by selecting the Boundary Conditions icon at the top of the window. This activated the Boundary Conditions Data Editor as shown in the bottom figure. As shown in the figure, a table is displayed that lists all of the river reaches. The table will automatically display any internal boundary conditions such as stream junctions. These internal boundary conditions are based upon how the river system was defined by the geometric data. The user can then enter any external boundary condition for each river reach.
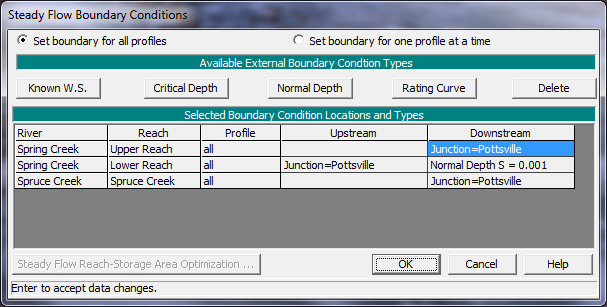
For this example, a subcritical analysis was performed and therefore a downstream boundary condition was required to be entered for the Lower Reach of Spring Creek. To enter this boundary condition, the downstream field for Lower Reach was selected and then the boundary condition Normal Depth was chosen. A slope of 0.001 was then entered for this boundary condition. For a further discussion on boundary conditions, the user is referred to chapter 7 of the User's Manual and to chapter 3 of the Hydraulic Reference Manual.
After all of the steady flow data had been entered, the steady flow data file was then saved by selecting File and then Save Steady Flow Data As from the Steady Flow Data Editor. The title "10 Year Profile" was then entered and the OK button selected.
Steady Flow Analysis (Stream Junction Energy Method)
After the flow data were entered, the steady flow data file and the geometry file were saved as a plan. This was performed by first selecting Run and then Steady Flow Analysis from the main program window. This activated the Steady Flow Analysis Window as shown in the following figure.
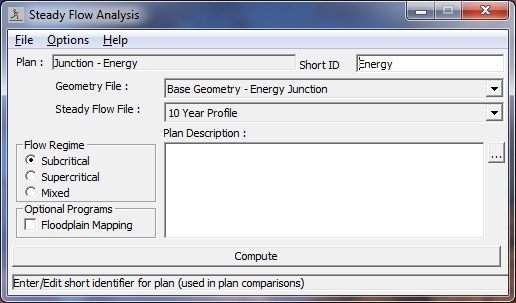
At the top of the Steady Flow Analysis Window, a Short ID was entered as "Energy." The next step was to select the appropriate flow regime for the analysis. For this example, the Subcritical regime was selected. Then, the geometry file "Base Geometry - Energy Junction" and the steady flow file "10 Year Profile" were selected by depressing the down arrows on the right side of the window. (Note: At this point in the example, there was only one geometry and one flow file. Therefore, this step was not necessary.) To save these files as a plan, select File and then Save Plan As. The title "Junction - Energy" was then entered as the plan title and the OK button was selected. This associated the geometry and the steady flow file as a plan and the name of the plan then appeared on the Steady Flow Analysis Window (as well as on the main program window). Finally, the COMPUTE button was selected to perform the analysis.
Review of Output for Stream Junction Energy Analysis
To review the output for the analysis, the user can evaluate the data in both graphical and tabular format. For this example, the water surface profile and the standard table 2 profile table will be reviewed.
Water Surface Profile
To view the water surface profiles for the analysis, from the main program window select View and then Water Surface Profiles. This will activate the profile plot as shown in the figure below. The profile in the figure displays the energy gradeline, the water surface elevation, and the critical depth line for the reaches of Upper Reach and Lower Reach. From the figure, it can be seen that the flow regime is subcritical because the water surface profile is above the critical depth line. Additionally, the energy gradeline displays a constant increase in energy in the upstream direction. Abrupt changes in the water surface profile or the energy gradeline should prompt the user to closely examine the flow situation at these locations.
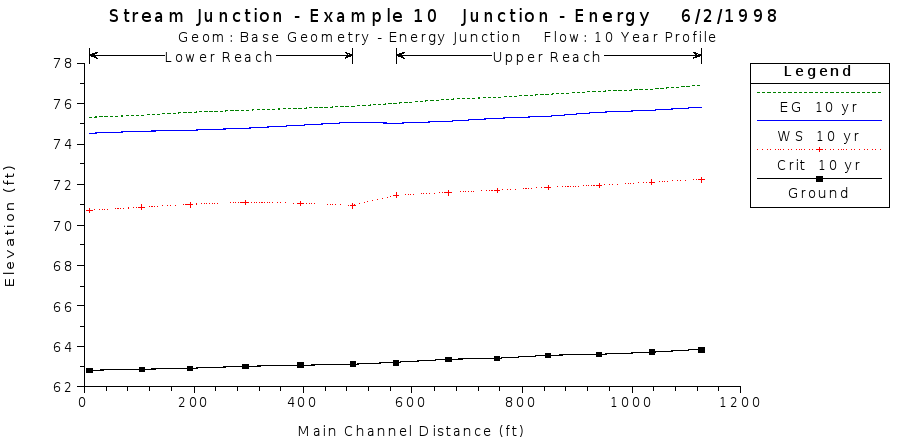
At this time, the user can select which reaches to be displayed by selecting Options and then Reaches. In this manner, the water surface profile for the combination of Spruce Creek and Lower Reach can be viewed. The user can also select to have all three reaches displayed simultaneously.
To determine the water surface profile across the stream junction, the program used the energy based solution routine for this plan. Since this was a subcritical flow analysis, the program started the calculations at the downstream end of the Lower Reach and computed the water surface profile up to the upstream river station of Lower Reach (10.091). Then the program performed standard step calculations separately across the stream junction to each of the downstream river stations of Upper Reach and Spruce Creek. During each of the separate calculations, the friction losses and the contraction and expansion losses were calculated to balance the energy from river station 10.091 to each of the river stations 10.106 and 0.013 of Upper Reach and Spruce Creek, respectively. By performing the calculations in this manner, the downstream water surface elevations of Upper Reach and Spruce Creek do not necessarily have to coincide.
Standard Table 2
As a further review of the output, from the main program window select View and then Profile Summary Table. Then select Std. Tables and then Standard Table 2. This will result in the display as shown in the figure below. The first two columns in the table are in fixed format and display the river reach and the river stationing. The columns in the non-fixed area of the table (as shown in the figure below) display the energy gradeline, the water surface elevation, the velocity head, the friction losses, and the contraction/expansion losses. The remaining portion of the table can be viewed by depressing the left and right arrows at the bottom of the window.
The table in the figure below can be reviewed to follow the standard step computations across the stream junction. The energy gradeline elevation for the upstream river station of Lower Reach (10.091) was 75.88 ft. When calculating the energy losses across the stream junction from river station 10.091 to 10.106 (the downstream river station of Upper Reach), the program determined that the friction loss was 0.09 feet and the contraction/expansion loss was 0.06 feet. These values are displayed in the row for the Upper Reach station of 10.106. By summing these losses, a total energy loss of 0.09 + 0.06 = 0.15 feet is obtained. Then, this 0.15 feet of energy was added to the energy of 75.88 feet to obtain an energy value of 0.15 + 75.88 = 76.03 feet at river station 10.106. (Note: The table only displayed the values to two decimal places and rounding of numerical values occurred.) The standard step procedure was then continued upstream through the reach of Upper Reach.
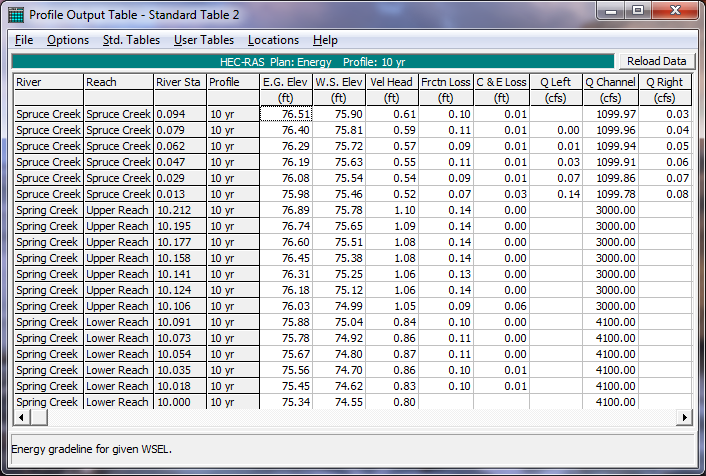
Similarly, the user can toggle the table to display the information for Spruce Creek and follow the same procedure to determine the energy losses across the junction from the upstream river station of Lower Reach to the downstream river station of Spruce Creek. (Note: If the table does not display the information for all of the river reaches, the user can select the appropriate reaches for display under the Options menu.)
Steady Flow Analysis (Stream Junction Momentum Method)
After the energy method was used to analyze the stream junction, the computation procedure was changed to the momentum method. This was performed by opening the Geometric Data Editor and selecting the Junction icon on the left side of the window. This will activate the Junction Data Editor as shown in the figure below.
The components of Junction Name, Description, and Reach Lengths were kept the same as described for the energy method analysis. However, the Steady Flow Computation Mode was selected as Momentum for the subsequent analysis. For the momentum method, the user must enter the angles at which the reaches are entering or leaving the junction. For a flow combining situation (such as this example), the user must enter the angles of the inflow reaches as measured from a line perpendicular to the upstream cross section of the outflow reach. (Note: Chapter 4 in the Hydraulic Reference Manual will assist the user to visualize the flow angles.)
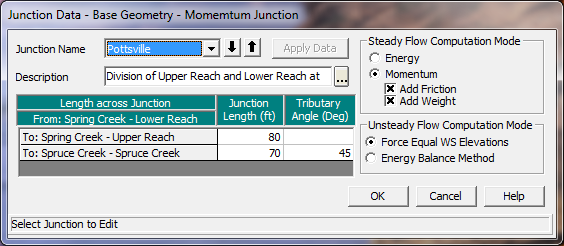
For this example, the tributary angle from Upper Reach to Lower Reach was entered as 0 degrees. This implies that the flow will continue in a straight line. The flow angle from Spruce Creek to Lower Reach was then entered as 45 degrees, as measured from the survey data.
Finally, the user must select whether the program should include the weight and/or the friction terms in the momentum equation. For this example, the terms were included by selecting the appropriate boxes in the lower right corner of the window. The user should refer to chapter 4 of the Hydraulic Reference Manual for a further discussion of the momentum equations.
After these changes were made, the Apply Data button was selected and the junction editor was closed. Since this geometry file was changed, it was then saved as a new file. This was performed by selecting File and then Save Geometry As. The title "Base Geometry - Momentum Junction" was entered and the OK button selected. Then the Geometric Data Editor was closed.
From the main program window, Run and then Steady Flow Analysis were then selected. This activated the Steady Flow Analysis Window as shown in the following figure.
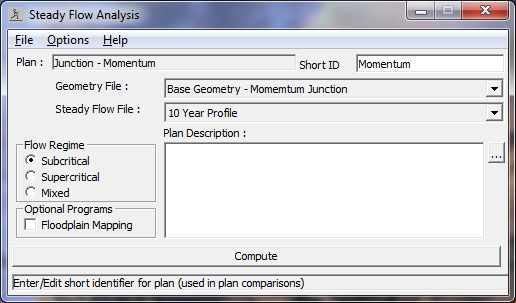
In the upper right corner of the window, a Short ID was entered as "Momentum." Then, the geometry file "Base Geometry - Momentum Junction" and the flow file "10 Year Profile" were selected by depressing the down arrows on the right side of the window. Next, the Flow Regime was selected as Subcritical. Then, File and Save Plan As were selected and the title "Junction - Momentum" was entered. This plan title then appeared at the top of the window (as well as on the main program window). Finally, the COMPUTE button was selected to perform the analysis.
Review of Output for Stream Junction Momentum Analysis
To review the output for the analysis, the user can evaluate the data in both graphical and tabular format. For this example, the water surface profile and the standard table 2 profile table will be reviewed.
Water Surface Profile
To view the water surface profiles for the analysis, from the main program window select View and then Water Surface Profiles. This will activate the profile plot as shown in the figure below.
The profile plot shown below is similar to the plot as shown for the Energy Analysis, except the figure below is for the results of the momentum analysis of the stream junction. The figure below shows the energy gradeline, the water surface elevation, and the critical depth line. The profile is seen to be occurring in the subcritical flow regime. As discussed previously, the user can select other reaches to display the corresponding water surface profiles.
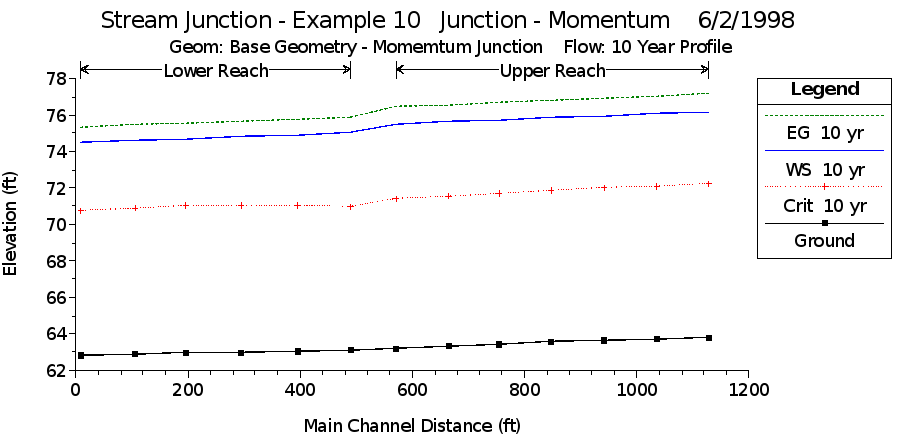
To determine the water surface profiles, the program started at the downstream end of the Lower Reach (since this was a subcritical flow analysis) and used the standard step procedure up to the upstream end of Lower Reach. At the stream junction, the program then used the momentum method to balance the forces across the junction. The momentum method (for this example) will solve simultaneously the forces in the X-direction for the flow at river stations 10.091 (the upstream river station of Lower River), 10.106 (the downstream river station of Upper Reach), and 0.013 (the downstream river station of Spruce Creek). The X-direction is determined as the direction of the flow out of the junction (the direction of flow at river station 10.091).
Since the water surface elevations at the downstream ends of Upper Reach and Spruce Creek are two unknown values and are solved simultaneously, the program will assume that these water surface elevations are equal to each other. Therefore, it is necessary that the cross sections be placed close to the stream junction in order to minimize the error associated with this assumption. For a more detailed discussion on the momentum method analysis, the user is referred to chapter 4 of the Hydraulic Reference Manual.
Standard Table 2
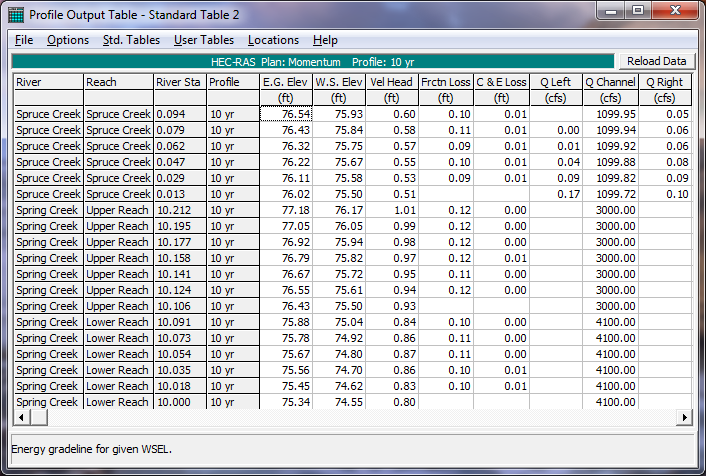
As a further review of the output, from the main program window select View and then Profile Table. Then select Std. Tables and then Standard Table 2. This will result in the display as shown in the figure below. As discussed previously, the first two columns in the table are in fixed format and display the river reach and the river stationing. (Note: For this table, all 3 river reaches were selected to be displayed.) The columns in the non-fixed area of the table display the energy gradeline, the water surface elevation, the velocity head, the friction losses, and the contraction/expansion losses. The remaining portion of the table can be viewed by depressing the left and right arrows at the bottom of the window.
As shown in the figure below, the water surface elevations for Lower Reach are exactly the same values in the previous run because nothing has changed in the downstream reach. However, for this plan, the water surface elevations across the stream junction were determined using the momentum method. As discussed previously, to perform the momentum calculations at the stream junction, the program will equate the two upstream water surface elevations. This is seen to have occurred as the water surface elevations at river station 10.106 (the downstream station of Upper Reach) and river station 0.013 (the downstream river station of Spruce Creek) are both equal to 75.50 feet. Then, the program determined separately the remaining water surface profiles for Upper Reach and Spruce Creek by using the standard step procedure in the upstream direction.
Comparison of Energy and Momentum Results
To compare the water surface profiles for the energy and the momentum analyses of the stream junction, the water surface profile plot was selected to view both of the plans. This was performed by selecting View and then Water Surface Profiles from the main program window. Then, under the Options menu, the reaches were selected as Upper Reach and Lower Reach. Finally, under the Options menu again, both Plans were selected. This resulted in the display as shown in the figure below.
The figure below shows the water surface elevations for Upper Reach and Lower Reach for both methods of junction analysis. At the top of the figure, the heading lists the project name "Stream Junction - Example 10" and the short identifiers listed for each plan. 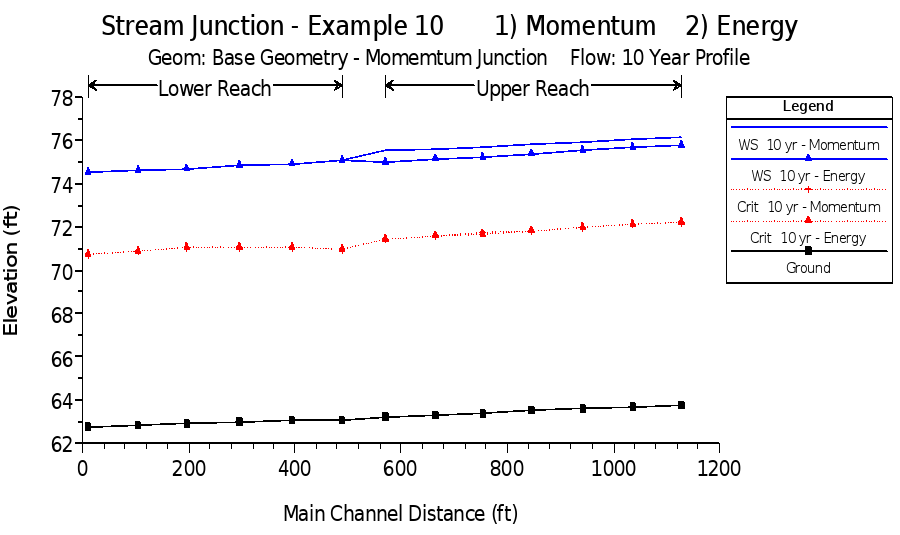
By visually comparing the two results, it can be seen that the calculated water surface profile for Lower Reach was the same for both plans. However, the water surface profile for Upper Reach was different. This is due to the fact that the starting downstream water surface elevation at river station 10.106 of Upper Reach was different, for the two methods of computation across the junction. If the standard step procedure was allowed to continue for a longer distance upstream on Upper Reach, both of the water surface profiles would eventually converge.
At this time, the user can select to view the combination of Spruce Creek and Lower Reach and observe a similar result. The profile would show that the momentum method produced a higher resulting water surface profile on Spruce Creek than the energy method. However, the difference of the water surface profiles for Spruce Creek is not as significant as that for Upper Reach.
The energy method uses friction and the coefficients of contraction and expansion in determining the energy losses across the junction. The user can adjust these coefficients to account for any abrupt transitions that occur in the cross sectional area. Additionally, the user could adjust the Manning's n value at the stream junction to account for additional internal energy losses associated with the junction. By adjusting these parameters, the calculated water surface profile can be calibrated to actual measured water surface elevations.
For the momentum method, the program determines the water surface elevations across the stream junction by taking into account the forces associated with the flow. To balance the forces across the junction, the program only uses the forces in the X-direction. This direction is determined as being perpendicular to the outflow direction (for a flow combining situation). Therefore, the tributary angles, as entered by the user, are crucial for the accurate calculation of the forces. Additionally, as for the energy method, the Manning's n values can be adjusted to account for additional friction losses associated with the stream junction.
Summary
Both the energy and the momentum methods were used to determine the water surface profiles across the stream junction. For this example, the resulting water surface profiles differed upstream of the junction for the two calculation procedures.
The energy method used the standard step procedure with the coefficients of expansion and contraction and the Manning's n value to account for energy losses across the junction. With the energy method, the program calculated separately the resulting upstream water surface elevations. The momentum method equated the forces in one dimension and used the tributary angles to balance the forces at the stream junction. Additionally, the Manning's n values are used to account for friction losses. The momentum method should be used when the tributary flow angles play an important role in influencing the water surface around the junction. However, in order to solve the momentum calculations, the upstream water surface elevations were equated. To reduce the error associated with this assumption, the cross sections should be located close to the stream junction.
The momentum method is an attempt at a more theoretical analysis of the stream junction. However, the user should be aware of the limitations of this one-dimensional analysis. To determine the most applicable method for the analysis, the user should compare the results to observed data and calibrate the model as deemed appropriate.