Download PDF
Download page Simplified Physical Breaching.
Simplified Physical Breaching
If the User selects to use the "Simplified Physical" Breach Method from the drop down at the top of the editor, the Breaching Editor will change to look the following way:
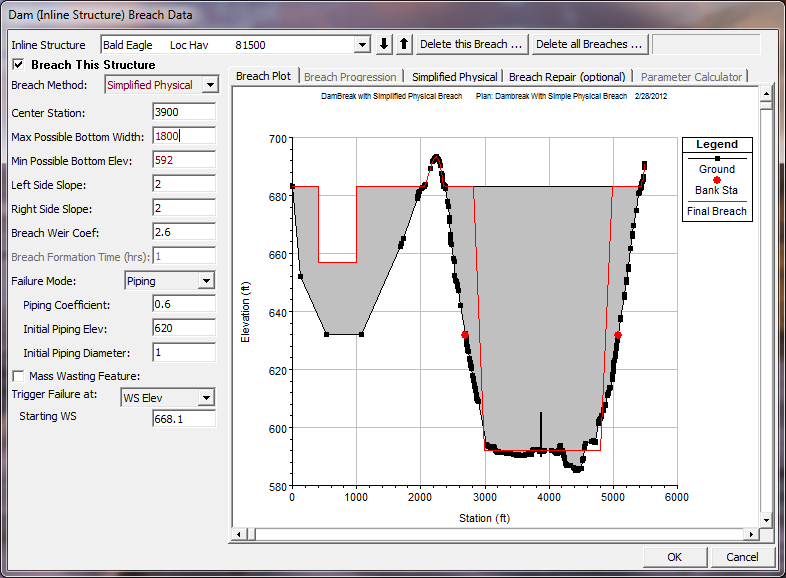
Figure 7 60. Simplified Physical Breaching Option for HEC-RAS
Once the User selects "Simplified Physical" breaching option, there are several fields in which labels change, some additional information required, and some previous information that is not required. The main changes between this method and the "User Entered Data" breach method are the following:
Max Possible Bottom Width – This field is now used to enter a maximum possible breach bottom width. This does not mean this will be the final breach bottom width, it is really being used to limit the breach bottom width growth to this amount. The actual bottom width will be dependent on the velocity verses erosion rate data entered, and the hydraulics of flow through the breach. This field is used to prevent breaches from growing larger than this user set upper limit during the run.
Min Possible Bottom Elev – This field is used to put a limit on how far down the breach can erode during the breaching process. This is not necessarily the final breach bottom elevation, it is a user entered limiter (I.e. the breach cannot go below this elevation). The final breach elevation will be dependent on the velocity verses erosion rate data entered, and the hydraulics of flow through the breach.
Starting Notch Width or Initial Piping Diameter – If the Overtopping failure mode is selected, the user will be asked to enter a starting notch width. The purpose of this is that the software will us this width at the top of the dam to compute a velocity, from the velocity it will get a down cutting erosion rate (based on user entered data), which will be used to start the erosion process. If a Piping Failure model is selected, the user must enter an initial piping diameter. Once the breach is triggered to start, this initial hole will show up immediately. A velocity will be computed through it, then the down cutting and widening process will begin based in user entered erosion rate data.
Mass Wasting Feature – This option allows the user to put a hole in the Dam or the Levee at the beginning of the breach, in a very short amount of time. This option would probably most often be used in a levee evaluation, in which a section of the levee may give way (Mass Wasting), then that initial hole would continue to erode and widen based on the erosion process. The require data for this option is a width for the mass wasting hole; duration in hours that this mass wasting occurs over (this would normally be a short amount of time); and the final bottom elevation of the initial mass wasting hole (it is assumed that the hole is open all the way to the top of the levee or Dam if this option is used).
When using the "Simplified Physical" breaching option, the user is required to enter velocity versus Downcutting erosion rates, as well as velocity versus erosion widening rates. To enter this data the user selects the "Simplified Physical" breach Tab. When this Tab is selected the editor will look like the following:
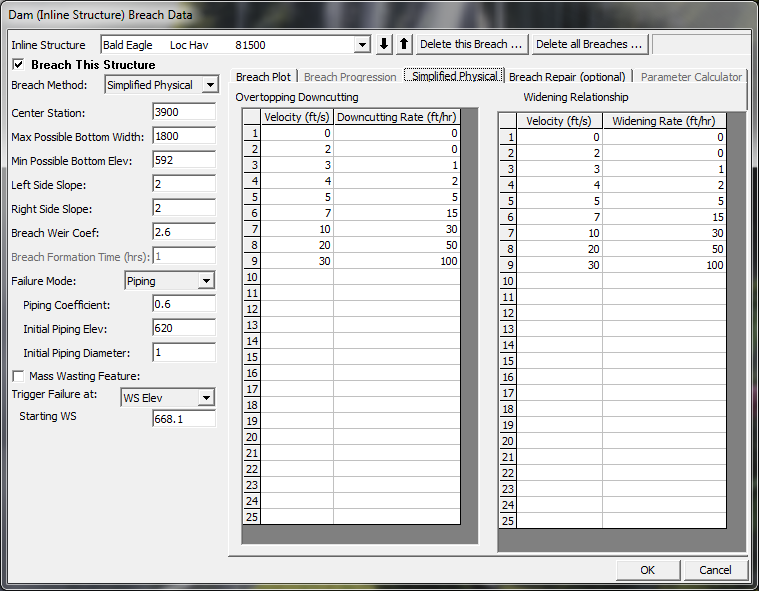
Figure 7 61. HEC-RAS Simplified Physical Breach Option.
As shown in Figure 7-61 above, the user is required to enter Velocity versus Down-cutting erosion rates and velocity versus erosion widening rates. This data is often very difficult to come by. User's will need to consult with Geotechnical engineers to come up with reasonable estimates of this data for your specific Levee or Dam. Another way to estimate this information is to try to derive it by simulating a historic Levee or Dam breach, and adjusting the velocity versus erosion rate data until the model simulates the correct breach width and time. This is obviously an iterative process, and may require the user to perform this at multiple locations to see if there is a consistent set or erosion rates that will provide a reasonable model for simulating Levee breaches (or Dams) in your geographical area.
We realize that this data is not readily available for any specific levee or dam. The hope is that over time we will be able to develop guidelines for these erosion rates based on analyzing historical levee and dam breaches.
Levee (Lateral Structure) Breach.
This option is very similar to the Dam Break option described previously. The only difference is that the breaching is performed on a levee. The options and data entered to describe the breach is the same as a Dam Break.
In order to use this option, the user must first define the levee as a lateral structure within HEC-RAS. The lateral weir profile is used to describe the top of the levee along the stream both at and between the cross sections. Second, a weir coefficient is entered for calculating the flow that may go over top of the levee if the water surface gets high enough. Entering breach data for the levee can be accomplished from the lateral weir editor or from the Levee (lateral structure) Breach option from the Unsteady Flow Simulation window. The levee breaching data is stored as part of the unsteady flow plan file, just as it is for a dam break. When the levee breach option is selected, a breach editor will appear as shown in Figure 7-62.
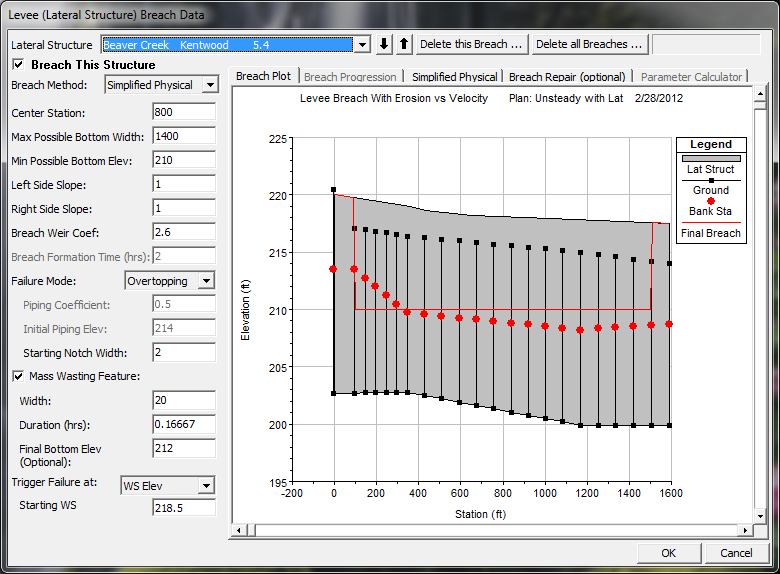
Figure 7 62. Levee Breaching Editor
As shown in Figure 7-62, this editor contains the same information as the Dam Breach editor. For a description of the variables please review the section on Dam Breaching above. More detailed information about levee breaching can be found in Chapter 14 of this manual.