Download PDF
Download page Workshop 3 – Creating At-Site Operating Rules.
Workshop 3 – Creating At-Site Operating Rules
Last Modified: 2023-02-07 13:33:19.149
Software Version
HEC-ResSim pre-release Version 3.5 will be used during the 2023 PROSPECT #098 course. Download here: https://drive.hecdev.net/share/YETr0az6
Workshop Instructions (PDF): Workshop 3 - AtSiteRulesWorkshop.pdf
Download Initial Zipped Workshop: WS3_Start.7z
Download Zipped Workshop Datafiles: WS3_data.7z
Download Solution Zipped Workshop: Workshop 3 - AtSiteRulesWorkshop_Solution.pdf & WS3_Solution.7z
Introduction
This workshop will demonstrate how to create at-site reservoir operation rules in HEC-ResSim, insert operating rules into appropriate zones, and verify that the rules produce desired operations. New operation sets and alternatives will be created for each rule type entered. Operation sets will be based on the basic guide curve operation set created in Workshop 3. Release Function and Flow Rate of Change operation rules will be investigated. Students will simulate alternatives for each rule type, identify the effects of rule operation, and verify that the effects match expected behavior.
Problem Statement
The goals of this workshop are to:
- Create reservoir operation rules in HEC-ResSim for several of the operations described in the Crazy Mountain Reservoir Regulation Manual,
- Determine the appropriate zone(s) to assign operation rules, and
- Identify the effects of the operation on simulation results
The rule operations we will explore are (from the Water Control Plan in Section III of the Crazy Mountain Reservoir Regulation Manual):
- Guide curve operation (already created from Workshop 2),
- Do not release less than 700 cfs,
- Do not release more than 6,000 cfs during the growing season, or more than 10,000 cfs during the non-growing season,
- Releases should not increase by more than 1,000 cfs per hour,
- Maximum allowable release is a function of reservoir elevation and season as described by Schedule B, and
- Specified irrigation diversion schedule is a function of season as described in Table 3-4.
You will create a new operation set and alternative for each operating rule mentioned above. This will enable us to learn how each rule impacts the operation independently.
- As a final task, you will enter all at-site reservoir rules into their appropriate zone(s) within a single operation set.
Please review the Water Control Plan for background information on the rules and operations before proceeding. Also, please refer to your lecture material for guidance on Implementing Release Rules.
The following summary table lists the associated Network, Operation Set, and rule(s) for each alternative you will be creating and analyzing in this workshop.
Summary for Network: 01 Standard
Alternative | Operation Set | Rule type to create and apply |
|---|---|---|
Alt01 GC | Basic GC | None, basic guide curve operation |
Alt02 Min | Min Required Release | Minimum release function of date |
Alt03 Max | Max Allowable Release | Maximum release function of date |
Alt04 ROC | Max-Inc-Flow-ROC | Maximum increasing flow rate of change |
Alt05 SchB | Schedule B | Maximum release function of pool elevation Maximum decreasing flow rate of change, and Maximum release function of date |
Summary for Network: 02 With Nutty
Alternative | Operation Set | Rule type to create and apply |
|---|---|---|
Alt06 Div | Diverted Outlet | Specified release function of pool elevation, and maximum release function of date. |
Alt07 ALL | At-Site Rules | All rules created in this workshop |
Part A – Create the new Rules and Operation Sets
1. Open the starting watershed for the Workshop 3: WS3_Start
2. From the Reservoir Network Module, open the network named 01 Standard
Creating 2nd Operation Set
Create a second Operation Set and a new Minimum Required Release Rule
3. Open the Reservoir Editor and select the Operations tab.
4. Duplicate the Basic GC operation set and name the copy Min Required Release.
5. Refer to Section III of the Regulation Manual. Interpret the at-site requirement “Do not release less than 700 cfs” and add a new rule to the Conservation zone:
In the New Operating Rule Dialog
- Name the Rule Min Rel at Dam – Normal Condition.
- The rule must Operate Releases from the Crazy Mountain-Dam.
- The rule type must be Release Function.
In the Reservoir Editor Rule Panel
- Define the rule as a Function of Date.
- Select the appropriate Limit Type (i.e., Maximum, Minimum, or Specified?) and Interpolation Type (i.e., Linear, Cubic, or Step?).
- Enter the Release criteria in the Date-Release table according to the Regulation Manual.
- Click Apply to apply/save your changes to the operation set and keep the Reservoir Editor open.
Creating 3rd Operation Set
Create a third Operation Set and a new Maximum Allowable Release Rule
6. Duplicate the Basic GC operation set and name the copy Max Allowable Release.
7. Refer to Section III of the Regulation Manual. Interpret the at-site requirement “Do not release more than 10,000 cfs during the non-growing season and do not release more than 6,000 cfs during the growing season.” Create a new rule called Max Rel at Dam that reflects this requirement, and apply the rule to the appropriate zone(s).
Question I
How did you handle the time-date aspects of the rule between the growing and non-growing seasons?
Entered Dates and Releases as:
01Jan 10000
01May 6000
15Dec 10000
Question II
What option did you choose for Interpolation type? Why?
Step. Because the values are constant for the entire season and do not change linearly between one date and the next.
Tip
To assign a rule to a second zone, highlight the second zone. Right click on the zone and select Use Existing Rule. In the popup window, select the previously defined rule to add to that zone.
Question III
To what zone(s) did you assign your rule? Why?
Normal Flood and Conservation. A maximum type rule should be assigned to the flood pool to limit the release that can be made to evacuate the flood pool. When reservoir inflows exceed this limit, the reservoir will store water in the flood pool. The rule should also be assigned to the conservation pool so that the release limit can be enforced as the reservoir level transitions from conservation to flood pool.
Creating 4th Operation Set
Create a fourth Operation Set and a new Maximum Increasing Flow Rate of Change Rule
8. Duplicate the Basic GC operation set and name the copy Max-Inc-Flow-ROC.
9. Refer to Section III of the Regulation Manual. Interpret the at-site requirement “releases should not increase by more than 1,000 cfs per hour.” Create a new rule called Max-Inc-Flow-ROC that reflects this requirement at Crazy Mountain- Dam, and apply the rule to the appropriate zones.
Question IV
To what zone(s) did you assign your rule? Why?
Normal Flood. Limits on the allowable rate of change of release were only identified in the “Normal Flood” section of the Regulations Manual. However, if additional background information was added to suggest why this limit was defined, such as a statement like: “to minimize impacts on downstream levees…,” you may decide that the rule applies to all releases regardless of the reservoir elevation or operating zone.
Creating 5th Operation Set
Create a fifth Operation Set and a new Maximum Release Function of Pool Elevation Rule
10. Unlike what you have done for the previous Alternatives (where you duplicated the Basic GC operation set), this time Duplicate the Max Allowable Release operation set and name the copy Schedule B.
11. Refer to Section III of the Regulation Manual. Interpret the at-site requirement “Follow Release Schedule B in the Major Flood Control Pool for Rising Inflow Condition as well as Falling or Constant Inflow Condition” and create two new rules:
Create the first rule for the Rising Inflow Condition
- Add a new rule to the Major Flood Control Pool.
In the New Operating Rule Dialog
- Name the rule Schedule B – Rising Inflow.
- The rule must Operate Releases from the Crazy Mountain-Dam.
- The rule type must be Release Function.
In the Reservoir Editor Rule Panel
- Define the rule as a Function of Model Variable: “Crazy Mountain-Pool Reservoir Elevation.” (Click the Define Button and set Release as a Function of: Model Variable. Filter through the Independent Variable Definition Editor to find the correct Model Variable. Highlight the variable and press Select so that the Time-Series name appears in the box at the bottom of the editor. For the Time Series Options, set Function: Previous Value. Press OK to close the Independent Variable Definition Editor.)
- Select the appropriate Limit Type (Maximum) and Interpolation Type (Linear)
- Enter elevations and releases in the table for the non-growing season.
Question V
How did you enter values that accommodate both step (707 – 711 ft) and linear (711 – 712 ft) interpolation in one table?
Enter a row for elevation corresponding to 710.99 feet
Elev Release
707.0 10,000
710.99 10,000
711.0 11,000
712.0 20,000
Question VI
Enter elevations and releases for the other seasons.
Elev 01Jan 01May 15Dec
707.0 10,000 7,000 10,000
710.99 10,000 9,000 10,000
711.0 11,000 9,000 11,000
712.0 20,000 20,000 20,000
Hint
HINT: Click the Edit… button next to Seasonal Variation.. In the popup window, select Step from the dropdown list labeled Interpolation Type, and enter the additional Dates.
- At this point, do not enter the rising inflow condition associated with the operation. Leave the checkbox Rising/Falling Condition unchecked.
- Press Apply to save changes to this rule and keep the Reservoir Editor open.
Create the second rule for the Falling-or-Constant Inflow Condition of Schedule B...
- Add this new rule to the Major Flood Control Pool
In the New Operating Rule Dialog
- Name the rule Max dec. flow ROC=0.
- The rule must Operate Releases from the Crazy Mountain-Dam.
- The rule type must be Flow Rate of Change Limit.
In the Reservoir Editor Rule Panel
- Define the rule as Function of: Constant.
- Select the rate of change Type according to the Regulation Manual (Decreasing).
- Enter 0 for the Max Rate of Change.
- Press Apply to save changes to this rule and keep the Reservoir Editor open.
12. In this Schedule B Operation Set, which is a duplicate of the Max Allowable Release Operation Set, there will be an existing Max Rel at Dam Rule that you should add to the Normal Flood and Conservation zones. This action will ensure that releases transition properly as the pool level rises. However, since this operation set was built as a duplicate of the Max Allowable Release Operation Set, those rules should already be in the appropriate zones. If they were not, these are the steps you could take to add them:
- Highlight the zone, right-mouse-click, and select Use Existing.
- Select the Max Rel at Dam.
- Click OK to apply your changes and close the Reservoir Editor.
- From the Network Menu, Save your changes to the Network.
Creating 6th Operation Set
Create a sixth Operation Set, a new Specified Required Release Rule
13. From Network Menu in the Reservoir Network Module, open the network named 02 With Nutty.
14. From the Reservoir Editor, duplicate the Basic GC operation set and name the copy Diverted Outlet.
15. Refer to Section III of the Regulation Manual. Interpret the at-site requirement “Water is diverted directly from the Crazy Mountain pool through the Nutty Canal for irrigation in fields located south of the reservoir” and add a new rule to the Conservation
In the New Operating Rule Dialog
- Name the rule Req Flow – Nutty Canal.
- The rule must Operate Releases from the Crazy Mountain-Nutty Canal.
- The rule type must be Release Function.
In the Reservoir Editor Rule Panel
- Define the rule as a Function of Date
- Select the appropriate Limit Type (Minimum) and Interpolation Type (Step).
Enter the Date and Release data in the table according to the Regulation Manual for the monthly required diversion schedule through Nutty Canal
- Click Apply to apply/save your changes to the operation set.
Question VII
How did you handle the time-date aspects of the rule for the seasonally varying monthly diversion schedule?
Entered Dates and Releases as:
01Jan 10
01Mar 100
01Apr 500
01May 1000
01Jul 800
01Aug 500
01Sep 100
01Oct 10
AND, Selected “Step” Interpolation type for the monthly requirements!
Creating 7th Operation Set
Create a seventh and final Operation Set, use ALL Existing Rules created for previous operation sets, and create a seventh and final Alternative
16. Add ALL Existing Rules available to this Operation Set, and place the existing rules accordingly in their appropriate zone.
17. From the Network Menu, Save your changes to the Network.
18. From the File Menu, Save your watershed.
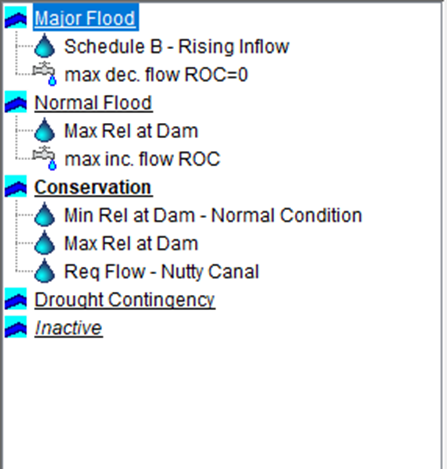
This is how the left side of the operations tab should look:
Part B – Create the new Alternatives
Alt 02 Min
19. From the Alternative Menu, select Edit to open the Alternative Editor.
20. Highlight the Alternative Alt01 GC created for the Basic Guide Curve Operations. Select the Save As… option from the Alternative Menu to make a copy of this alternative:
- Name the new copy Alt02 Min
- Provide a description “Minimum Required Release Operation”
21. Edit the Alt02 Min Alternative to use the ”Min Required Release” Operation Set:
- Verify that the Time Step is set to 1 Hour and the Flow Computation Method to Instantaneous under the Run Control tab.
- From the Operations tab, select the new Operation Set “Min Required Release.”
- Save the Alt02 Min alternative.
Alt 03 Max
22. Make a copy of Alt01 GC and edit the Alt03 Max alternative to use the “Max Allowable Release” Operation Set.
Alt04 ROC
23. Make a copy of Alt01 GC and edit the Alt04 ROC alternative to use the “Max-Inc-Flow-ROC” Operation Set.
Alt05 SchB
24. Make a copy of Alt01 GC and configure the new alternative:
- From the Operations tab, select the new Operation Set Schedule B.
- Change the lookback elevation to start the Crazy Mountain reservoir level at 707.2 ft.
Alt06 Div
25. Make a copy of the alternative Nutty which is equivalent to Alt01 GC except it uses the 02 With Nutty
- Name the new copy Alt06 Div.
- Provide a description “Reservoir Water Diversion for Irrigation.”
26. Edit the Alt06 Div Alternative to use the Diverted Outlet Operation Set.
Alt07 ALL
27. Make a copy of Alt06 Div and edit Alt07 ALL to use the At-Site Rules Operation set.
Part C – Simulation Module – Analyze Results
28. Switch to the Simulation Module. Open and Edit the simulation “1997.06.19-0200.”
- In addition to Alt 01 GC and Nutty, add to this simulation Alternatives 02 through 07 (i.e., Alt02 Min, Alt03 Max, etc.).
- Check the box for Performing a New Extract.
- Press OK to close the Simulation Editor.
29. Compute each of the new alternatives.
Tip
To compute an alternative without first making it active, right click on the alternative in the Simulation Control Panel (the tree at the right of the main window) and select Compute from the context menu.
Alt02 Min
30. In the Simulation Control Panel, check the boxes next to Alt02 Min and Alt01 GC. This will allow you to compare the results of Minimum Required Release Operation against Basic Guide Curve Operation in the plots and summary reports.
31. Analyze Reservoir Plots and Release Decision Reports.
Tip
To view a plot, right-click on an element and select one of the plot options. Data will be plotted from all of the computed alternatives that have been checked in the Simulation Control Panel. Release Decision Reports can be accessed by either right-clicking on a reservoir, or from the Reports menu. The Release Decision Report will provide results only from the active (bold) alternative.
Question VIII
How do the releases for the new Alt02 Min alternative differ from the basic Guide Curve operation? When do the differences start? Why do they start? When do they end? Why do they end at that time? Do the results correspond to the operation you are trying to model (release must be at least 700 cfs)? How do you know that the rule is determining the release?
The reservoir releases 700 cfs between 19Jun and 22Jun rather than cutting back all the way to 0 cfs. Releasing more water means that it takes longer for the reservoir to refill. The Alt02 Min release ends on 21Jun, 20:00 as the reservoir conservation pool completely fills. The Alt01 GC release ends ten hours earlier. Afterwards, reservoir releases inflow (which is larger than the minimum required release) to maintain the conservation pool fill. Yes, this behavior matches. Release Decision Report lists “Min Rel at Dam – Normal Condition” as the active rule.
Question IX
What happens if you add the Min rule to the Normal flood pool instead of the conservation pool? Why?
The results are the same as the Basic GC. When the reservoir level is below the Guide Curve, the reservoir can cut back releases to zero to fill the conservation pool. The reservoir is no longer required to release a minimum amount of 700 cfs. In the Flood pool, the reservoir is trying to release as much water as possible. A minimum required flow rule (which requires releases be larger than minimum amount) entered in the flood pool generally will not constrain guide-curve operation as it empties the flood pool. Therefore, the reservoir is still able to release as much water as possible (up to the outlet capacity) to evacuate the flood pool and maintain the guide curve level.
Question X
In which zone(s) should you enter the rule to correctly simulate the desired operation?
Normal Flood and Conservation
Question XI
Why, or how did you determine that?
The subsections titled Flood Control and Water Supply in Section III of the 0Crazy Mountain Reservoir Regulation Manual imply that this rule is applicable in those zones.
- If necessary, reassign the rule to the correct zone(s). Re-compute the simulation.
Alt03 Max
32. Set As Active Alt03 Max.
33. Use Reservoir Plots and Release Decision Reports for Alt03 Max and Alt01 GC to compare the results of Maximum Allowable Release Operation against Basic Guide Curve Operation.
Question XII
How do the releases for the Alt03 Max alternative differ from the basic Guide Curve operation? When do the differences start? Why do they start? When do they end? Why do they end at that time? How do you know that the rule is determining the release?
On 22Jun, reservoir maintains a release of 6,000 cfs until the end of the simulation as inflows exceed 6,000 cfs. The Release Decision Report says the Max Rel at Dam rule is active over this time period.
Question XIII
What happens if you assign the rule to only the flood pool? To only the conservation pool? Why?
The reservoir makes releases identical to Basic GC. In both cases after 21Jun, 11:00, reservoir level can remain at top of conservation pool (still in conservation pool) with no limit on releases to maintain a full reservoir.
- If necessary, reassign the rule to the correct zone(s). Re-compute the simulation.
Alt04 ROC
34. Use Reservoir Plots and Release Decision Reports for Alt04 ROC and Alt01 GC to compare the results of Maximum Increasing Flow Rate of Change Operation against Basic Guide Curve Operation.
Question XIV
How do the releases for the Alt04 ROC alternative differ from the basic Guide Curve operation? When do the differences start? Why do they start? When do they end? Why do they end at that time?
The results are the same as the Basic Guide if the “Max inc. flow ROC” rule is added only to the Normal Flood control zone. For assignment to both pools, see description below.
Question XV
What happens if you assign the rule to both the Conservation and Normal Flood pools? Why?
When the “Max inc. flow ROC” rule is added into both the Conservation and Flood Control zones, you will notice that Starting on 21Jun, 10:00, the operation requires releases to increase from 0 cfs at a rate slower than that for Basic GC operation. This limitation causes some water to be stored in the Flood Pool which necessitates releases larger than reservoir inflow up until 21Jun, 19:00. After 19:00, releases fall back to inflow and follow inflow for the rest of the simulation because inflow never increases by more than 1,000 cfs/hr in this simulation period.
Alt05 SchB
35. Use Reservoir Plots and Release Decision Reports for Alt05 SchB and Alt01 GC to compare the results of Schedule B Operation against Basic Guide Curve Operation
Question XV
How do the releases for the Alt05 SchB alternative differ from the basic Guide Curve operation? When did the differences start? When did they end? Why?
“Alt05 SchB” starts in the Major Flood zone and the “Schedule B – Rising Inflow” rule influences the first release decision of 7,100.25 cfs. The “max dec. flow ROC=0” rule attempts to maintain a minimum release of this value. The higher-priority “Schedule B – Rising Inflow” sets the maximum, which decreases slightly as the pool drops. These rules fall out of effect on 19Jun, 16:00 when the reservoir pool drops into the Normal Flood zone. Then, the “Max Rel at Dam” Rule constrains releases to 6,000 cfs until 26Jun, 08:00 when stored inflow volume finally fills the Normal Flood zone. For the remainder of the simulation, the reservoir pool rises in the Major Flood zone because inflows are increasing and are greater than the release made by “Schedule B – Rising Inflow.”
36. Now enter the Rising/Falling Condition information associated with the Schedule B operation (The rising inflow condition is defined by a three-hour average increase of 500 cfs).
- In the simulation module, open the reservoir editor and select the operations tab.
- Highlight the “Schedule B – Rising Inflow” operation rule.
- Check the Rising/Falling Condition Click the Edit… button.
- Enter Rising/Falling criteria in the popup window. Click OK. Click OK again to close the reservoir editor. (Rule applies when Inflow is Rising by at least 500 cfs over 3 hours.)
- Re-simulate the alternative.
Question XVII
How do releases change? What determines releases in the first few hours after the lookback period ends? Why?
“Alt05 SchB” starts in the Major Flood zone, but because inflows are decreasing, the “Schedule B – Rising Inflow” rule gets switched off by new Rising Condition. Therefore, this rule is prevented from influencing the first release decision of 18,978.14 cfs. Effectively maximum outlet capacity releases are made without operational constraint until 19Jun, 06:00, when the reservoir pool falls into the Normal Flood zone. Then, the “Max Rel at Dam” Rule constrains releases to 6,000 cfs until 26Jun, 17:00 when stored inflow volume finally fills the Normal Flood zone. For the remainder of the simulation, the reservoir pool sticks to the top of Normal Flood zone due to Zone Boundary constraint which, in this case, is preventing the pool from oscillating between the Major and Normal Flood zones.
37. Save all changes made in the simulation module for the Alt05 SchB alternative back to the network module:
- Right-mouse-click on the Alt05 SchB alternative in the control panel. Select Save to Base Directory.
- Check the Copy Data box in the Save…to Base window and click OK.
Alt06 Div
38. Use Reservoir Plots and Release Decision Reports for Alt06 Div and Nutty to compare the results of Diversion Operation against Basic Guide Curve Operation.
Question XVIII
How do the releases for the Alt06 Div alternative differ from the basic Guide Curve operation? What releases did the Dam make? What releases did Nutty Canal Diversion make?
The conservation zone is filled slower in this alternative because the “Required Flow – Nutty Canal” rule diverts a required flow of 1,000 cfs. When the Top of Conservation is reached, inflows are released through the diverted outlet (Nutty Canal), its required flow of 1000 cfs, and through the main controlled outlet of the dam, up to its maximum physical capacity.
Alt07 ALL
39. Use Reservoir Plots and Release Decision Reports for “Alt07 ALL” and Nutty to compare the results of all At-Site Rule Operation against Basic Guide Curve Operation
Question XIX
How do the releases for the Alt07 ALL alternative differ from the basic Guide Curve operation? What releases did the Dam make? What releases did Nutty Canal Diversion make?
For the period 19Jun, 0200 through 22Jun, 0800 the conservation zone is filled slower in this alternative because the “Required Flow – Nutty Canal” rule diverts a required flow of 1,000 cfs, and the “Min Rel at Dam” rule forces a release of 700 cfs through the main controlled outlet.
For the period 22Jun, 0900 through 22Jun, 24:00 inflows are released through both the diverted outlet (Nutty Canal) and the main controlled outlet of the dam. Nutty Canal is no longer constrained by “Req Flow – Nutty Canal” because the pool entered the Normal Flood zone. Nutty Canal releases up to maximum physical capacity. The controlled outlet of the dam releases up to the maximum allowable release of 6,000 cfs.
For the period 23Jun, 01:00 through 25Jun, 16:00 the reservoir pool is maintained at the Top of Conservation zone. Excess inflows are released through the Nutty Canal diversion, within maximum physical capacity, and through the controlled outlet of the dam, up to the maximum allowable release of 6,000 cfs.
For the period 25Jun, 17:00 through the end of this simulation, inflows rise and the reservoir pool rises into the Normal Flood zone. Nutty Canal releases up to maximum physical capacity. The controlled outlet of the dam releases up to the maximum allowable release of 6,000 cfs.