Download PDF
Download page Workshop 8 – If-Then-Else Rules and Scripting.
Workshop 8 – If-Then-Else Rules and Scripting
Last Modified: 2023-02-09 14:10:21.16
Software Version
HEC-ResSim pre-release Version 3.5 will be used during the 2023 PROSPECT #098 course. Download here: https://drive.hecdev.net/share/YETr0az6
Workshop Instructions (PDF): Workshop 8 - IfThenElseAndScripting_2023.pdf
Download Initial Zipped Workshop: WS8_Start.7z
Download Zipped Workshop Datafiles: WS8_data.7z
Download Solution Zipped Workshop: Workshop 8 - IfThenElseAndScripting_Solution.pdf and WS8_Solution.7z
Introduction
This workshop will demonstrate building conditional rule structures (if-then-else blocks), creating static scripts, and creating state variable scripts in HEC-ResSim. Pre-written scripts will be utilized to demonstrate the process of scripting rather than the details of the scripting language.
Problem Statement
The goal of this workshop is to:
- Create a static script that plots Crazy Mountain inflow and outflow for the active alternative, as well as historical statistics (25th and 50th percentile historical inflows) for the same time window.
- Create an alternative that utilizes an if-then-else block to restrict the releases from Crazy Mountain Lake Reservoir based on comparisons of current inflow with historical statistics.
- Create an alternative that utilizes a state variable to restrict the releases from Crazy Mountain Lake Reservoir based on comparisons of current inflow with historical statistics.
To simplify the data entry aspects of the exercise, the following are in the shared folder of your watershed directory:
- Statistical data based on Historical inflows to Crazy Mountain. These have been placed in the ventura.dss file with the following pathnames:
- //CRAZY MOUNTAIN/FLOW-RES IN-P25//1HOUR//
- //CRAZY MOUNTAIN/FLOW-RES IN-P50//1HOUR//
- "Custom Plot.txt". This file contains the script code for the static script.
- "State Variable.py". This file contains the script code for the state variable.
Task 1. Open Workshop
Open the workshop watershed WS8_Start in ResSim and switch to the Simulation module, if necessary.
Task 2. Open Simulation
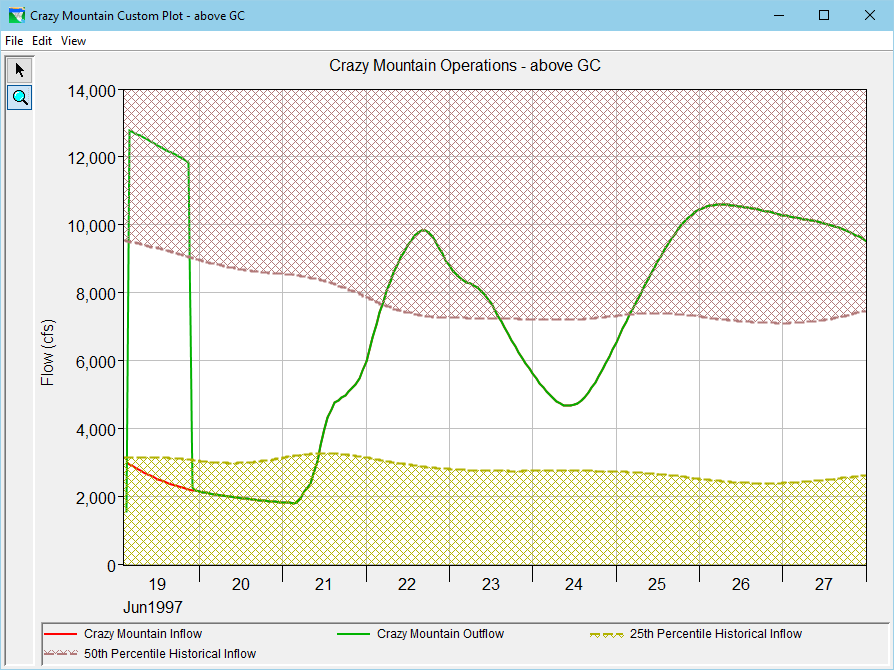
Open the Sim 01 19Jun1997 simulation and compute the above GC alternative. Then view the default plot for the Crazy Mountain reservoir and verify that basic guide curve operations are being followed.
Task 3. Import Static Script
Import a static script to create a custom plot.
- From the Tools menu, select Script Editor… to open the Script Editor.
- Select the appropriate folder in the tree pane for the script to be accessible (visible) only from the Simulation module of the current watershed.
Question I
What folder did you select?
Scripts/System/Current Watershed/WS8_Start/Modules/Simulation
- From the File menu, select Import. A file browser will open.
- Browse to the shared folder of the WS8_Start watershed. Locate and double-click on the Custom Plot.txt file.
- Note that Custom Plot.txt has been entered in the Label field as the name of the script. You can delete the extension (.txt) if you like. Also note that the edit pane of the Script Editor has been filled with the contents of the Custom Plot.txt file.
- Click the Save and Test button on the bottom of the Script Editor. A plot displaying inflow, outflow and the 25 & 50 percentile inflows should be displayed. The 50 percentile inflows are represented by the dashed red curve which is "filled above" with red hatching. The 25 percentile inflows are drawn with a dashed dark yellow curve which is "filled below" with dark yellow hatching.
Question II
In what other ways does the custom plot differ from the default reservoir plot?
The elevation and zones viewport is not included; inflow is red, not black (or dark grey); the lookback period is not included; the plot has a title showing the active alternative and the plotted data is for the active alternative only, not the selected alternatives.
- Close the plot and the Script Editor.
Task 4. Add the Custom Plot Script
Add the Custom Plot script to the script pane of the Simulation module.
- Right-click in the blank pane below the Compute button in the Simulation Control panel of the Simulation module in ResSim and select Edit Script List from the context menu. The Edit Scripts dialog will open.
- Move Custom Plot from the Available Scripts list to the Selected Scripts list then click OK. A new button will appear in the center of the pane below the compute button with the name of your selected script on it.
- Verify that you can execute the Custom Plot script by clicking its button. Close the plot.
Task 5. Create an Alternative
Create an alternative that uses an IF_Block.
- Switch to the Reservoir Network module and open the 01 Standard network.
- Edit the Crazy Mountain reservoir.
- Duplicate the Basic GC operation set, name the duplicate If-Then-Else.
- Create a new IF_Block named Conditional Release in the Normal Flood Control zone.
- Name the IF Conditional Inflow < 25th Percentile.
- Click Add Cond. to add a line to the Conditional Expression editor
- Set Value 1 to Time Series, then click Pick Value to use the Independent Variable Definition editor to select the Previous Value of the Model Variable Crazy Mountain-Pool reservoir inflow.
- Set the Operator to <.
- Set Value 2 to Time Series, then set it to the Previous Value of an External Variable named 25th Percentile Inflow.

- Right-click on the {}Conditional Release IF_Block in the Zone-Rules tree and use the context menu to append an ELSE IF Conditional section. Name the ELSE IF Inflow < 50th Percentile.
- Add a condition.
- Again, set Value 1 to Time Series, then set it to the Previous Value of the Model Variable Crazy Mountain-Pool reservoir inflow.
- Set the Operator to <.
- Set Value 2 to Time Series, then set it to the Previous Value of an External Variable named 50th Percentile Inflow.
- Append an ELSE conditional block and leave it unnamed.
- Add rules to the conditional sections of the {}Conditional Release IF_Block.
- Add a new Release Function rule to the IF section.
- Name it Max Release = 4000 cfs
- Set the release element to Crazy Mountain-Dam.
- Define the rule to be a Maximum limit function of Date with a value of 4000 cfs for the entire year.
- Add a new Release Function rule to the ELSE IF section.
- Name it Max Release = 6000 cfs
- Set the release element to Crazy Mountain-Dam.
- Define the rule to be a Maximum limit function of Date, with a value of 6000 cfs for the entire year.
- Add a new Release Function rule to the ELSE section.
- Name it Release Inflow
- Set the release element to Crazy Mountain-Dam.
- Define the rule to be a Maximum limit function of the Previous Value of the Model Variable Crazy Mountain-Pool reservoir inflow
Define the function as a 1:1 relationship using the values below:
Flow
Release
0
0
1,000,000
1,000,000
- Add a new Release Function rule to the IF section.
- Add the new {}Conditional Release IF_Block to the Conservation zone.
- Close the Reservoir Editor
- Open the Alternative Editor.
- Use SaveAs to copy the above GC alternative and name the copy If Block.
- Modify the If Block alternative as follows:
- Set the Flow Computation Method to Period Average because the external time series we are using in the comparisons are period average.
- Set the Operation Set for Crazy Mountain reservoir to If-Then-Else.
- Map the following pathnames from the C:\class\WS8_Start\shared\ventura.dss file to the external variable time series defined above (if rows are not visible for this mapping, close and re-open alternative):
- //CRAZY MOUNTAIN/FLOW-RES IN-P25/31Dec1996 - 01Jan 1998/1HOUR//
- //CRAZY MOUNTAIN/FLOW-RES IN-P50/31Dec1996 - 01Jan 1998/1HOUR//
- Save the alternative and close the Alternative Editor.
- Save the reservoir network.
Task 6. Add Alternative to Current Simulation
- Add the If Block alternative to the current simulation.
- Switch to the Simulation module
- From the Simulation menu, select Edit…. The Simulation Period dialog will open.
- In the Alternatives table, place a checkmark in the checkbox for the If Block alternative to add it to the simulation, then click OK.
- Right-click on the If Block alternative in the Simulation Control panel and select Set As Active to make the If Block alternative active alternative.
- Compute it.
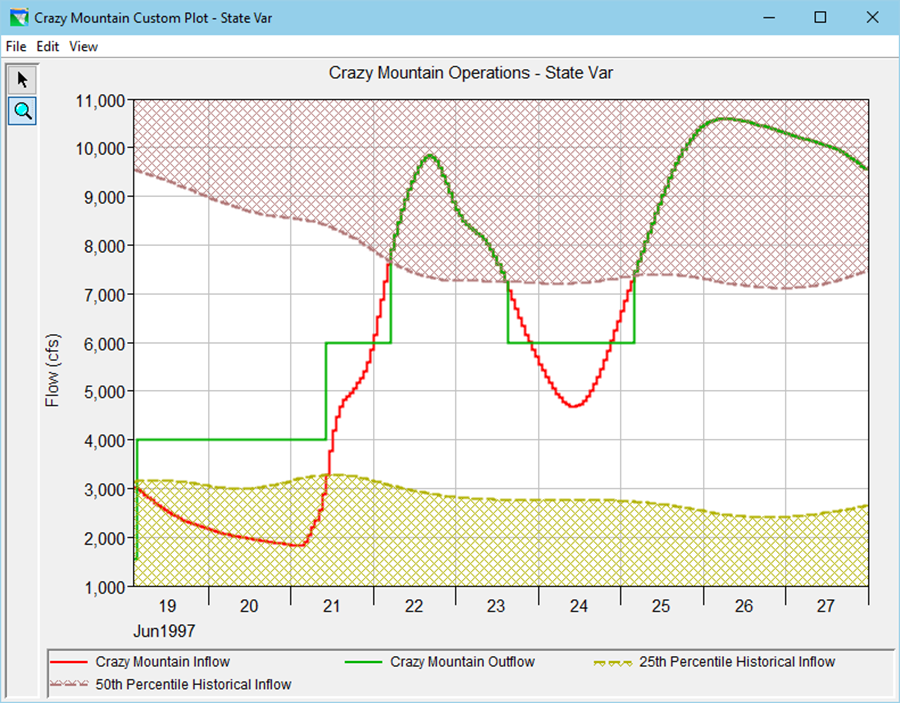
- Execute the Custom Plot script and verify that the releases follow the new rules.

Task 7. Create an Alternative that uses a State Variable
- Switch to the Reservoir Network module and open the 01 Standard network.
- Create a state variable named MaxRelease that utilizes the same limits as the If Block alternative.
- From the Edit menu select State Variables to launch the State Variable Editor.
- From the State Variable menu, select New to create a new state variable.
- Set the state variable Name to MaxRelease
- Set the Parameter Name to Flow-Max Out, and the set the Parameter Type to Flow.
Make sure that the state variable type is set to Jython Script.
Select the Initialization, Main, and CleanUp tabs to see that comments are provided in new state variables to help you get started.

TIP...
- Code in the Initialization tab will be executed once before the simulation starts.
- Code in the Main tab will be executed on every iteration of every time step in the simulation.
- Code in the CleanUp tab will be executed once after the simulation ends.
Import the state variable code.

NOTE...
The State Variable Import option should only be used to import a state variable that has exported. The Export function combines and formats the state variable's 3 scripts into a single file so that the Import function knows how to break it up again.
- From the State Variable menu, Select Import
- Navigate to and select C:\class\WS8_Start\shared\State Variable.py. Click OK to complete the import.
- Review the three tabs to verify that the script was correctly imported.
- Click the Compile Script button to verify there are no syntax errors.
- From the State Variable menu, Select Save to save your new state variable.
- Close the State Variable Editor.
- Use the Reservoir Editor to edit the Crazy Mountain reservoir properties and create an operation set that uses the MaxRelease state variable.
- Duplicate the Basic GC operation set and name the copy State Variable.
- Create a new Release Function rule in the Normal Flood Control zone.
- Name the new rule Max Release and set the release element to Crazy Mountain-Dam.
- Define the rule to be a function of the Current Value of your new MaxRelease State Variable.
Set the limit type to maximum and define the function as a 1:1 relationship using the values below:
Flow
Release
0
0
1,000,000
1,000,000
- Add your new Max Release rule to the Conservation zone.
- Use the Alternative Editor to create an alternative that uses your new operation set.
- Use SaveAs to copy the If Block alternative and name it StateVar.
- Set the Operation Set for Crazy Mountain to State Variable.
- Save the alternative and Close the Alternative Editor.
Task 8. Add Alternative to the Current Simulation
Add the StateVar alternative to the current simulation and verify its operation using the Custom Plot script. Refer to Task 6 for details if necessary.
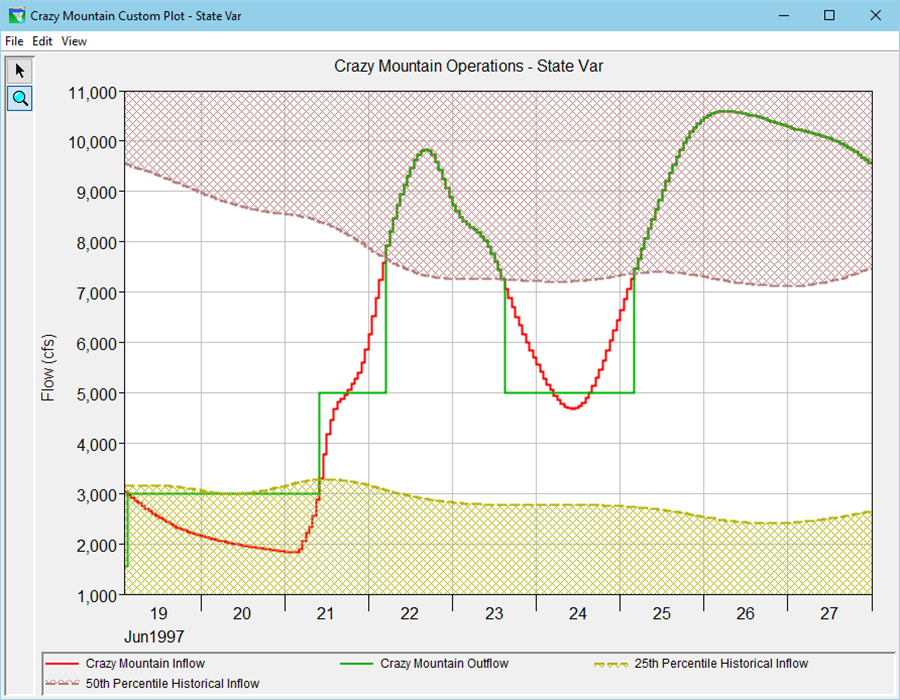
Task 9. Modify and Compute Simulation
- Modify the simulation's copy of the State Variable Script.
- Remain in the Simulation module and edit the MaxRelease state variable to modify the values to 3000 and 5000 cfs.
- Re-compute the State Var alternative and verify the changes using the Custom Plot script.