Download PDF
Download page Viewing and Printing Balanced Hydrograph Analysis Results.
Viewing and Printing Balanced Hydrograph Analysis Results
The user can view the output for the balanced hydrograph analysis directly from the Balanced Hydrograph Analysis editor (tabular and graphical output) or by using the buttons at the bottom of the editor.
Tabular Output
Once the computations for the balanced hydrograph analysis are completed, the user can view the tabular output by selecting the Results tab. Tabular results can be opened after clicking the Plot Balanced Hydrograph button and selecting File | Tabulate or by double clicking on the balanced hydrograph plot in the Results tab and in the opened plot selecting File | Tabulate. The balanced hydrograph table can also be printed once opened in a new window using the File | Print option. An additional printing option available from the File menu is Print Preview. The table can also be exported by selecting Export… from the File menu. When the Export option is selected, a window will appear allowing the user to select the Field Delimiter and additional Table Export Options. Currently five field delimiter formats are available for exporting the table: TAB, SPACE, COMMA, COLON and SEMI-COLON.
Graphical Output
Graphical output of the balanced hydrograph analysis can be obtained by selecting either the Results tab, or by pressing the Plot Balanced Hydrograph button at the bottom of the balanced hydrograph analysis editor. When the Plot Balanced Hydrograph button is pressed, a balanced hydrograph plot will appear in a separate window as shown in Figure 1. The example balanced hydrograph plot in Figure 1 was created after modifying the Time-Window (in the General tab). The user can modify the Time-Window to obtain balanced hydrographs for a specific maximum peak in the dataset.
The balanced hydrograph plot can be sent to the printer by selecting the Print option from the File menu at the top of the window. Additional printing options available from the File menu are Page Setup, Print Preview, and Print Multiple (used for printing multiple graphs on the same page). The graphic can also be sent to the Windows Clipboard by selecting Copy to Clipboard from the File menu. Additionally, the plot can be saved to a file by selecting the Save As option from the File menu. When the Save As option is selected, a window will appear allowing the user to select a directory, enter a filename, and select the format for saving the file. Currently, four file formats are available for saving the graphic to disk: windows metafile, postscript, JPEG, and portable network graphic. 
As explained previously, the data contained within the plot can also be tabulated by selecting Tabulate from the File menu. When this option is selected, a separate window will appear with the data tabulated. Additional options are available from the File menu for saving the plot options as a template (Save Template) and applying previously saved templates to the current plot (Apply Template).
The Edit menu contains several options for customizing the graphic. These options include Plot Properties, Configure Plot Layout, Default Line Styles, and Default Plot Properties. Also, a shortcut menu will appear with further customizing options when the user right-clicks on a line on the graph or the legend. Both the Y and X-axis properties can be edited by placing the mouse on top of axis and clicking the right mouse button. Then select the Edit Properties menu option in the shortcut menu. For example, the user can turn on minor tic marks for the y-axis and modify the minimum and maximum scale for the x-axis. The graphic customizing capabilities within HEC-SSP are very powerful, but are also somewhat complex to use. The code used in developing the plots in HEC-SSP is the same code that is used for developing plots in HEC-DSSVue and several other HEC software programs. Please refer to the HEC-DSSVue User's Manual for details on customizing plots.
Viewing the Report File
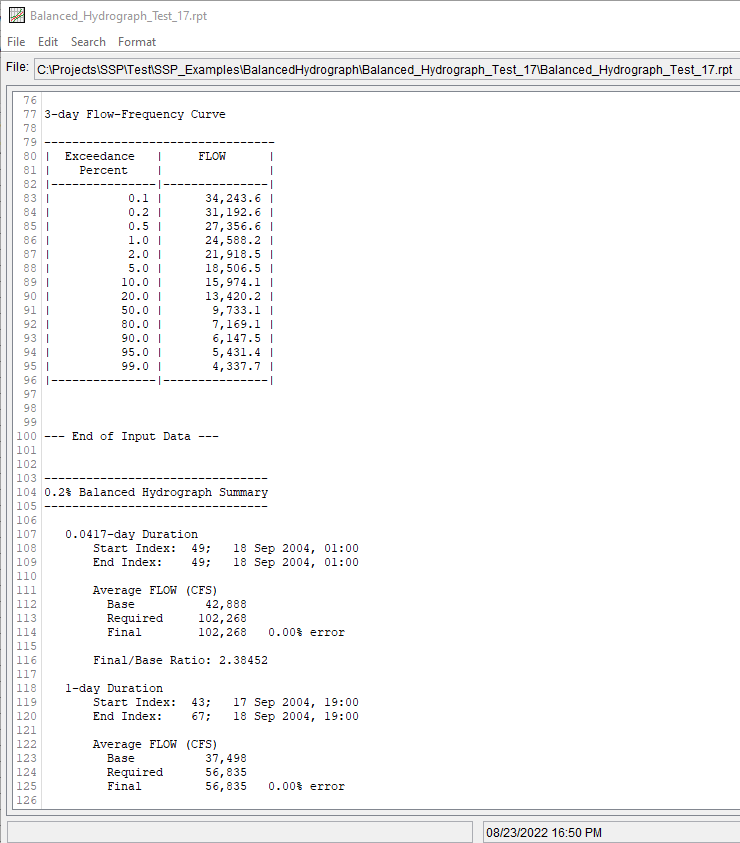
A report file is created when the balanced hydrograph analysis computations are performed. The report file lists the input data, user settings, and the final results. This file is often useful for understanding how the software arrived at the balanced hydrograph.
Press the View Report button at the bottom of the Balanced Hydrograph Analysis editor to view the report file. When this button is pressed, a window will appear containing the report as shown in Figure 2.
The computations that were used to create the balanced hydrographs are contained within the Report output. Specifically, the base, required, and final flow-duration values are detailed along with the percent error for each duration and frequency. Additionally, the balanced hydrograph report can be opened using the Results | Report option in the Results dropdown menu at the top of the SSP window.