Download PDF
Download page Flood Risk Analysis (FRA) Compute Option.
Flood Risk Analysis (FRA) Compute Option
Downloads
| Software | 
HEC-WAT Version 1.1.0 was used to develop this guide. If you haven't done this already, please review the Download and Install HEC-WAT page to download, install, open and configure the HEC-WAT. |
|---|---|
| Example Watershed Data | The Russian River watershed is the example WAT watershed used in the HEC-WAT Version 1.1 quick start guide. Please review the Example Watershed page for an overview of the study watershed. Zipped dataset required for this guide: FRA_RR.7z |
USACE flood risk management (FRM) policy requires that USACE analytical processes include methods and tools that employ integrated, comprehensive, systems and life-cycle based approaches and risk-based concepts in planning, design, construction, operations and major maintenance. These USACE methods need to incorporate systems response of projects when considering load distribution and failure possibilities. USACE policy also states that project performance needs to consider the system reaction to flood loading and how those loadings are distributed across the watershed.
HEC-WAT includes an option that will analyze complex riverine systems while implementing the flood risk management and systems requirements. The compute option, Flood Risk Analysis (FRA), allows a user to perform plan formulation or system performance analyses while incorporating risk analysis. This quick start guide provides instructions for creating a Flood Risk Analysis (FRA), HEC-WAT study from scratch using existing HEC-ResSim, HEC-HMS, and HEC-RAS models.
Note: If you want a guide for creating an HEC-WAT study from scratch and building the schematic for the default alternative, please review the Create an HEC-WAT Study from Scratch page.
Configuring the Hydrologic Sampler
The Hydrologic Sampler plugin is an event generator plug-in for the HEC-WAT Flood Risk Analysis (FRA) compute type that implements a nested Monte Carlo simulation following USACE guidance to separate natural variability from knowledge uncertainty. The Hydrologic Sampler stochastically generates boundary conditions by sampling from statistical distributions and sets of potential hyteograph or hydrograph sequences (also called "shape sets"). These distributions and the hyetographs or hydrographs used are typically derived from observed data, estimates of historical events, or synthetic and modeled data for extreme events. The sequence of models defined in the HEC-WAT simulation are run with these sampled boundary conditions to produce a stochastic sample of their outputs, which can be summarized into scalar metrics (output variables) and summarized with common techniques such as flow/stage frequency curves and histograms. The HEC-WAT and the Hydrologic Sampler plugin use a pseudo-random number generator with a seed value to ensure that these stochastic processes are reproducible. For more information regarding the hydrologic sampler, please review the Hydrologic Sampler User Guide.
Creating a new Hydrologic Sampler alternative from scratch for this watershed is covered in the HEC-WAT Training workshops, so for this guide, we have provided the Hydrologic Sampler model alternative in the files above.
Importing a Hydrologic Sampling Alternative
- From the Study Tree, right-click on the RussianRiver study name, and click Browse Study Folder to quickly navigate to the RussianRiver HEC-WAT directory.

- From the File menu, click Save Study and then Exit.
- With the HEC-WAT software closed, from the user's computer, locate the HEC-WAT directory for the watershed. From the FRA_RR > RR_Models folder, copy the RR_hs folder to the HEC-WAT directory that contains the study. Rename that folder to hs.
- Open HEC-WAT, and open the RussianRiver study.
- From the Study Pane, expand Models. There should be a Hydrologic Sampling node, click on it. In the Content Pane (below the Study Pane), there should be a Hydrologic Sampling Alternative - RR_Precip2.

- Right-click on RR_Precip2, from the shortcut menu click Edit. The Hydrologic Sampling Editor opens.

- RR_Precip2 is a hydrologic sampling alternative that was previously built for the Russian River study. This alternative is setup to sample precipitation data. How do we know that (besides the name)?
- From the Data to be Sampled list on the Hydrologic Sampling Editor, Precipitation Sampling has been selected. (The other choice is Flow Sampling).
- For Precipitation Sampling there is one sampling method available (Sampling Method list), Basin Average Frequency Curve.
- For Flow Sampling, there are two sampling choices (Sampling Method list) - Basin Average Frequency Curve (which is the selection for RR_Precip2) and Historical Basin-wide Events. Each of these choices are the mechanisms that generate a hydrologic sequence.
- Basin Average Frequency Curve - generates an event hydrograph for each location by sampling a peak flow from a flow frequency curve and combining that peak with a hydrograph shape (for further details please review the Hydrologic Sampler User Guide).
- Historical Basin-wide Events - the period-of-record of actual events plus an array of synthetic events are put into a "flood bucket" and repeatedly re-sampled to provide basin-wide sets of hydrographs (for further details please review the Hydrologic Sampler User Guide).
- Close the Hydrologic Sampling Editor.
Create an Analysis Period
An HEC-WAT compute requires an HEC-WAT alternative, an analysis period, a program order, and model alternatives.
To create an analysis period:
- From the HEC-WAT main window, from the Study Tree, right-click on the Analysis Periods folder. From the shortcut menu click New.

- The Create New Analysis Periods dialog opens. In the Name box enter a name (FRA_TW). In the Time Window box enter the information required for the time window. The FRA Analysis Period must have a start date and end date that encompass a whole number of years, and the number of years in the time window determines the number events that will be simulated in the FRA compute. Typical Flood Risk Analysis simulations will only model shorter time windows within each year as part of the flood event, however large complex watershed systems may require using the full year available to each compute. The state date should be set such that it is prior to the typical flood season, such as using the first of October to simulate events within water years.

For the Start Date and End Date, enter in the format ddmmmyyyy. The Start Time and End Time should be entered as military time - e.g. 0000, 0600, 1300 (1 p.m.), 2400 (midnight).
- Click OK to close the Create New Analysis Periods dialog and create the analysis period. The HEC-WAT main window, will show the new analysis period name in the Study Pane, under the Analysis Periods folder.
Program Order

HEC-WAT Flood Risk Analysis Computes with HEC-RAS
Within the HEC-WAT Flood Risk Analysis framework, it is critical to manage the overall compute time for each event to minimize the overall compute time for the simulation. The HEC-RAS model in this simulation is the most substantial portion of the overall compute time for this study. We strongly recommend taking steps to reduce the number of individual events that require the HEC-RAS model to compute, through the use of HEC-WAT features like stratified sampling and the Model Skip Rule feature.
While this Quick Start Guide presents the steps to include the HEC-RAS model, if it is left out of the Program Order setup (described below) the remaining HEC-RAS model steps are optional.
HEC-WAT allows for a flexible set of programs, computation order, and data flow through the establishment of a program order.

Once a program order has been chosen for an HEC-WAT simulation, changes should not be made to the program order as this could cause a disruption in the flow of data and invalidate any existing work. For further details on Program Order, review Program Order of the HEC-WAT User's Manual.
If a program order needs to be changed after it is used by a simulation, we recommend creating a new program order and changing the simulation to use the new program order.
To create a program order:
- From the HEC-WAT main window, from the WAT Tools toolbar, click the Program Order Editor
 button.
 - From the Program Order dialog box, from the Program menu, click New.
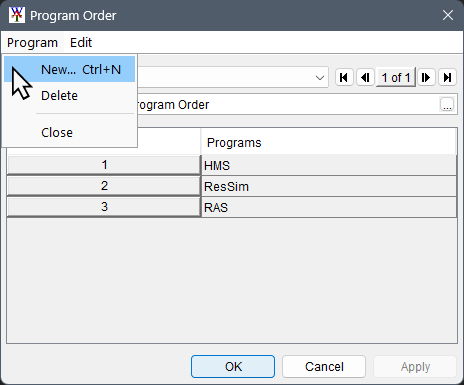
- The New Program Order dialog box opens.
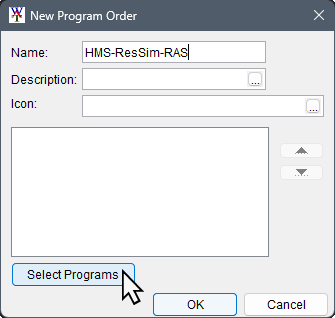
- Enter a name for the program order in the Name box (e.g., HMS-ResSim-RAS). Description and Icon are optional.
- Click Select Programs to open the Selection Editor. Select the software applications that are required for the program order from the Available list.

- Double-click a program in the Available box, or select an available program and click Add, and the name of the selected software applications is added to the Selected list.
The order that items are added in this step will define the compute sequence; if adjustments are desired, programs can be reordered in the New Program Order dialog after selection. To have a program appear in the program order more than once, it must be added to the program order in this step as many times as desired.
- Once all the software applications have been selected (HMS, ResSim and then RAS), click OK to close the Selection Editor.
- The New Program Order dialog box now displays the names of the selected software applications. Click OK to close the New Program Order dialog box.
- The Program Order dialog box Name list now contains the name of the new program order and the table displays the sequence for the selected software applications. The created program order (e.g., HMS-ResSim-RAS) can now be selected by simulations.
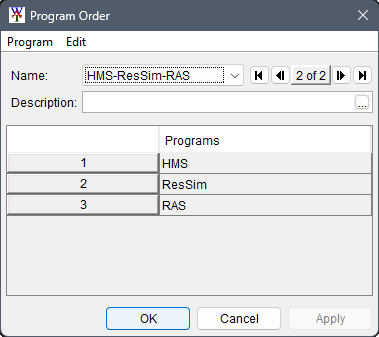
- Click OK to close the Program Order dialog.
Create an HEC-WAT FRA Simulation
Now that all of the building blocks have been configured, the user can now create an HEC-WAT FRA simulation. To create an HEC-WAT FRA simulation:
- From the HEC-WAT main window, from the WAT Tools toolbar, click the Alternative and Simulation Manager button
 .
. - The Alternative and Simulation Manager dialog opens. From this dialog box the user can create/modify alternatives, analysis periods, simulations, program order, link models, and make runs.

- To create a simulation, from the table right-click on the intersection of an alternative and analysis period. From the shortcut menu click Create Simulation. The Create New Simulation dialog opens.

- HEC-WAT has defined a default name for the simulation (Without Project Conditions-FRA_TW) in the Name box. The name is a combination of the HEC-WAT alternative name and analysis period name, where the intersection was in the table (name can be changed). Also, in the Alternative and Analysis Period lists the selections have already been made based on the intersection in the table. The selected Alternative cannot be changed, but the selected Analysis Period can be changed.
- In the F Part box, a default F Part is displayed that was generated by HEC-WAT based once again on the alternative and analysis period.
- To create an FRA simulation, select Run FRA. The options for setting up an FRA simulation are now available.
Number of realizations to perform the flood risk management analysis - enter the maximum number of realizations (e.g., 10) that are needed to perform the FRA analysis; number must be equal to or larger than the simulation time window.
Years per realization - default is 500; number can be increased. - From the Hydrologic Event Alternative list select the appropriate Hydrologic Sampling Alternative (RR_Precip2).

- A program order needs to be selected. From the Program Order list select the HMS-ResSim-RAS program order.
- In the Programs table, the software applications that were defined in the program order appear in the order the software applications were selected. Now the user must select the appropriate alternative (plan, run) for each software application. From the Alternative column, from the list for HMS, select the appropriate HMS run ((MCA)DCL_WAT).
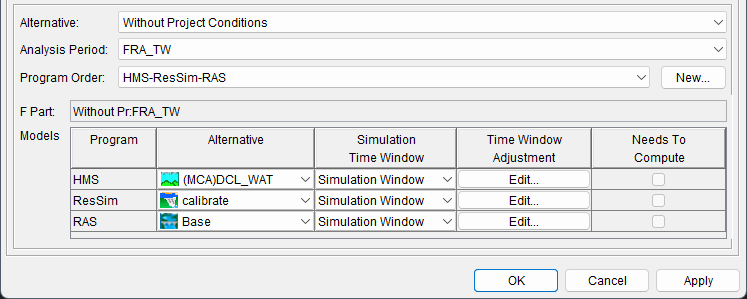
- Repeat the process for the other software applications. Below is the list of the appropriate alternatives for the RussianRiver study:
- HMS - (MCA)DCL_WAT
- ResSim - calibrate
- RAS - Base (optional)
- Now that all of the alternatives have been selected, click OK. The Create New Simulation dialog closes. On the Alternative and Simulation Manager dialog, the intersection of the alternative and analysis period now provides information about the simulation.
- Click OK; the Alternative and Simulation Manager dialog closes.

- From the HEC-WAT main window, the created simulation appears on the Study Tree, under the Simulations folder.
- Click on the simulation in the Study Tree and the Content Pane displays information about the selected simulation.
- Double-click on the simulation name (Without Project Conditions-FRA_TW), a Select Map dialog opens. Select, Existing Map Windows, to add the simulation to the existing map window and see the schematic elements that represent the simulation.

Linking
The next step is to have the models of a simulation communicate with each other. This is accomplished by linking (DSS mapping) the models thru DSS and using a simulation name. From HEC-WAT, the Model Linking Editor provides an easy way to link models including observed data, and provides a mechanism where the linking will have to be done once per alternative.
- From the HEC-WAT main window, from the WAT Tools toolbar, click the Model Linking Editor button
 .
. - The Model Linking Editor opens.

- From the Simulation list the user will need to select a simulation. For this example the user will be selecting the Without Project Conditions-FRA_TW (default) simulation.
- Now let's link the individual model alternatives that are part of the selected simulation.
Linking the HMS Model Alternative
- From the Model Linking Editor, from the Model to Link list select HMS-(MCA)DCL_WAT. The Model Linking Editor table will now contain all of the locations for the HEC-HMS model that need to be linked.
- For HEC-HMS the linking will be results from the Hydrologic Sampling alternative.

- This HEC-HMS model should be linked to the outputs from the Hydrologic Sampler RR_Precip2 alternative. Use the Default Model To Link button to select the Hydrologic Sampler alternative and then confirm that each location is linked to the correct sub-basin precipitation output.
Linking the ResSim Model Alternative
- From the Model Linking Editor, from the Model to Link list, select ResSim-calibrate. The Model Linking Editor table will now contain all of the locations for the ResSim model alternative that needs to be linked.

- For ResSim the linking will be the results from the HMS model alternative. For this example watershed, the models were already configured for a HEC-WAT FRA compute, so the model linking should be correct with the models that were imported.
- In the Model Linking Editor above, it is showing the HEC-ResSim model linking, with the HEC-HMS model being used as the inputs. The green text shows that this HEC-ResSim model alternative is already linked to an HMS model alternative that HEC-WAT knows about, as it was linked to a different HEC-WAT simulation.
- Click Default Model to Link. The Select Default Model to Link dialog opens. From the Default Model to Link list, select HMS-(MCA)DCL_WAT. Click OK, the Select Default Model to Link dialog closes.
- A Confirm Input From Model changing to window opens. Basically the window is asking the user to be sure before proceeding, click Yes. The Confirm Input From Model changing to window closes, and the Model Linking Editor now displays the linking for the ResSim model alternative.

- Once the linking is finished for the ResSim model alternative, from the Model Linking Editor click
 , this will save the linking.
 - That completes the linking for the ResSim model alternative.
Linking the RAS Model Alternative
(Optional, if the HEC-RAS model is not being used, this step can be skipped)
- From the Model Linking Editor, from the Model to Link list, select RAS-Base. The Model Linking Editor table updates with all of the locations for the RAS model alternative.
- For the RAS linking, results from the HMS and ResSim model alternatives will be used. By default HEC-WAT attempts to link to the correct locations and should be correct.
- The current linking that is displayed for the RAS model alternative is correct, so the linking does not need to be done.

- Note, the two locations in the RAS linking that need to be linked to the ResSim model alternative:
- DryCreek DryCreek RS 74716.8 (Sonoma Outflow J) location should have ResSim-calibrate, and Lake Sonoma Outflow JCT - Flow selected.
- Russian CoyoteToDC RS 527387.7 (Lake Mendocino Outflow J) location should have ResSim-calibrate, and Lake Mendocino Outflow JCT - Flow selected.
- Lastly, the location (Russian@181688.0) in the RAS model that has a Failure Elevation parameter does not require an input from a model and should be left blank.
- Once the linking is finished for the RAS model alternative, from the Model Linking Editor click Save, this will save the linking.
- That completes the linking for the Without Project Conditions-FRA_TW simulation. Close the the Model Linking Editor and return to the HEC-WAT main window.
Output Variables
HEC-WAT Flood Risk Analysis (FRA) Computes use Output Variables to summarize results from individual events. Output Variables represent a single scalar value that can be pulled out of the model results for an individual event to characterize system performance. For example, the maximum stage from a reservoir time-series could be extracted to build a reservoir stage frequency curve, or the maximum flow at a downstream control point can be used to build a regulated flow frequency curve. Saving the time-series information from many thousands of events, at many locations, for many alternatives could easily overwhelm the available storage on a desktop computer, but these scalars do not require much disk space. From the Output Variable Editor, a user can select any available output variables from the models that are part of the selected HEC-WAT simulation and get summary information (e.g., maximum flows, maximum stage, etc.) for each event in the FRA compute. Each HEC-WAT plugin provides a specific set of Output Variables for the model outputs it produces. Typically these are maximums from a time-series output, but may include many other statistics.
Why is it a good idea for the user to choose at least one output variable?
In most cases, the desired type of output from a WAT/FRA simulation will include the maximum (or minimum) value from a time-series record to be summarized as annual peak flow or stage as a frequency curve. Thus, selecting Output Variables for FRA simulations from the Output Variable Editor is the expected route to generate these summary statistics. The HEC-WAT FRA simulation will not compute without Output Variables selected unless a checkbox for "Output Variables Optional" is used, confirming that no output variables are necessary. For a full "production" compute, it is recommended to review the set of output variables, and adding any potentially needed, prior to computing the simulation, as a full HEC-WAT compute may take several hours or days to complete.
- From the HEC-WAT main window, from the WAT Tools toolbar, click
 to open the Output Variable Editor. From this editor, the user can select variables from the model alternatives that are part of a selected HEC-WAT simulation.
- Currently, the maximum value for each of the output variables selected will be saved as a table to the simulation's output DSS file. If a frequency curve should be computed for a selected output variable, the user must select Frequency from the Output Variable Editor.
- From the Simulation list, select an HEC-WAT simulation (selected by default); next from the Model list select the appropriate software application; and, then from the Alternative list select the appropriate model alternative.
- Next click Select Variables to Save, the Select Variables selector dialog opens.

- A list of the model alternative's available output variables is listed in the Available Variables list. To select variables, highlight (use the CTRL key to select multiple variables) the desired variable(s) in the available list, and then click Add. The selected variable(s) move to the Selected Variables list. Click OK, the Select Variables selector dialog closes and the selected output variables appear on the Output Variable Editor.
Use the above instructions to add the following output variables:
- With the Hydrologic Sampler model and RR_Precip2 alternative selected, add:
- Lake Mendocino - PEAK Precip
- Lake Sonoma - PEAK Precip
- BASIN AVERAGE Watershed 1 - PEAK Precip
- With the ResSim model and calibrate alternative selected, add the following locations as these represent the flow at the control points for which the reservoirs are regulating flow to reduce flooding:
Hopland Flow 1HOUR Flow
Healdsburg Flow 1HOUR Flow
Dry Creek Flow 1HOUR Flow
- Russian River + Dry Creek Flow 1HOUR Flow
- With the ResSim model and calibrate alternative selected, add the following variables as these will tabulate the peak inflow, peak pool elevation, and peak outflow from the reservoirs.
Lake Mendocino-Pool Elev 1HOUR Elev
Lake Mendocino Inflow JCT Flow 1HOUR Flow
Lake Sonoma-Pool Elev 1HOUR Elev
Lake Sonoma Inflow JCT Flow 1HOUR Flow
Lake Sonoma Outflow JCT Flow 1HOUR Flow
Lake Mendocino Outflow JCT Flow 1HOUR Flow
- Optionally, if the HEC-RAS model is being used, add HEC-RAS model output variables – with the RAS model, Base alternative selected, add:
RUSSIAN COYOTETODC RS 527387.7-STAGE
RUSSIAN COYOTETODC RS 527387.7-FLOW
RUSSIAN DCTOOCEAN RS 3190.079-STAGE
RUSSIAN DCTOOCEAN RS 3190.079-FLOW
RUSSIAN COYOTETODC RS 187978.9-FLOW
- RUSSIAN COYOTETODC RS 187978.9-STAGE
RUSSIAN COYOTETODC RS 445878.0-STAGE
RUSSIAN COYOTETODC RS 445878.0-FLOW
- For all variables added to the Selected Model Output Variables table, check the Frequency checkboxes in the last column.
- From the File menu, click Compute Frequency Curves.

- From the File menu, click Save and then Close to save the selected variables and close the Output Variable Editor.
Compute and View Results
Now that a simulation has been defined, the linking of model alternatives has been completed for a simulation, and model alternatives have been imported into HEC-WAT, the user is now ready to compute the Russian River study.
- From the HEC-WAT main window, from the Study Tree, from the Simulations folder, right-click Without Project Conditions-FRA_TW. From the shortcut menu point to Compute, click Simulation.

- The Run FRA Simulation dialog opens. In the Name box is the name of the simulation that will be computed (Without Project Conditions-FRA_TW). The number of realizations (10) that will be computed is provided in the Max. Number of Realizations box. Other options are:

- Start at Lifecycle 1 – default starting point of an FRA compute.
- Run specified – by selecting this option the user can choose whether to run specific lifecycle(s), realization(s), or event(s). In the text box(es) the user will then enter the number of the specific lifecycle, realization, or lifecycle - event combination to start the FRA compute from.
- Save Lifecycle DSS Files – when the user makes this choice all FRA time-series results are saved for each lifecycle. This may be necessary for additional analysis of model results beyond the built-in capabilities of HEC-WAT.
- Save Model Folders – HEC-WAT produces a copy of relevant model files for each event computed, which are deleted at the end of each lifecycle compute by default. If the user wishes to save all model files produced for a given event, Save Model Folders must be selected. As the model copying process results in a significant amount of data being produced during the compute, we strongly recommend against using this option except when testing HEC-WAT models or trying to troubleshoot individual events.
- Stop Simulation Compute on Error – selecting this option will make the FRA compute stop when any kind of error is detected during the simulation (compute).
- Output Variables Optional – by default an FRA compute requires that at least one output variable be selected; if Output Variables Optional is selected then output variables are not required for the FRA compute.
- Restart WAT After Model Errors – if Stop Simulation Compute on Error has not been selected, this option becomes available. If this option is selected, the user can set the consecutive number of errors that will make HEC-WAT restart and the maximum number of restarts.
- Restart Plugins – this allows the user to decided which programs to stop and re-start during the FRA compute. This needs to be used when there are memory issues with the individual software applications during an FRA compute.
- Click Next, the Run FRA Simulation Information dialog opens. This dialog box provides information about the FRA simulation that is about to be computed. Information includes the time window, when the simulation will be stopped, whether results will be saved, lifecycles that will be run, convergence information, model sequence information, variables for convergence, time window modifiers; and output variable time windows.

- Click Compute, the Compute Progress dialog opens.

Once the model has finished computing all realizations, lifecycles, and events, the simulation log will report Compute Complete and the compute progress window can be closed. For instructions on opening and viewing simulation results, access the Reviewing Results page.