Download PDF
Download page The State Variable Editor.
The State Variable Editor
State variables are created, edited, and managed through the ResSim State Variable Editor. The State Variable Editor can be accessed by selecting State Variables… from the Edit menu of either the Reservoir Network module ("Figure: Reservoir Network Module - Edit Menu") or the Simulation module.

Figure: Reservoir Network Module - Edit Menu
ResSim's State Variable Editor ("Figure: The State Variable Editor - Annotated") is designed to help you create and manage your state variables. It includes a built-in scripting interface for editing your state variable scripts and accessing needed objects from your ResSim model.
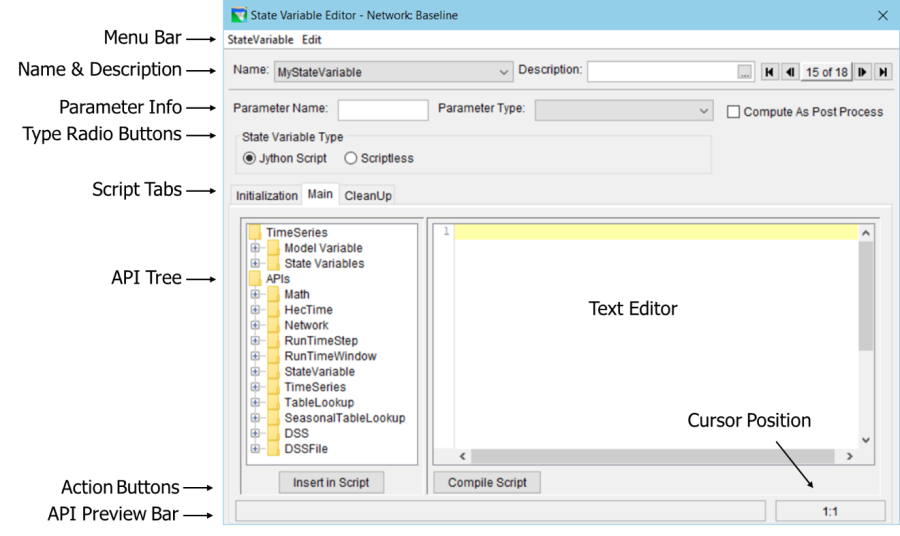
Figure: The State Variable Editor - Annotated
The State Variable Editor consists of several important regions and widgets:
- Menu bar—this bar contains the StateVariable and Edit menus.
- StateVariable menu—like a File menu, this menu provides access to the functions for creating and managing your state variables.
- Edit menu—this menu provides access to the standard text editing functions including Cut, Copy, Paste, and Undo. Redo will also appear in this menu if there's anything that has been Undone since the last save of the current state variable.
- Name & Description—this bar contains the Name and Description fields as well as a set of navigation buttons. The Name field is a selector; use it to select the specific state variable you want to edit. The Description field can be used to add a description of the selected state variable. The navigation buttons, like the Name selector, give you the ability to cycle through all the network's state variables by moving forward and backward through the list.
Parameter Info—this bar contains the fields for specifying the current state variable's Parameter Name and Type. For example, if your state variable is going to compute basin inflow, then the parameter type is probably Flow and the parameter name you enter is up to you—you might call it flow, or inflow, or flow-in or something descriptive of the data you are computing.

Note: when the compute results are written to the simulation.dss file at the end of the compute, the B and C parts of the DSS pathname for each state variable's output are formed from its Name and its Parameter Name, respectively. The units of the data are based on the parameter type and the current unit system for your watershed.
 —this checkbox, located to the right of the Parameter Info bar, is provided to force the computation of a State Variable that would otherwise not be computed. State variables that are not referenced in the current operations (e.g., used in a rule) will not be calculated during the simulation unless the Compute As Post Process box is checked. When this box is checked, the state variable will be computed after the Regulated Compute has finished running through the time window but has not yet started its CleanUp process. This option might be used when a State Variable has been created for the purpose of post-processing results (e.g., water accounting, system balancing, etc.). Note: this option to compute the State Variable as a Post Process should only be used when needed since it will increase the compute time.
State Variable Type Radio Buttons—these radio buttons allow you to choose between two types of state variable—Jython Script or Scriptless. While all user-defined state variables must be calculated and written by a script, the default Jython Script state variable type is calculated by its own Jython script, whereas a Scriptless state variable has no script of its own and must be calculated by another state variable. You may wish to use a single script to calculate several different but related state variables. In such a case, you would create one Jython Script state variable and one or more Scriptless state variables, all of which would be calculated and populated during the compute of the Jython Script state variable. When a state variable is denoted as Scriptless, the Script tabs and Text Editor will be disabled and ResSim will not attempt to launch a script to compute the variable. A lookback entry will be created for the Scriptless state variable and a DSS record will be defined, however the record will not be populated with data unless a Jython Script state variable explicitly writes values to that Scriptless state variable.
Note: The functionality of the Scriptless state variable will be replaced by Global Variables in future versions of ResSim.
- Script Tabs—the Tabs in the State Variable Editor separate the three scripts that define the three compute functions of each state variable:
- Initialization—this tab holds the initStateVariable function for your state variable. Use this tab to initialize the variables and objects that your state variable needs. The initialization function is executed only once, at the start of the Regulated Compute loop.
- Main—this tab holds the script that is executed at least once per timestep through the simulation portion of the time window in order to compute the value of the state variable for each timestep.
- CleanUp—this tab holds the script that is executed only once, at the end of the Regulated Compute loop. Use this tab to clean up the variables you created in your state variable and to write to disk any local time series or other objects that you need for analysis and/or debugging.
API Tree—a tree widget is used to provide access to the ResSim Application Programming Interface (API) available to the script. The tree is divided into two major branches:
TimeSeries branch—Each node in this branch gives you access to the TimeSeries objects for the various elements in your model ("Figure: Model Variable Node in the Time Series Branch of the API Tree").
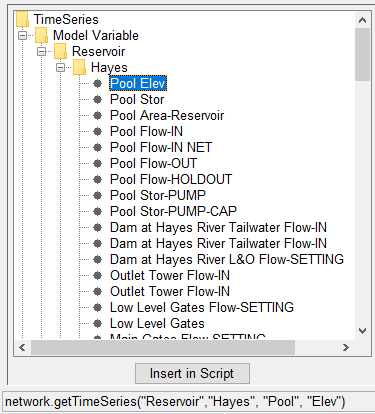
Figure: Model Variable Node in the Time Series Branch of the API Tree
APIs branch—each node in this branch provides you with easy access to the method calls for accessing and manipulating the objects in your model that you are most likely to need in your scripts. Among other things, it contains API entries for:
- Accessing methods for manipulating the TimeSeries objects you have retrieved from the TimeSeries branch.
- Determining the date and time, as well as the index, of the timestep being evaluated.
- Accessing data directly from HEC-DSS file.
By double-clicking on a node in the tree, the code needed to retrieve an element's time series or to access a method for manipulating a particular object type can be placed in your script at the current location of your cursor in the editor. This action can also be performed by selecting a node in the API tree and clicking the Insert in Script button.
By hovering your cursor over a node in the tree, a tooltip ("Figure: Method Node in the APIs Branch of the API Tree - Showing Tooltip") will appear with the Javadoc entry for the method call that is represented by that node. The Javadocs are class-level documentation of the public classes and their methods that you can use in your scripts.
Most method calls (or functions) that you may need require arguments (or parameters) as input. If the method you select requires arguments, the text of that method call that is added to your script will include the arguments between the parentheses ().
Method arguments given as literals (i.e., actual numbers, or strings enclosed by " ") are already complete and require no additional input. The text inserted from items under the Time Series branch of the API Tree typically fall into this category; for these calls, you do not need to modify the argument list.
Method arguments given as java classes are placeholders for variables that you must supply in the script ("Figure: Method Node in the APIs Branch of the API Tree - Showing Tooltip"). The method call text inserted from nodes in the APIs branch usually requires that you replace the placeholders in the argument list with appropriate variables/objects that you created within your script.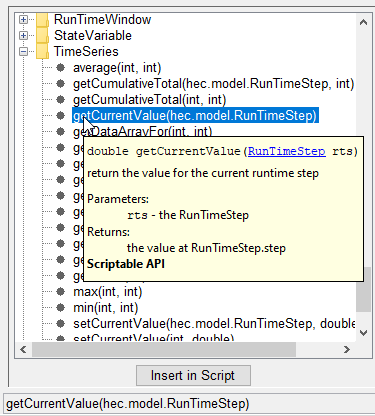
Figure: Method Node in the APIs Branch of the API Tree - Showing Tooltip

If a method call has: RunTimeStep rts as an argument, you should almost always use the variable: currentRuntimestep for that argument. You will learn more about currentRuntimestep in the next section.
The list of ResSim classes and their methods that are included in the APIs branch of the API Tree is not complete or all-inclusive. If you are looking for a class or method you think you need from ResSim and it isn't in the list, click on a branch or node in the APIs section and press F1. The Javadoc Viewer ("Figure: The Javadoc Viewer") will open showing the Javadoc pertinent to the node or branch you selected. From there, you can search through the Javadocs to find the method you need to access the information you need.
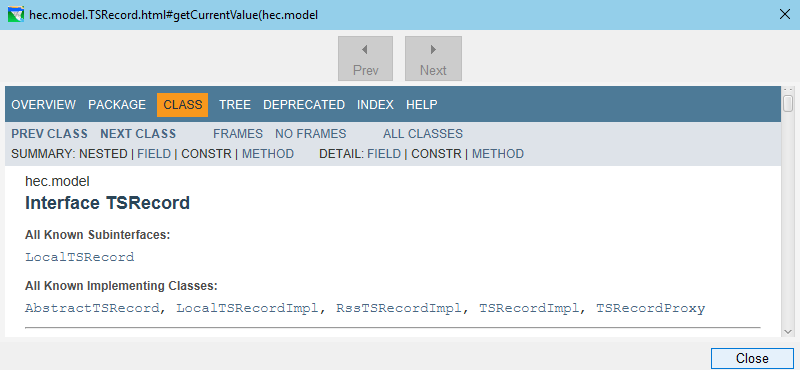
Figure: The Javadoc Viewer
- API Preview Bar: When you select a node in the API tree, the text that would be generated by that node will appear in the Preview Bar.
- Text Editor—This pane of the State variable Editor uses a text editor that interprets the text of your script as Jython source code and colorizes it according to the type of statement or key word it recognizes. This editor supports the standard Windows® shortcut-keys for select all (Ctrl+A), cut (Ctrl+X), copy (Ctrl+C), and paste (Ctrl+V), and undo (Ctrl+Z) functions. These functions can also be accessed from the Edit menu or by right-clicking in the Text Editor to open a context menu. The find (Ctrl+F) function is also supported but can only be access from the shortcut keys.
- Cursor Position — the position (row and column number) of the cursor in the Text Editor is shown in the small box to right of the API Preview Bar.