Download PDF
Download page Configuring a Release Overrides Tab and Variable.
Configuring a Release Overrides Tab and Variable
To minimize the "clicks" needed for specifying a release schedule and reviewing the impacts, you may decide—like we did—to use the OSI as the tool for performing your release overrides (instead of ResSim's Overrides Editor) and to assemble the necessary reservoir release override variables in one tab along with the variables that show the response to the releases in the system.
As discussed in "Running Simulations and Analyzing Results", a release override can be applied to any controllable outlet or outlet group in the reservoir outlet hierarchy, including the total release from the reservoir pool. For many systems, a single OSI variable to override the total release from each reservoir is good enough to meet the release schedule needs. For some systems, however, you may need to setup a release override OSI variable for multiple release elements of one or more of your reservoirs.
For the Hayes Basin, we created a tab we called Release Schedule. On this tab we created a variable for each reservoir's total release override and a variable for each control point.
"Figure: OSI - Release Schedule Tab" shows our Release Schedule tab with the Hurst variable selected. The Plot Panel shows two viewports; the upper viewport contains two flow time series and the lower viewport contains an elevation time series. The flows in the upper viewport are the pool inflow and outflow; the outflow is the OSI Reservoir Release (override) variable and the inflow is one of the two variables we added to be plotted with the OSI variable. The pool elevation, displayed in the lower viewport, is the other additional time series we added to be plotted with the reservoir release variable.
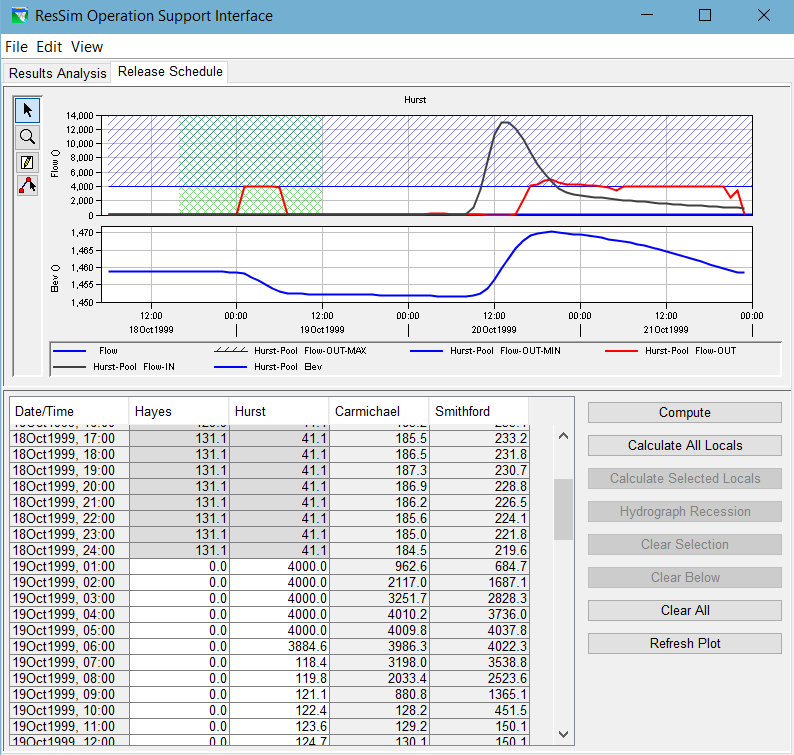
Figure: OSI - Release Schedule Tab
Configuring a Release Override Variable
To create an OSI variable for performing release overrides:
Create a new OSI variable by selecting Add Variable from the Edit menu. After you give the variable a name and click OK in the New Variable dialog, the OSI Variable Editor will open ("Figure: OSI Variable Editor - Configured for a Release Override").
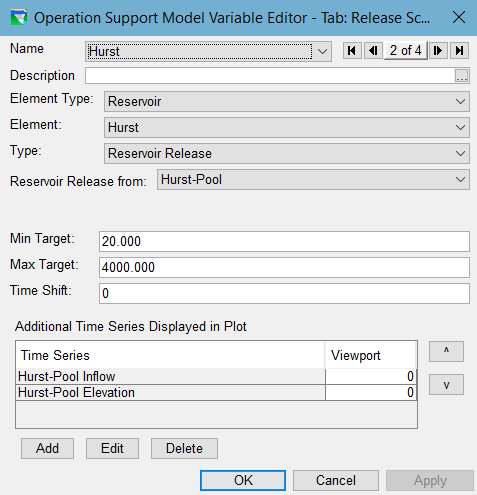
Figure: OSI Variable Editor - Configured for a Release Override
- Select Reservoir as the Element Type.
- Select the reservoir from the Element list.
- Select Reservoir Release as the variable Type.
Select the release element from the Reservoir Release from selector. The list includes all controlled outlets and outlet groups from your selected reservoir's outlet hierarchy. Consider carefully which release element you want to apply to your variable. Depending on your circumstances, you may want to setup a separate OSI variable for each controlled outlet or you may want just one variable to cover the total release. To override the total reservoir release choose the Pool; if you have a diverted outlet that you do not want affected by the override, choose the DamTailwater.
- If your reservoir has constant, at-site, minimum and/or maximum release limits and you would like to see those limits in the plot, enter those limits in the Min Target and Max Target fields.
- Consider adding key reservoir output time series to the plot with your reservoir release; we like to add pool inflow and pool elevation. To do so, use the Add button to open the Independent Variable Definition dialog.
- When finished, click the OK button to close the OSI Variable Editor.
"Figure: OSI Variable Editor - Configured for a Release Override" shows how we configured the Hurst variable in our example watershed. As suggested, we included the reservoir pool's inflow and elevation as Additional Time Series… and we entered the minimum and maximum at-site release limits in the Min and Max Target fields.
After setting up the Reservoir Release variables for Hayes and Hurst, we added two Computed Parameter variables, Carmichael and Smithford to show results at the two control points so that we could see—from the OSI—how our overrides were affecting the control points without having to go back to the main ResSim interface. In addition to the control point flow, we added additional time series to our two variables so that we could see how much unregulated (cumulative local) flow was reaching the control points, flow that the reservoirs could do nothing about.
Enter your Overrides and Compute
The OSI interface is designed to facilitate the specification of overrides, computing the alternative using the overrides, and reviewing results.
To enter overrides, you have two options:
- Specify the override values by entering data for the variable into the white cells in its column in the table panel. Fill options are available from the column's context menu to assist in entering data into the column. Each override value will appear in the table in green text and will also be drawn, in blue with magenta symbols, in the same viewport of the Plot Panel as the variable itself.
- Specify the override values by using the Edit tools in the Plot Panel's toolbar to draw the desired override on the plot viewport where the variable is displayed. Use the Multi-point Edit tool to draw a series of line segments by clicking with the tool's cursor in the plot region to draw each point. After placing the last point, right-click anywhere in the plot to stop the draw process. The values you specified in the plot will be drawn as a blue line and with magenta symbols; the same information will appear in the variable's column in the Table Panel in green text.
To compute the current alternative, you can use the Compute button at the top of the stack of Action Buttons; no need to return to the main ResSim interface.