Download PDF
Download page Recognizing Simulation Screen Components.
Recognizing Simulation Screen Components
The Simulation Module ("Figure: Simulation Module - Main Window") provides the tools you will need to create and run Simulations. The following is a discussion of the components and features of the Simulation Module.
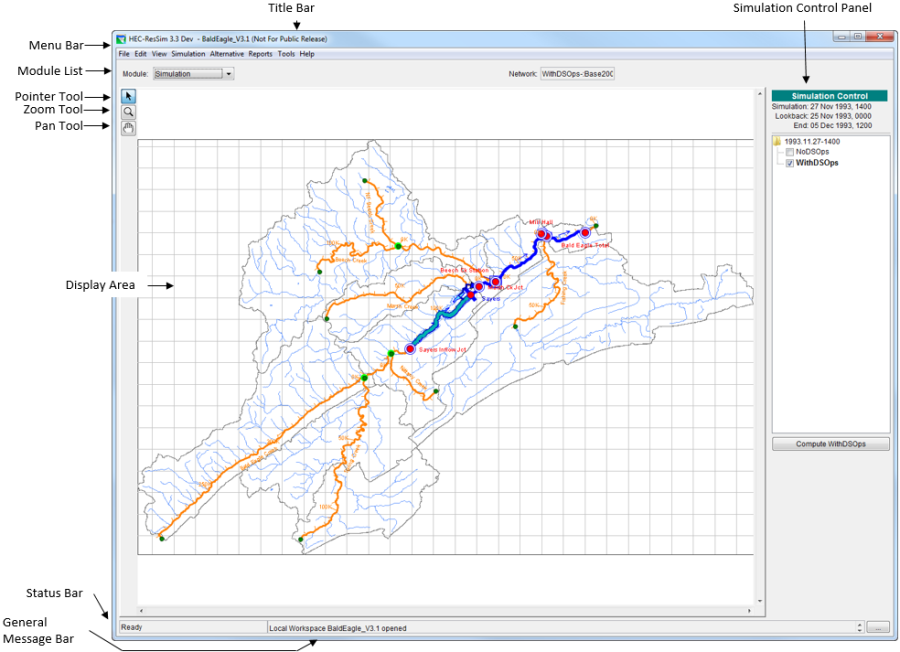
The Title Bar displays the name of opened watershed (displayed to the right of the HEC-ResSim name).
The Simulation Control Panel shows the time window for the currently opened simulation and provides controls to manipulate the simulation and alternatives. For more detail, see "Simulation Control Panel".
The Menu Bar contains menus of commands that you can use in ResSim. The items on the menus change as you switch between the various Modules, offering Module-specific commands. You can select a menu bar item by clicking on the name of the menu (such as File), then pointing and clicking on the item you wish to select. The Menu Bar is described in more detail in the next section.
The Module List contains all the available Modules of ResSim. Use this list to move between the Watershed Setup, Reservoir Network, and Simulation Modules. By default, the Module List opens to the Module most recently used.
Menu Bar
The following is an overview of the Simulation Module's Menu Bar tools, which allow you to create and edit Simulations. The tools specific to this module will be described in more detail in the context of particular tasks later in this chapter.
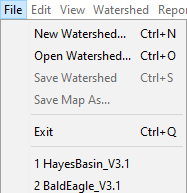
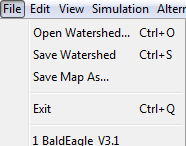
The File menu ("Figure: File Menu") allows you to Open an existing watershed, Save a watershed, Save Map (saves the display area) and Exit ResSim. Your most-recently-used watersheds are listed at the bottom of the File menu.
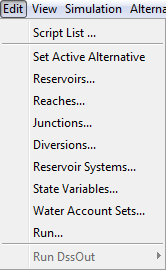
The Edit menu ("Figure: Edit Menu") provides access to the Script List, allows you to Set the Active Alternative, and allows access to editors for Reservoirs, Reaches, Junctions, Diversions, Reservoir Systems, and State Variables. Additionally, you can select Run… to open the ResSim Editor for the active alternative. Note that any revisions you make to these elements applies only to the active Alternative. If you want the revisions to apply to subsequent Simulations, you must save the changes to your base directory ("Saving Data to the Base Directory").
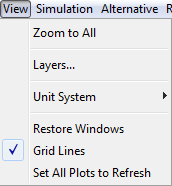
In the View menu ("Figure: View Menu") select Zoom to All to restore your watershed map view to full size. Layers... opens the Layers Selector dialog. Unit System allows you to customize the display (view) settings for your watershed. If a dialog or editor window is open but inactive, Restore Windows brings the dialog or editor window to the front as the active window. The Grid Lines option allows for turning on or off the grid lines in the map region.
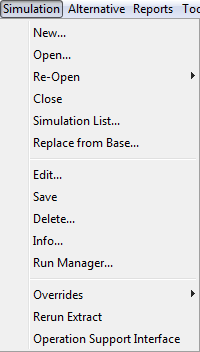
The Simulation menu ("Figure: Simulation Menu") is unique to the Simulation Module. It allows you to create a New Simulation, and Open, Re-Open, Close, Simulation List…, Replace from Base…, Save, or Delete an existing Simulation. The Edit command opens the Simulation Period dialog, while Info allows you to view the name, directory path, and user information for the current Simulation. The Run Manager provides the user with the capability of computing multiple alternatives without having to manually compute each one separately. You can also access Overrides for alternatives within the Simulation.
The Alternative menu ("Figure: Alternative Menu"), also available in the Reservoir Network Module, provides access to the Alternative Editor.
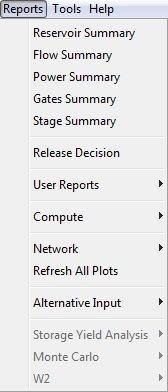
The Reports menu ("Figure: Reports Menu") provides access to the following reports: Reservoir Summary, Flow Summary, Power Summary, Gates Summary, Stage Summary, Release Decision, and User Reports. You can also access Compute logs and Network reports (including the Reservoir List, Reach List, Junction List, Diversion List, and the "Advanced" Network Connectivity summary report). The Refresh All Plots option will cause all open plots to reflect any changes that have been made in the event of a simulation being recalculated after changes have been made to an alternative.
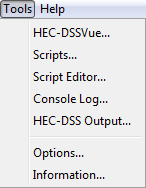
As in the other Modules, the Tools menu ("Figure: Tools Menu") provides access to HEC-DSSVue, Scripts and the Script Editor, the Console Log (which displays the information written to the ResSim.log file), HEC-DSS Output (a temporary log file that contains messages produced when DSS files are accessed), Options, and Information (which provides details about client, user, and watershed settings as well as server and system properties).
The Options Editor has tabs allowing access to the following items which are the same as those in the Network Module:
Model Directories (watershed locations for storing your watersheds); Compute Display settings (set the colors for compute messages and the format of log files); Debug Levels (set the level of debug messages); General (choose whether or not you want a confirmation message to appear when you exit ResSim and choose whether you want the last watershed reloaded at startup of the program); and, Fonts (for various window components). Specific to the Simulation Module, are two additional tabs: Simulation and ResSim Compute. These two options are discussed further in "Computing the Simulation".
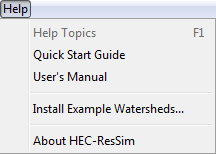
In the Help menu ("Figure: Help Menu"), the About HEC-ResSim command displays information about the version of ResSim. Also, from this menu you can access user documentation and Install Example Watersheds (after you define a watershed location as described in "Defining a Watershed Location")
Map (Mouse) Tools
The Map (Mouse) Tools, which appear in a toolbar on the left side of the ResSim screen, allow you to interact with objects in the map display. The Simulation Module has three Map Tools and all are available in the other ResSim Modules:![]() Pointer Tool—in the Simulation Module, right-click model schematic elements in the map display with the Pointer Tool to access editors, default and user-defined plots, and release decision reports (for reservoirs).
Pointer Tool—in the Simulation Module, right-click model schematic elements in the map display with the Pointer Tool to access editors, default and user-defined plots, and release decision reports (for reservoirs).![]() Zoom Tool—the Zoom Tool allows you to zoom in and out of the display area in all Modules. To zoom in, hold the left mouse button down and outline the area you want to enlarge. To zoom out, click the right mouse button. Zooming out using the right-click button zooms out by a factor of two, positioning the clicked location at the center of the screen.
Zoom Tool—the Zoom Tool allows you to zoom in and out of the display area in all Modules. To zoom in, hold the left mouse button down and outline the area you want to enlarge. To zoom out, click the right mouse button. Zooming out using the right-click button zooms out by a factor of two, positioning the clicked location at the center of the screen.![]() Pan Tool—after you have zoomed in with the Zoom Tool, you can use the Pan Tool to view watershed areas that fall outside of the ResSim window borders.
Pan Tool—after you have zoomed in with the Zoom Tool, you can use the Pan Tool to view watershed areas that fall outside of the ResSim window borders.
Simulation Control Panel
The Simulation Control Panel ("Figure: Simulation Menu") displays details about the current Simulation and allows you to interact with Alternatives.
Displayed at the top of the panel are the Simulation time, Lookback time, and End time.
Below these details is the Simulation Tree, which displays the name of the current Simulation and its associated Alternatives. The currently active Alternative displays as bold, and a check mark in the box next to an Alternative indicates that it will be included when displaying results. Right-click on a Simulation or Alternative to access their context menus.
When you select an Alternative, Compute becomes available, allowing you to execute a run.
At the bottom of the Simulation Control Panel, the Scripts area displays buttons that launch user-created scripts.
Display Area
The Display Area displays model schematic objects and map layers representing the Active Alternative.
Model elements of a Reservoir Network will not appear in the display area until you have created or opened a Simulation and activated an Alternative ("Setting the Active Component").