Download PDF
Download page Printing and Exporting Reports.
Printing and Exporting Reports
From each individual report (or plot) there is a context menu that allows you to print the report, preview the report before you print, and export the report to an ASCII file. Right-clicking on the active report accesses the context menu. You can also print or export a report by selecting Print or Export from the report's Report (or File) menu.
Printing Reports
In one way or another, all ResSim reports are tables of information about your model. Hence, when you select Print from a report's context menu ("Figure: Report Print Option") or Report (or File) menu, the printed output will be a titled table containing the data from the active report. The printed report and its columns are influenced by the width of the report window and the reports columns, so if items in the columns of the report are not printing as you would like, you can resize the report window and/or the individual columns to adjust the printed report.

To resize the report columns or the report window:
Position the mouse pointer in the table header over one of the lines that separate the columns or over the window border.
- When the resize arrows
 appear, hold down the left mouse button and drag the mouse right or left to indicate how wide or narrow you want the columns or dialog.
To print a report from the Watershed Setup module:
Open a report. For example, from the Reports menu in the Watershed Setup module, select List of Streams ("Figure: Selecting a Report").
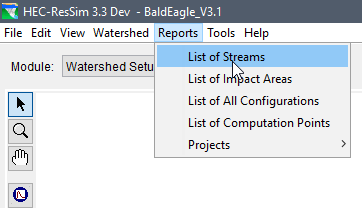 Figure: Selecting a Report
- From the Report or File menu of the opened report, select Print.
Or, right-click anywhere within the tabulated data of the report and select Print from the context menu ("Figure: A Report's Context Menu").
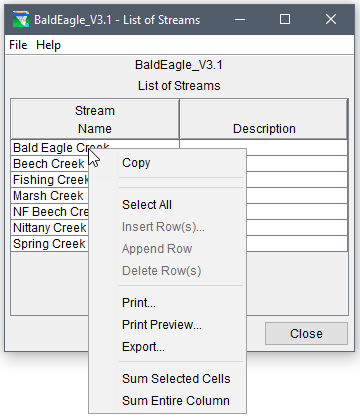 Figure: A Report's Context Menu
The Print Properties dialog will open ("Figure: Print Properties Dialog").
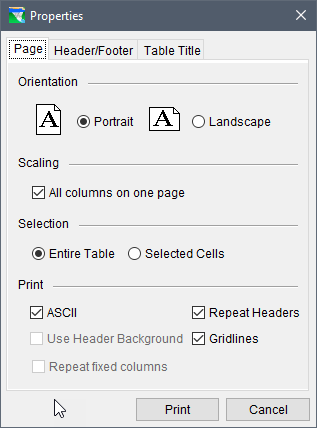 Figure: Print Properties Dialog
- From the Page tab of the Print Properties dialog, you can:
- Set the Orientation of your printed report—Portrait (default) or Landscape
- Make the report columns fit on one page
- Print the Entire Table (default) or just print the Selected Cells,
- Repeat (Column) Headers on subsequent pages,
Display Gridlines (draw borders around each cell of the table).
By default, the report prints in ASCII format with a white background. If you would like the column headers to have a light grey background, uncheck ASCII and check Use Header Background. If header rows are included among the data in the table, those rows will also get a grey background, a little darker than the column headers.
- The Header/Footer tab contains two text boxes where you can enter text for a header and/or footer for the report. The header will be centered just below the top margin (and just above the report title). The footer be centered just above the bottom margin and will be separated from the table data by a blank line. The header and footer will appear on all pages of the report. When a header and footer are included, together they occupy approximately 3 lines of space on each page, thus reducing the number of lines of table data that will appear per page.
- The Table Title tab contains a text box with the default title shown. You can use this text box to change the title of the report. Also on the Table Title tab is a check box to allow you to choose whether to repeat the report title on subsequent pages.
- Once you have your print properties set, click Print and the system Print dialog will open ("Figure: System Print Dialog"). Select a printer then click OK. The report will be printed on the selected printer.
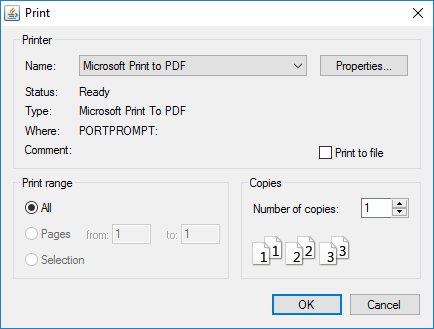
To save paper, use "Microsoft Print to PDF" to test your print settings before sending your report to a printer.
Print Preview
You can preview the report before printing. To do so:
- Open a report by selecting one from the Reports menu.
- Right-click anywhere within the tabulated data of the report and select Print Preview from the context menu.
The Print Properties dialog ("Figure: Print Preview Properties Dialog") will appear. This Properties dialog differs from the one shown in "Figure: Print Properties Dialog" only by the Print button, which is now labeled Preview.
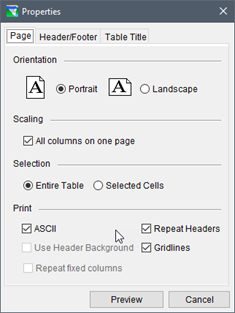 Figure: Print Preview Properties Dialog
- Configure your report and print properties as described in "Printing Reports" above, then click the Preview button.
- The Print Preview dialog ("Figure: Print Preview Dialog") will open. If you like what you see, you can send the report to a printer by clicking the Print button at the top of the dialog or you can close the Print Preview dialog by clicking the Close button.

Exporting Reports to a File
You can export reports to an ASCII text file. The primary reason to export the report to a file is to open it in another software product such as Microsoft Excel. To export a report:
Right-click anywhere within the tabulated data of the report and select Export from the context menu. The Table Export Options dialog ("Figure: Table Export Options Dialog") will open. The options include:
 Figure: Table Export Options Dialog
Field Delimiter—the dropdown list includes TAB, SPACE, COMMA, COLON, and SEMI-COLON. If you plan to import the report into Excel, TAB and COMMA are the best delimiters to use.
- Fixed Width Columns—although not a default setting, if you want the table to be more readable in a simple text editor, you may want to turn this option on. The cool thing about this option is that, unlike the printed report, the "fixed" width of each column in the exported report is at least the length of the longest string (value) in that column, so you will not get truncated data in your exported report.
- Quoted Strings—some software products treat spaces as string delimiters, so you might need this option so that a multi-word name or description is seen as a single string. Be careful, if you select this option and fixed width string, the quoted string for each column will be padded with trailing blanks so that all the strings in a column have the same number of characters.
- Include Column Headers—although the column headers are, by default, included in the report, you can turn them off if you wish.
- Print Gridlines—is another option you might want to consider but use with care. This turns on Fixed Width Column and then disables the Field Delimiters and turns on Fixed Column Width Options. This results in an exported report with fixed width columns of data separated by pipe characters ( | ) and rows of data separated by rows of dashes ( - ).
- Print Title—this option adds a title to the top of the exported report. If selected, a text box is available for you to enter a title.
- Once you have chosen your desired options, click OK.
The Save file browser will open. Use the browser to select where you want the file to be saved and enter a filename. If you want the filename to have an extension, you must enter your own; there is no default file extension. Then click Save to save the file and close the browser.