Download PDF
Download page Reservoir Yield Analysis.
Reservoir Yield Analysis
The edit panel for the Reservoir Yield analysis type is shown in "Figure: Yield Analysis Tab - Reservoir Yield View". The process for setting up a Reservoir Yield Analysis proceeds from the top down in the edit panel. Most of the panel involves selecting the Demand Rule. The remainder of the panel provides options for setting the tolerances, maximum number of iterations, and the convergence method.
Select "Demand" Rule to Maximize—You must select one minimum limit or specified limit type rule to represent demand from the pool. The value of the rule will be maximized in order to determine the pool's firm yield. This rule may be a Release Function rule, Downstream Control Function rule or Hydropower rule.
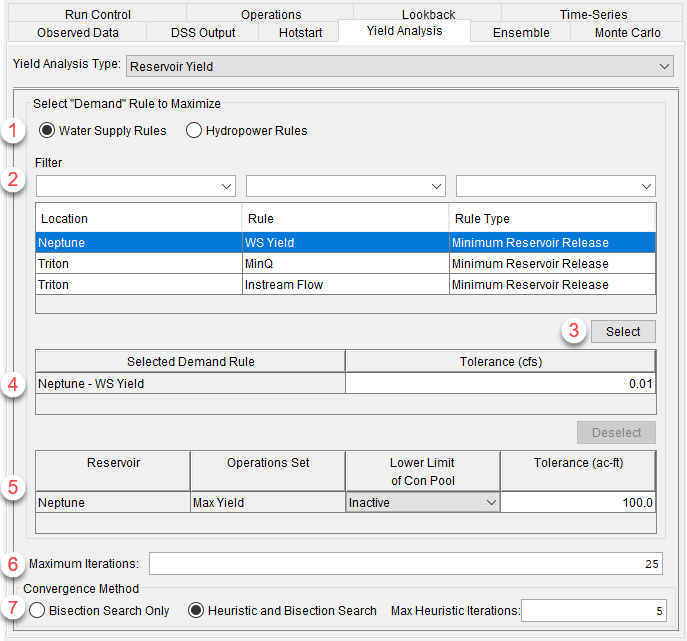
Figure: Yield Analysis Tab - Reservoir Yield View
- Rule Category Radio Buttons—select a rule category and the table below will be filled with all available rules of the selected category. The list of rules will be drawn from the active operation sets for the reservoirs in the current alternative.
- Water Supply Rules—minimum or specified Release Function and Downstream Control Function rules
- Hydropower Rules—system and local Hydropower rules
- Filter—(optional) use the filter dropdown boxes to filter the list of rules based on Location (reservoir), Rule name, or Rule Type.
- Highlight the desired rule in the rule list and click Select. This will place your selected rule into the Selected Demand Rule table. It will also place the Reservoir and Operation Set into the last table on the edit panel, the Storage Parameters table.
- Selected Demand Rule—set the tolerance for the rule.
- Tolerance—this is the flow Tolerance used for the determination of the yield analysis convergence. The flow tolerance is the maximum tolerable limit for the demand being shorted. If the computed demand delivery in a given yield iteration is below the requirement by more than the tolerance, the iteration is considered "failed." Both the flow and storage tolerance criteria must pass in the same iteration for the yield analysis to reach final convergence.

Tip
When setting the initial value of the demand rule in the Reservoir Editor, do not set too close to the likely true yield. This will make it harder for the computations to converge.
- Tolerance—this is the flow Tolerance used for the determination of the yield analysis convergence. The flow tolerance is the maximum tolerable limit for the demand being shorted. If the computed demand delivery in a given yield iteration is below the requirement by more than the tolerance, the iteration is considered "failed." Both the flow and storage tolerance criteria must pass in the same iteration for the yield analysis to reach final convergence.
- Reservoir Storage Table—displays reservoir and active operations set. You set the pool lower limit and storage tolerance. Note that this table refers to the "Con Pool" but the storage pool used for the yield calculation is actually defined by the Guide Curve, which may or may not be the top of your conservation pool.
- Lower Limit of Con Pool—Use the selector to choose the top of zone curve that marks the bottom of the storage pool used to determine yield. The top of this storage pool (usually referred to as the Conservation pool) is by default the reservoir's Guide Curve. Note that the storage pool defined here may encompass more than one zone below the Guide Curve.
- Tolerance—this is the storage Tolerance used for the determination of the yield analysis convergence. The storage tolerance defines how close above the bottom of the conservation pool (defined as "Lower Limit of Con Pool") the computed minimum storage may reach to be acceptable for the analysis. If the computed minimum storage in an iteration is greater than the bottom plus tolerance, it is a failed iteration. If the reservoir empties below the lower limit of the conservation pool, it is also considered to be a failed iteration. Both the flow and storage tolerance criteria must pass in the same iteration for the yield analysis to reach final convergence.
- Maximum Iterations—this is maximum number of iterations that the yield analysis may perform in its attempt to converge on a solution. The default value is 25. If the simulation is unable to converge within the specified flow and storage tolerances you entered but has reached the maximum iterations, it will save the answer from the last iteration and give a warning in the Compute Log that the convergence was not achieved after completing the maximum number of iterations.
- Convergence Method—a radio button provides the choice of either Bisection Search Only or Heuristic and Bisection Search, and the second option allows you to specify a value for the Maximum Heuristic Iterations that will be performed before the convergence method automatically switches to the Bisection search. The heuristic method uses a mass balance approach; it calculates the storage remaining (or the volume of water shorted, if storage went to zero) from the prior iteration to estimate the next demand to use while attempting convergence. The combined heuristic and bisection search may narrow in on the final result faster than with Bisection Search only. The heuristic search can diverge in multiple reservoir cases, so it is used for a limited number of iterations before switching to the bisection method for the remaining iterations. Typically, the heuristic search can approach the final result within a few iterations, and the bisection method adds to the precision of the final answer if the maximum number of iterations for the heuristic method is exceeded. The combined Heuristic and Bisection Search is currently meant for single-reservoir watersheds and is less successful for more complex reservoir systems and operations.