Setting Up a Cumulus Extract
Software Version
CWMS 3.3.1 was used to create this tutorial.
Introduction
Cumulus is a WMES-CWMS web service that offers a one stop shop for meteorological data access for the U.S. Army Corps of Engineers Water Management and Hydrology and Hydraulics Communities of Practice. Cumulus is primarily meant to provide meteorologic data for real-time hydrologic and hydraulic forecast modeling, model development and calibration for CWMS, planning, and dam safety applications. For data access, Cumulus currently requires direct CorpsNet or VPN access with CAC authentication. A full catalog of the data available can be found at the Cumulus website (https://cumulus.corps.cloud/). Previewing Cumulus is possible without logging in, but logging in is required in to allow data downloads.
Direct Cumulus extract via the CAVI was introduced in version 3.3.0. This streamlines data collection for the water management community.
Cumulus is NOT available in HEC-RTS as Cumulus is a USACE only resource.
Create a Cumulus Extract Group
- Ensure connection to CorpsNet or VPN.
- Launch the CWMS CAVI and open a watershed.
- Select the server of your choice when prompted (you can choose local).
- In the Setup module, select Edit Extract from the Models menu.

- The Extract Editor dialog will open. Select New Extract Group.

- Within the the New Extract Group dialog, name the extract accordingly and select the type as Gridded Data and the source as Cumulus.
- Cumulus only stores gridded data; therefore, the Cumulus option is unique to the gridded data type option.
- Cumulus only stores gridded data; therefore, the Cumulus option is unique to the gridded data type option.
- Select the Refresh Icon to the right of the URL to generate options for the Office and Watershed dropdown menus.

- Select the office and watershed of interest from the dropdown menus. Cumulus will automatically clip the data extents for the watershed selected to help minimize the download size.
- In the Products area, select the ellipses on the right side to select the data you want to include in your extract.

- Select the data of interest and then select Add to get options from the Available column to the Selected column. If you select and then hold the ctrl key, multiple options can be selected at once.

- Once all the desired data products are in the selected column, click OK.
- For the extract time window, select the Extract Start for the start time and Forecast Time for the end time as shown below:


Setting an offset on the Extract Start time is fine, especially when there is the need to extract on extra day back for the Gridded Hamon ET method.
However, an offset should not be set on the Forecast Time because Cumulus uses this date to look up the closest available issuance time of the forecast dataset.
- To complete the creation of the Extract Group, decide whether or not to run it by default then select OK.
Forecast Dataset Extract Time Window
For Forecast data sets, set the end of the Time Window to Forecast Time
- You can include both observed and forecast datasets in the same extract group if the extract Time Window is set from Extract Start to Forecast Time.
- For a forecast dataset from Cumulus with an extract Time Window of Extract Start to Forecast Time, the entire forecast version of the product will be extracted into the forecast.dss file.
- Data may be extracted past the end time of the extract window. For example, if the forecast dataset is a 7 day product, then the entire 7 days will be extracted regardless of the end time of the extract window. The HEC-Metvue Alternative Editor provides an option to trim the amount of forecast grids to use (i.e. only use 3 days of forecasted precipitation instead of the given 7 days).
- You can separate products into different Cumulus extract groups, but you still need to use the extract Time Window of Extract Start to Forecast Time, even for forecast datasets.
- Cumulus archives all issued forecast data sets based on the issuance date and time. The end time for an extract (in the above case Forecast Time) is used by Cumulus to return the forecast version issued closest to or at that time. Depending on the time of forecast, setting the Extract Time Window from Forecast Time to End of Simulation may result in missing forecast data sets.
Add Inputs to the Cumulus Extract Group
Now that the Cumulus Extract Group has been created, you need to map the pathnames from Cumulus to the pathnames in the forecast.dss file. You can either add the required inputs (as requested by HEC-MetVue) or add the records using the ad-hoc option.
Required Inputs Method
- Select the HEC-MetVue inputs from the Required Inputs table and select Add to Group. This will generate a To forecast.dss pathname that HEC-MetVue is anticipating.

- Within the Extract Linking table, double-click on the row in the From Cumulus column. Click on the ellipses to the right of this column to select the correct product from Cumulus.

- A Cumulus DSS Selection dialog will open. Choose the correct product from the table and click Select.

- Repeat this process until all Required Inputs have been added to the Extract Group. Click Apply to save your changes and then click OK to close the Extract Editor.
Ad-hoc Method
- Select Add Extract Data Set at the bottom center of the Extract Editor
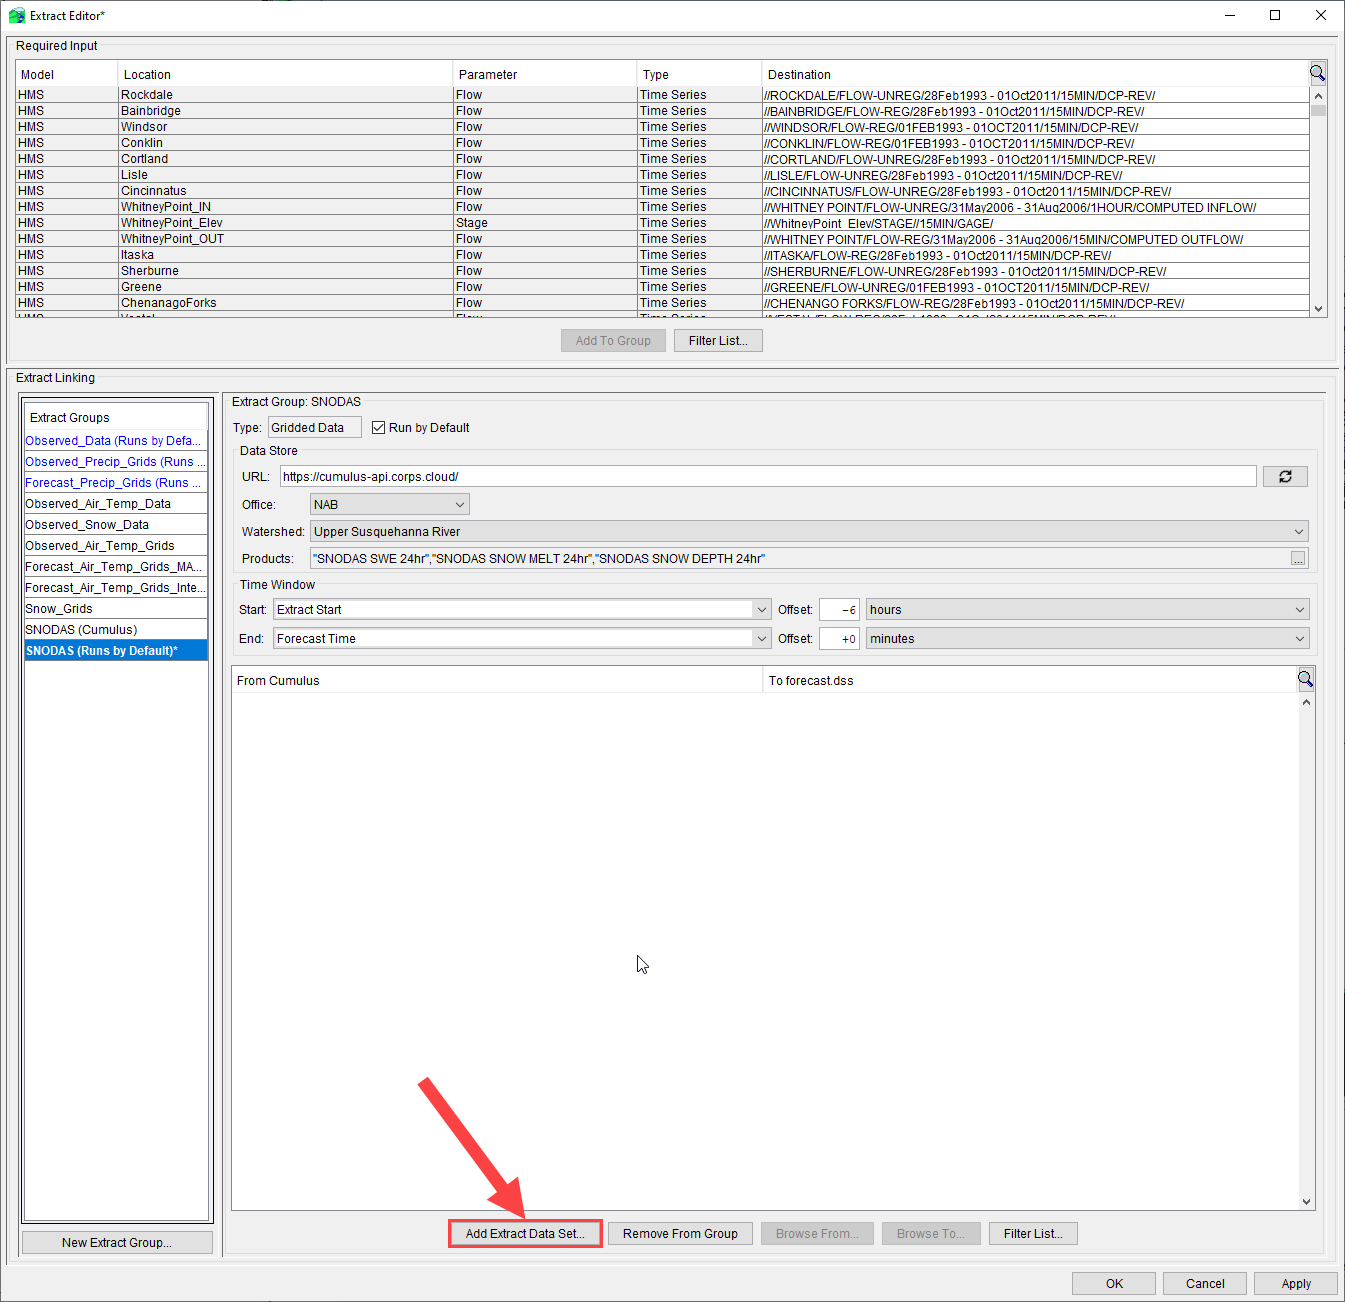
- From the Cumulus DSS Selection dialog, choose the Cumulus data of interest and click Select to add them to the Extract Group.

- Compare the To forecast.dss cells to the input required for HEC-MetVue and rename the pathname if needed.
- To rename, double click in the To forecast.dss cell and directly modify the HEC-DSS pathname or select the ellipse and find the pathname of interest in an existing HEC-DSS file.

- Note that HEC-DSS pathnames in the To forecast.dss cell can only be edited with the AdHoc Method when adding pathnames to the Extract Group.
- To rename, double click in the To forecast.dss cell and directly modify the HEC-DSS pathname or select the ellipse and find the pathname of interest in an existing HEC-DSS file.
- Repeat this process until all Required Inputs have been added to the Extract Group. Click Apply to save your changes and then click OK to close the Extract Editor.
Now the Cumulus extract is ready and can be used for new forecasts. For general information regarding the Extract Editor, please see Setting Up an Extract Group or view the CWMS User Manual section on the Data Extract and Post Editors.