Setting Up an Extract Group
Software Version
CWMS 3.3.1 was used to create this tutorial.
This tutorial is intended to walk you through the process of setting up an Extract Group using the Extract Editor in the CAVI.
The Extract Editor is used to extract data from a data source and copy the data into the forecast.dss file. The forecast.dss file is the HEC-DSS file that contains all necessary input data for running a CAVI forecast and the modeled output generated from forecast simulations. Before setting up extract groups, you will need to import all required models into the CAVI. The CAVI will use the models to determine what data are needed in the forecast.dss file to run the models.
Create an Extract Group
- Open the CAVI and watershed of interest.
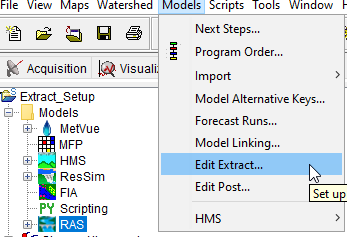
- In the Setup module, select Edit Extract under the Models menu.
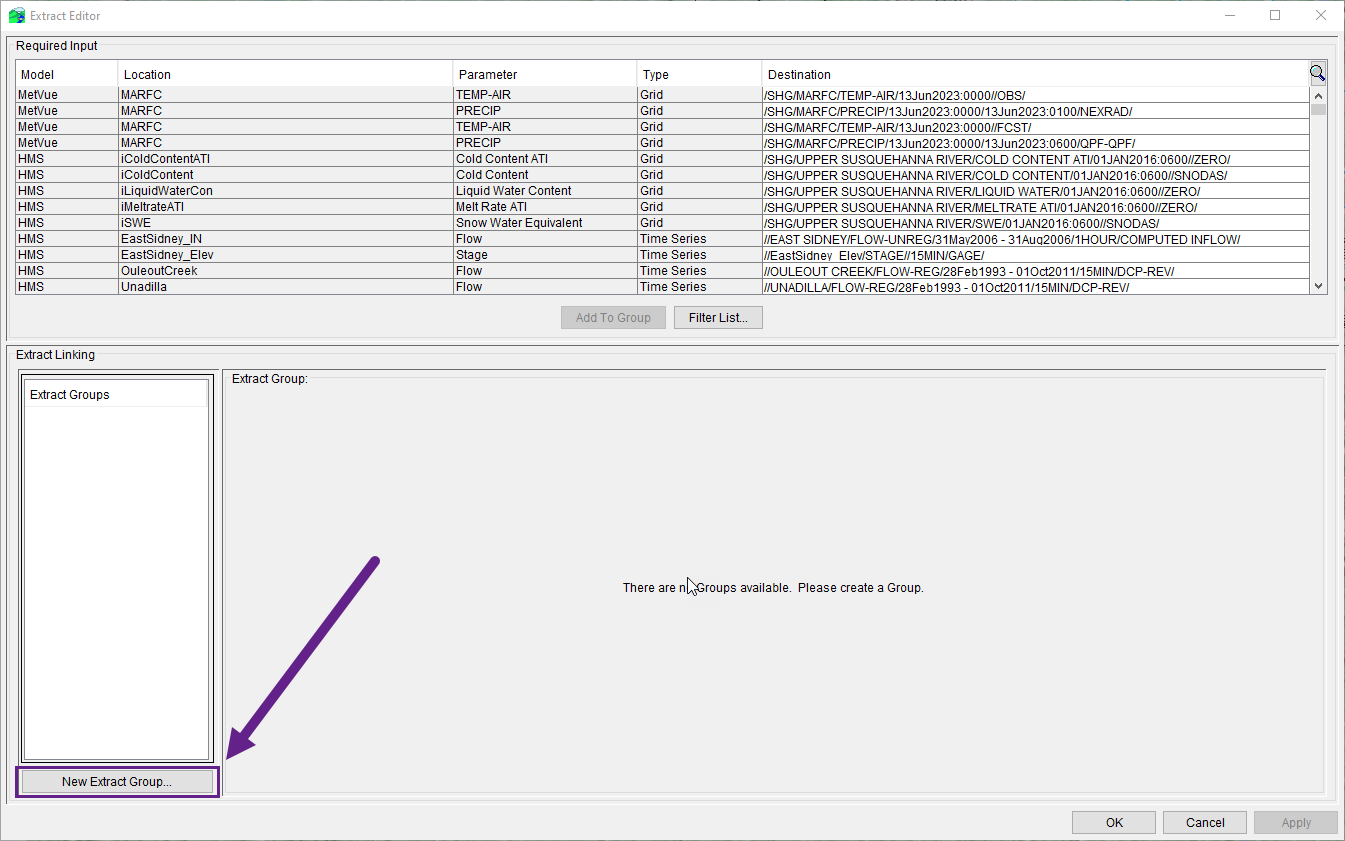
- The Extract Editor dialog will open. Select the New Extract Group button to create a new extract group.
- The New Extract Group dialog will open.
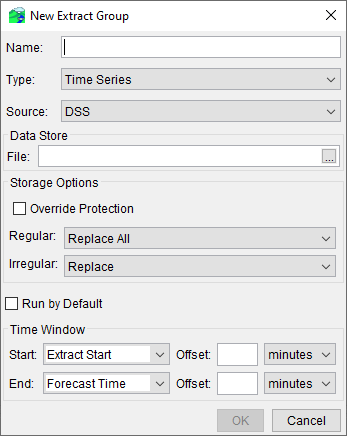
- In the Name box, enter a name for your extract group.
- From the Type list, select the type of data being extracted. The choices are:
- Time Series
- Gridded Data
- From the Source list, select the source of the data being extracted, the choices are:
- If Time Series is selected for Type:
- DSS if using a local HEC-DSS file
- Remote DSS if using a remote HEC-DSS file on a CWMS server
- Oracle if selecting data from a CWMS database
- CWMS Data API if selecting data from the national CWMS-Data-API (CDA) database
- KiWIS (WISKI Extract and Post) if selecting data from a WISKI database
- If Gridded Data is selected for Type:
- Cumulus if using data from the Cumulus database
- DSS if using a local HEC-DSS file
- Remote DSS if using a remote HEC-DSS file on a CWMS server
- If Time Series is selected for Type:
The options within the New Extract Group dialog will change based on the type/location selected in Step 7 above.
Time Series from HEC-DSS
- Follow the steps above to define your new Extract Group.
- Select Time Series from the Type dropdown box and DSS from the Source dropdown box.
- Since the source of the data has been defined as HEC-DSS, you must provide information about the location of the HEC-DSS file. Click on the ellipses to the right of the File box, and an Open browser will appear. Browse to the location of the appropriate file and click on the filename. Click Open. The Open browser will close, and you will be returned to the New Extract Group dialog.
- There are several options to set within the Storage Options box:
- Override Protection - if checked, only missing values will be replaced (no data currently in the forecast.dss file will be overridden on subsequent extracts). If not checked, then all values will be replaced (if there is overlap).
- Regular time series:
- Replace All - store all incoming values, replacing any/all values in the file (do not create entire records of missing data, nor delete such records if they exist in the file)
- Replace Missing Values Only - store only incoming values that replace missing values in the file
- Replace And Create - replace all, but create entire records of missing data if necessary
- Replace And Delete - replace all, but delete any resulting records if they consist entirely of missing values
- Replace With Non-Missing - replace all, but do not replace a non-missing file value with a missing incoming value
- Irregular time series:
- Replace - delete all existing values in time window of incoming data and then store incoming data
- Merge - insert values at new times and replace any values at existing times, even if incoming values are specified as missing
- If you want your extract group to run automatically when a forecast is made, check the box next to Run by Default. If Run by Default is not selected, the user will have to manually trigger the extract group. This is done after a forecast has been created.
- Specify the time window for the extract group. From the Time Window box, available options are:
- Extract Start (default for Start)
- Start of Simulation
- Forecast Time (default for End)
- End of Simulation
- Offsets for the start and end times can also be included. In the Offset field, enter the offset increment. This time window is relative to the forecast time window that you defined when you created the forecast.
- You may want to include an offset to ensure that there is no missing data preventing you from running your models. This is especially important for irregular time series data.
- You may want to include an offset to ensure that there is no missing data preventing you from running your models. This is especially important for irregular time series data.
- Click OK, the New Extract Group dialog will close. The new time series extract group will display at the bottom of the Extract Groups box.
If the HEC-DSS file is located on a CWMS server, you will choose Remote DSS in Step 2 of this process. All other steps remain the same.
Time Series from Oracle
- Follow the steps above to define your new Extract Group.
- Select Time Series from the Type dropdown box and Oracle from the Source dropdown box.
- Since the source of the data has been defined as Oracle, you do not need to enter any information about the location of the database.
- There are several options to set within the Storage Options box:
- Override Protection - if checked, only missing values will be replaced (no data currently in the forecast.dss file will be overridden on subsequent extracts). If not checked, then all values will be replaced (if there is overlap).
- Regular time series:
- Delete Insert - delete all existing values in time window of incoming data and then insert incoming data
- Replace All - insert values at new times and replace any values at existing times, even if incoming values are specified as missing
- Do Not Replace - insert values at new times but do not replace any values at existing times
- Replace Missing Values Only - insert values at new times but do not replace any values at existing times unless the existing values are specified as missing
- Replace with Non-Missing - insert values at new times and replace any values at existing times, unless the incoming values are specified as missing
- Irregular time series:
- Delete Insert - delete all existing values in time window of incoming data and then insert incoming data
- Replace All - insert values at new times and replace any values at existing times, even if incoming values are specified as missing
- Do Not Replace - insert values at new times but do not replace any values at existing times
- Replace Missing Values Only - insert values at new times but do not replace any values at existing times unless the existing values are specified as missing
- Replace with Non-Missing - insert values at new times and replace any values at existing times, unless the incoming values are specified as missing
- If you want your extract group to run automatically when a forecast is made, check the box next to Run by Default. If Run by Default is not selected, the user will have to manually trigger the extract group. This is done after a forecast has been created.
- Specify the time window for the extract group. From the Time Window box, available options are:
- Extract Start (default for Start)
- Start of Simulation
- Forecast Time (default for End)
- End of Simulation
- Offsets for the start and end times can also be included. In the Offset field, enter the offset increment. This time window is relative to the forecast time window that you defined when you created the forecast.
- You may want to include an offset to ensure that there is no missing data preventing you from running your models. This is especially important for irregular time series data.
- You may want to include an offset to ensure that there is no missing data preventing you from running your models. This is especially important for irregular time series data.
- Click OK, the New Extract Group dialog will close. The new time series extract group will display at the bottom of the Extract Groups box.
Time Series from CWMS-Data-API
See How to Set Up CDA extract for more information
Gridded Data from DSS
- Follow the steps above to define your new Extract Group.
- Select Gridded Data from the Type dropdown box and DSS from the Source dropdown box.
- Since the source of the data has been defined as HEC-DSS, you must provide information about the location of the HEC-DSS file. Click on the ellipses to the right of the File box, and an Open browser will appear. Browse to the location of the appropriate file and click on the filename. Click Open. The Open browser will close, and you will be returned to the New Extract Group dialog.
- If you want your extract group to run automatically when a forecast is made, check the box next to Run by Default. If Run by Default is not selected, the user will have to manually trigger the extract group. This is done after a forecast has been created.
- Specify the time window for the extract group. From the Time Window box, available options are:
- Extract Start (default for Start)
- Start of Simulation
- Forecast Time (default for End)
- End of Simulation
- Offsets for the start and end times can also be included. In the Offset field, enter the offset increment. This time window is relative to the forecast time window that you defined when you created the forecast.
- You may want to include an offset to ensure that there is no missing data preventing you from running your models.
- You may want to include an offset to ensure that there is no missing data preventing you from running your models.
- Click OK, the New Extract Group dialog will close. The new time series extract group will display at the bottom of the Extract Groups box.
If the HEC-DSS file is located on a CWMS server, you will choose Remote DSS in Step 2 of this process. All other steps remain the same.
Gridded Data from Cumulus
See Setting Up a Cumulus Extract for more information.
Add Required Input Data to Extract Groups
Once an extract group is created, you can select what required input data you want to map to the selected source data. To include required input data with an extract group:
- Select an extract group from the Extract Groups box.
- In the Required Input section, select all the records you want to add to the extract group. You can select multiple records holding the CTRL key and clicking on the records you want to add.

- After selecting the required input records, click Add to Group.
- The records selected will be displayed in the Extract Linking section in the table.
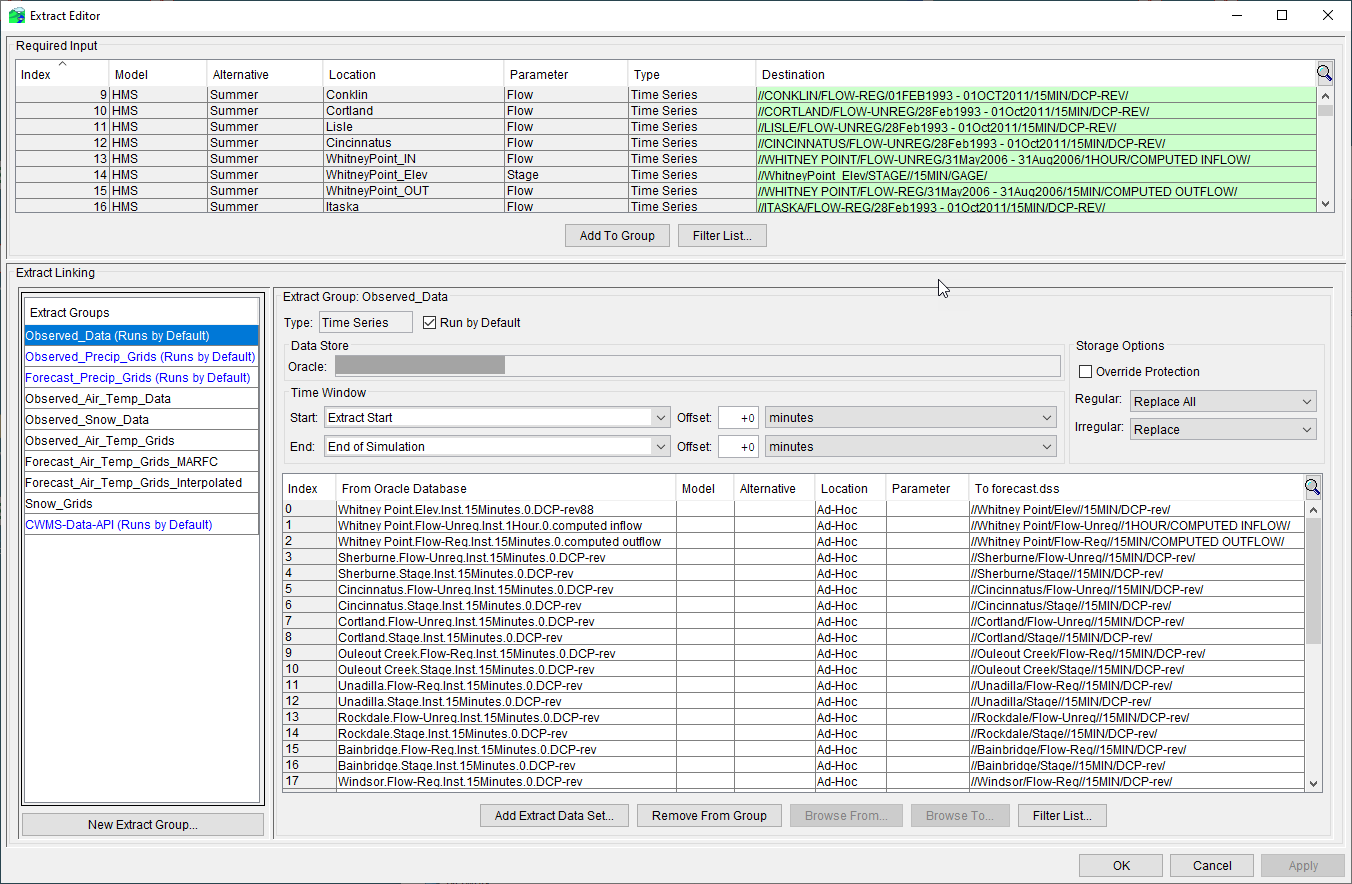
Select how much information you want to view in the Extract Linking table by clicking the magnifying glass icon in the upper right hand corner. Refer to Extract Editor for further details on formatting the Extract Linking table.
Select Source Records
When records are added to an extract group, the name of the record is displayed under the From <data_source> column in the Extract Linking table. CWMS does its best to match the From <data_source> record names to the To forecast.dss record names, but sometimes CWMS needs help.
To select records for the From <data_source> record:
- Double-click the row in the From <data_source> column you would like to set the time series record for.
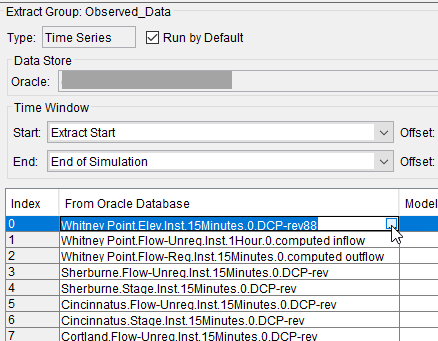
- Click the ellipsis that appears in the right section of the cell with the From <data_source> name. A dialog will open, dependent on what type of data the record contains. For the example shown, a CWMS Time Series Record Chooser dialog will open.
- From the Search By Parts area, use the various filter lists to locate the desired time series record.
- To select a time series record to replace the one displayed in the selected row in the Extract Linking table, click the time series record row and click Set Pathname.
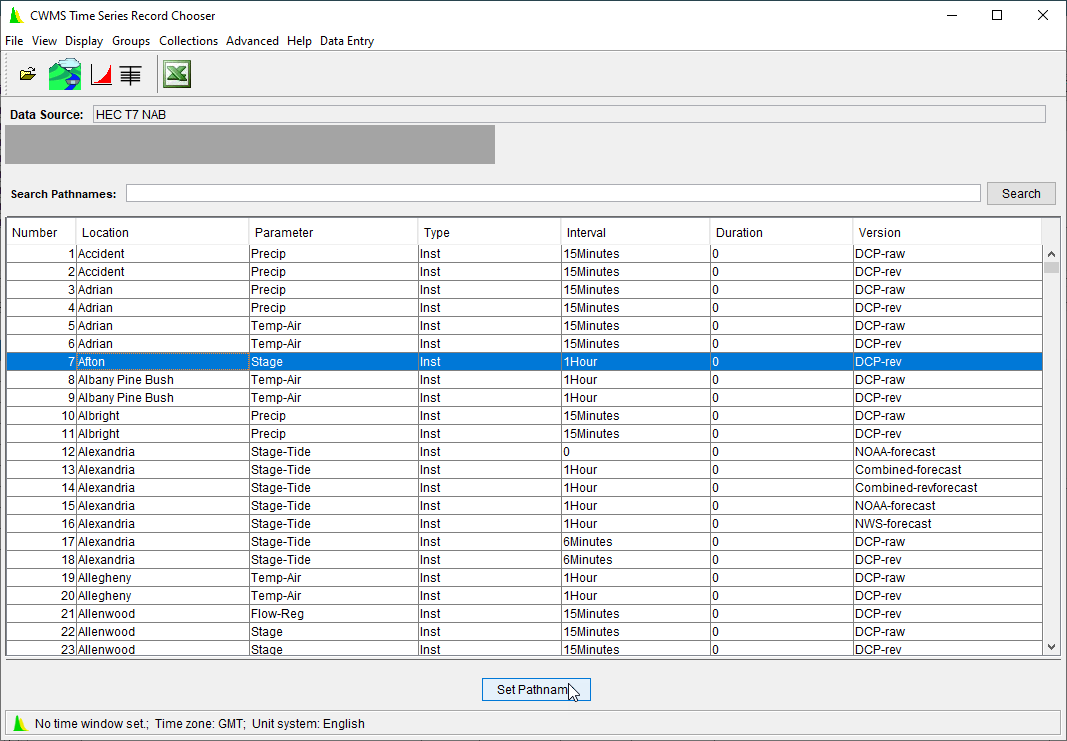
- The time series record you selected will display in the Extract Linking table in the row you originally selected.
- Close the CWMS Time Series Record Chooser to return to the Extract Editor.
- Repeat this process for all data sets you need to link in the Extract Editor.
Ad-Hoc Records
Additional input data not listed in the Required Extract table may be required for a forecast compute. You can add additional data sets using the Ad-Hoc record feature.
To add an Ad-Hoc record:
- From the Extract Editor, click Add Extract Data Set.
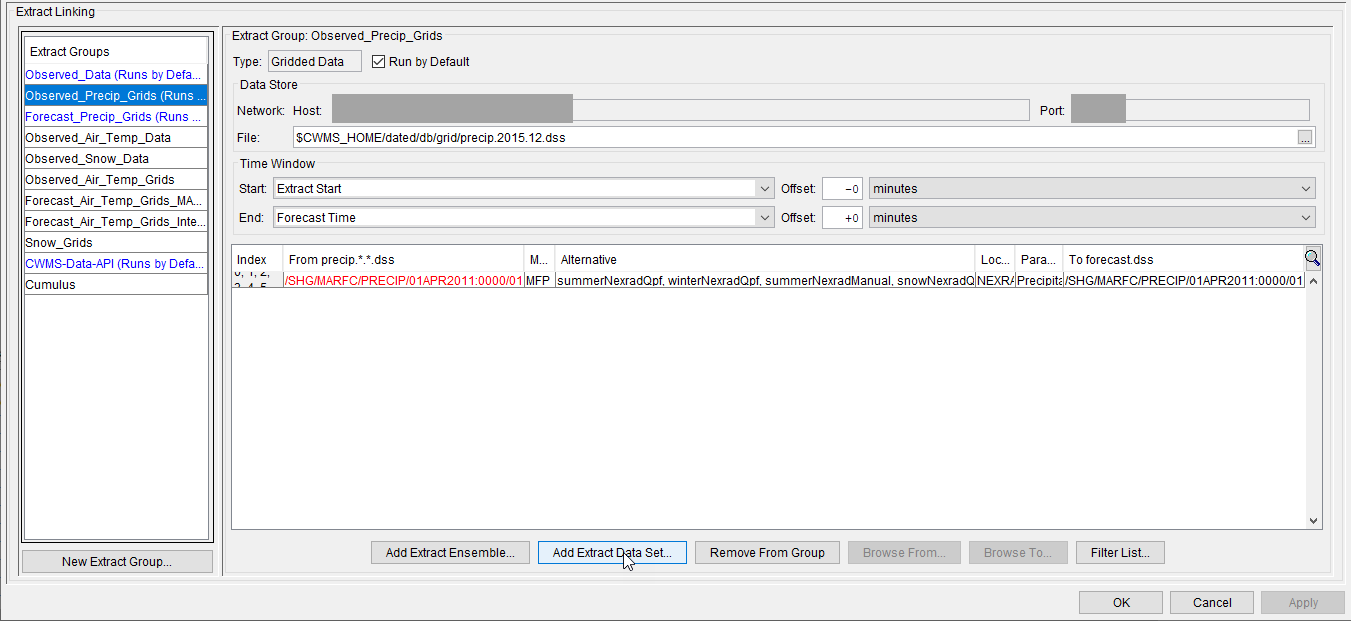
- The Adhoc Record Chooser dialog will open. Depending on the type of data and source location, the dialog may be slightly different.
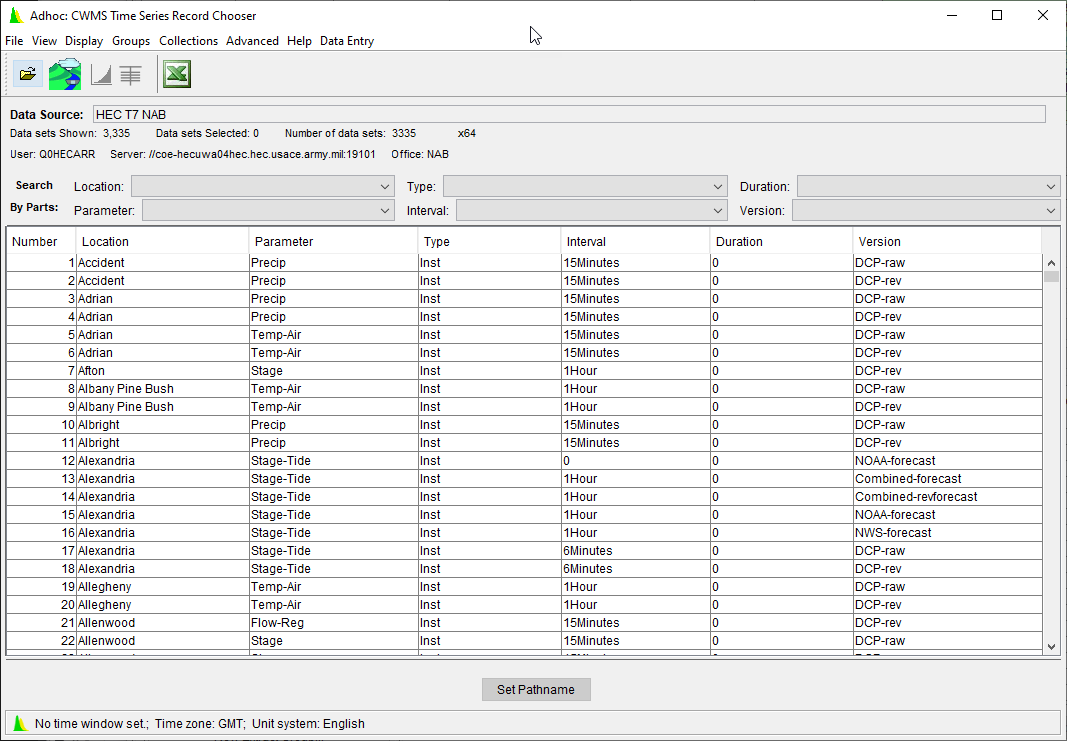
- From the Search By Parts area, use the various filter lists to locate the desired record.
- Select the pathname row for the record and click Set Pathname.
- The time series record you selected will display in the Extract Linking table in the row you originally selected.
- Click Close. The Adhoc Record Chooser dialog will close and you will return to the Extract Editor.
The From <data_source> and To forecast.dss time series records (Extract Linking table) will display the same pathname. The time series record pathname displayed in the To forecast.dss column of the Extact Linking table will need to be changed to a conventional HEC-DSS pathname. You can either enter the HEC-DSS pathname or select one through the DSS Time Series Record Chooser dialog.
To select an HEC-DSS pathname using the DSS Time Series Record Chooser dialog:
- From the Extract Linking table, select the To forecast.dss record you would like to change.
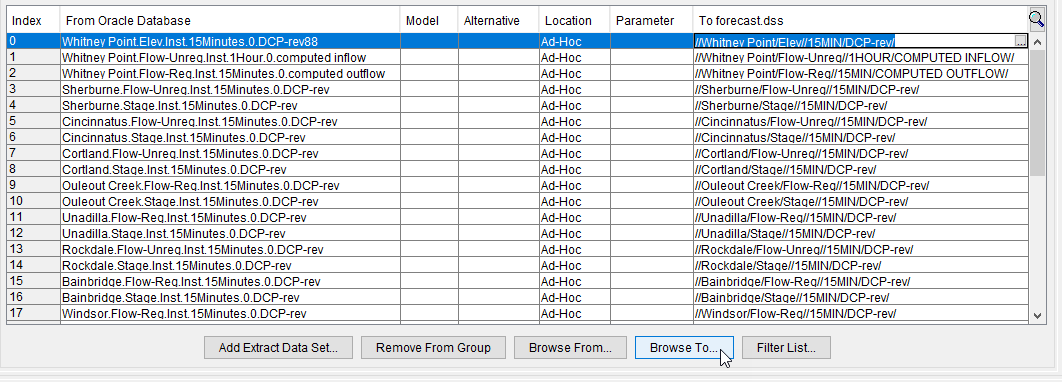
- Click Browse To, and the DSS Time Series Record Chooser dialog will display.
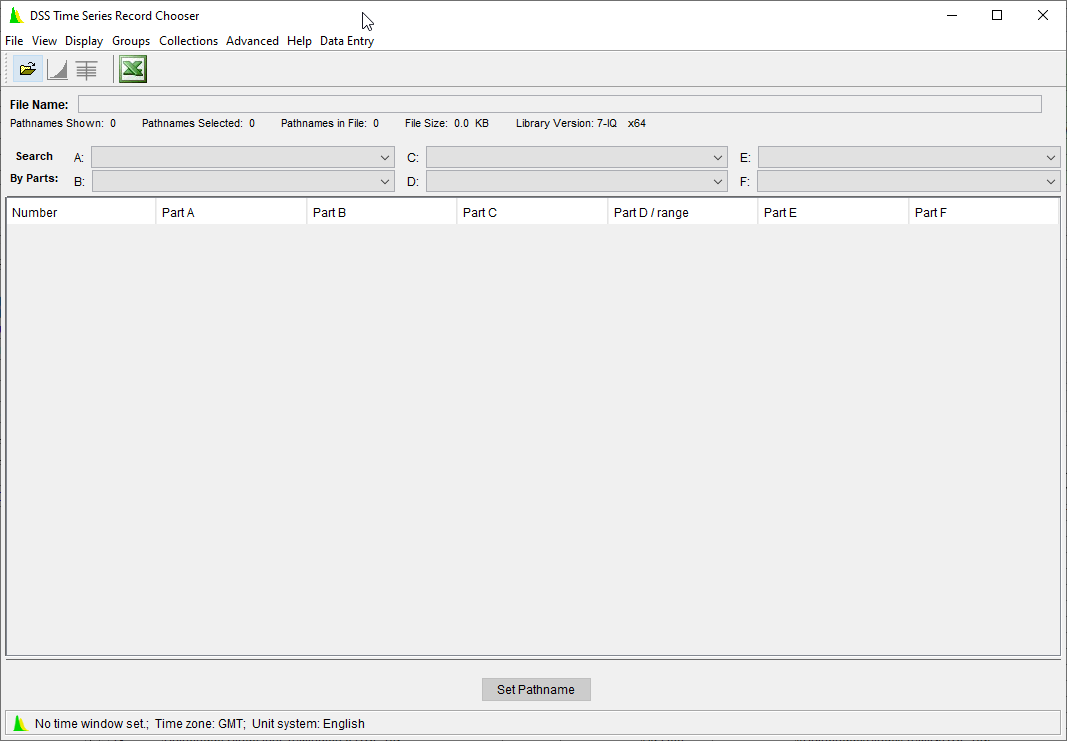
- From the File menu, click Open. An Open HEC-DSS File browser will open. Browse to location of the HEC-DSS file with the pathname you want to use, click Open.
- The Open HEC-DSS File browser will close, and the HEC-DSS file will be displayed.
- Select the pathname for the HEC-DSS record listed in the table, click Set Pathname. This will copy the selected record to the Extract Linking table.
- When you are finished selecting the HEC-DSS pathnames, click Close from the File menu. The DSS Time Series Record Chooser dialog will close.