Download PDF
Download page Adding Background Maps.
Adding Background Maps
Layers in ResSim are like transparencies laid one on top of the other. Static images of physical, political, or logic features of the watershed, such as rivers, subbasins, roads, state boundaries, etc., can be layered in the display as color pictures. Each of these images, along with its associated data, is called a map layer and is added to the watershed and managed by the Layer Selector. Access to the Layer Selector is available by selecting Layres... from the View menu. In addition to the sections below, you can refer to "Working with Map Display Layers" for more information on managing Map Layers.
Several map file formats are supported in ResSim including:
- ArcView® Shapefiles
- AutoCAD® DXF files
- ArcInfo® DEM files
- USGS Digital Line Graphs (DLG) files
- USGS Digital Elevation Model (DEM) files
- ASCII NET TIN files
- Raster images
Adding a Map Layer
Before adding a map layer to your watershed, we recommend that you copy the map files into the maps folder of the watershed. Also, you should verify that all maps you plan to add to your watershed share the same coordinate system.
To add a map layer to your watershed:
Select Layers from the View menu. The Layer Selector dialog will appear ("Figure: Layer Selector Dialog").

Figure: Layer Selector Dialog
From the Maps menu, select Add Map Layer. The Open File dialog ("Figure: Open File Dialog to Add Map Layer") will open.
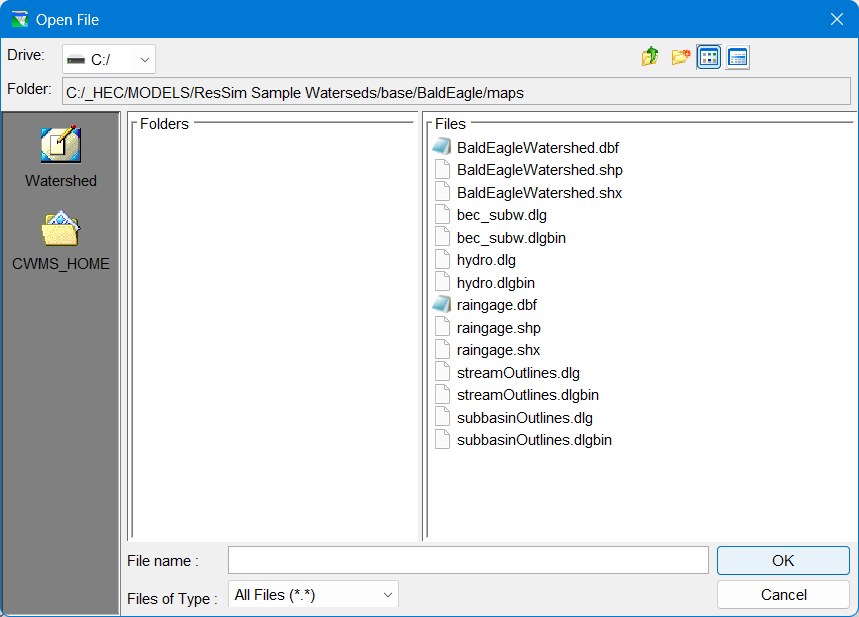
Figure: Open File Dialog to Add Map Layer
- Locate the map file you wish to use on your local computer (for example, "raingage.shp").
After you have selected the map you wish to use, click OK. The new map will now appear in the Layer Selector dialog.
Setting the Geographic Coordinate System
To maintain a geographic reference, you must specify a coordinate system for each watershed. To establish the grid size and coordinate system:
- Select Layers from the View menu to open the Layer Selector dialog.
From the Maps menu, select Map Display Coordinates to open the Display Coordinates dialog ("Figure: Display Coordinates Dialog").
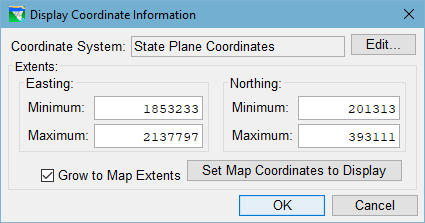
Figure: Display Coordinates Dialog
The Display Coordinate Information dialog includes the following data:
Coordinate System
This box identifies the coordinate system established for the watershed. The coordinate system can be edited, but remember that all maps and data must exist in one unified coordinate system. Therefore, some layers or data might require the use of a GIS program to transform coordinate system information. For additional information about editing the Coordinate System, see "Editing the Coordinate System" paragraph below.
Extents
The Easting Minimum & Maximum and the Northing Minimum & Maximum values indicate the location of the left, right, top and bottom borders of the grid in the display area. ResSim displays coordinates in the Status Bar as you move the cursor within the map display panel.
Grow to Map Extents
When you check this box, ResSim automatically sets the geographic region to define the smallest rectangle that encompasses all the objects (maps, icons, alignments, etc.) in the display area. If you add any objects to the watershed that lie outside the geographic region, ResSim automatically updates the extents to include the new objects.
You must specify the geographic extents of your watershed carefully to ensure that all map layers in your watershed setup are included. The extents you specify and the coordinate system you use must be consistent for all layers in the watershed. You should use GIS tools to transform map layers from one coordinate system to another before you use them in ResSim.
Setting Map Coordinates to Display
If the extent of your model schematic covers only a small portion of the extent of your map layers, you can automatically set the geographic extents of the Map Display area to the coordinates in your current view. Here's how:
- First, zoom in or out in the display area until the Map Display shows only your model schematic (with a little bit of margin),
- Next, open the Display Coordinate Information dialog from the Layer Selector and click Set Map Coordinates to Display. ResSim will set the maximum view extents of the Map Display area to the current view extents.
- Click OK to save your selection and close the dialog.
To return the view to the extents covered your map layers:
- Check the box labeled Grow to Map Extents then click the OK button.
Editing the Coordinate System
You can edit the Coordinate System of the Watershed by selecting Edit in the Geographic Region dialog. This opens the Map Coordinate Information dialog, where you can configure the System, Units, Spheroid, and other system-specific data. See Working with Map Display Layers for more information on configuring map coordinate information.