Download PDF
Download page Diversions.
Diversions
Drawing a Diversion Element
To draw a diversion from a stream:
- Using the Diversion Tool
 , position your pointer at the location on the stream alignment where the diversion will occur (the "from" or inflow location) then press the Ctrl key and click.
If a computation point exists at (within the "snap" range of) that location, a Computation Point Found query dialog will ask if you want to connect the diversion to the Existing Computation Point or to a New Computation Point ("Figure: Connect to Existing Computation Point Query") .
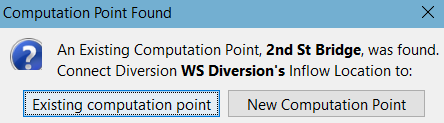
Figure: Connect to Existing Computation Point Query
If you select New Computation Point, ResSim will create a new computation point on the stream alignment as near as possible to the location of your pointer when you "clicked" and will connect the diversion to it. The new computation point will be given a default name and will be located very near the existing computation point that was identified in the query. Don't forget to rename the new computation point(s).
- You can give shape to the diversion reach by continuing to hold down the Ctrl key and clicking as you move the pointer across the map display. With each Ctrl+click, a point will be added to the polyline that represents the diversion.
To place the last point of the diversion, move the pointer to the location where the diverted water will go (the "to" or outflow location) then release the Ctrl key and click. Note: the outflow of the diversion can be placed at a location…
on the stream alignment. This will make the diversion connected and indicates that the diverted water will remain within the river system. Like the inflow location, if a computation point exists at this location, you will be queried to be sure you want to connect the diversion to that computation point.
not on the stream alignment. This will make the diversion unconnected and indicates that the diverted water will be lost from the river system.
A Name New Diversion dialog ("Figure: Name New Diversion") will appear. Enter a Name and Description for your diversion and click OK to complete the creation of the diversion.

Figure: Name New Diversion
If the outflow of your diversion is connected to a computation point, the diversion will be drawn in the Map Display with a blue arrowhead. If the diversion is unconnected, the diversion will be drawn with a black arrowhead. "Figure: Connected and Unconnected Diversions" illustrates two diversions—Irrigation Diversion is a connected diversion and WS Diversion is unconnected. If you cannot see a difference between the arrowheads of a connected and an unconnected diversion, you can change the draw properties of the diversions in the Drawing Properties Editor. Select Drawing Properties… from the Edit menu to open the editor. For more details, refer to "Working with Map Display Layers".

Figure: Connected and Unconnected Diversions
To draw a diversion from a reservoir:
- Using the Diversion Tool , position your pointer along the storage reach of a reservoir—away from the dam or inflow junctions, then press the Ctrl key and click. This will connect the diversion's inflow to the reservoir.
- Finish drawing the diversion as described above.
ResSim will not generate a computation point at the inflow of a diversion from a reservoir. The Irrigation Withdrawal diversion illustrated in "Figure: Connected and Unconnected Diversions" is a diversion from a reservoir. Note that ResSim did not generate a computation point at the inflow of a diversion from a reservoir.
Disconnecting a Diversion
Connected diversions are diversions whose outflow point is connected to a computation point in the watershed schematic. To disconnect the outflow point of the diversion:
- Using the Diversion Tool or the Pointer Tool
 , right-click on the diversion.
 Select Disconnect Outflow from the bottom of the diversion's context menu ("Figure: Diversion Context Menu").

Figure: Diversion Context Menu
(NOTE: the inflow point of a diversion cannot be disconnected. If you connected the upstream end of a diversion to the wrong computation point, you must delete the diversion and re-create it.)
Reshaping a Diversion
A diversion is represented by a polyline that ends with an arrowhead. To reshape the diversion polyline:
Using the Diversion Tool
, double-click on the diversion. The polyline will highlight (turn yellow) and the vertices (points) that describe the polyline will display as tiny black dots as illustrated in "Figure: Highlighted Diversion".
Figure: Highlighted Diversion
- Drag each of the black dots to a new position in the Map Display until the diversion polyline is shaped as you desire. If the diversion is unconnected, the only point that cannot be moved is the first one at the diversion inflow. If the diversion is connected, neither the first (inflow) point nor the last (outflow) point can be moved.
- To add points to the polyline, hold down the Ctrl key and click anywhere along the diversion's polyline. A new black dot will appear where you clicked.
- To delete points from the pool polygon, hold down both the Ctrl and Shift keys while clicking on a point you want to delete from the polygon. The point will disappear.
Editing Diversion Data
Use the Diversion Properties Editor to edit configuration data for the diversion elements. To open the Diversion Properties Editor ("Figure: Diversion Editor"):

Figure: Diversion Editor
- Using the Diversion or Pointer Tool, right-click on the diversion.
Select Edit Diversion from the diversion's context menu.
Use the Diversion Properties Editor to edit the description of the diversion, specify whether the diversion is an Existing Project and/or a Corps Project, and enter the Year in Service (when the diversion first began operating). You can also verify which schematic elements the diversion is connected to by reviewing the content of the Diversion Information table.
Renaming a Diversion
To rename a diversion:
- Using the Diversion or Pointer Tool, right-click on the diversion.
- Select Rename Diversion… from the diversion's context menu.
- Enter a new Name (and Description) for the diversion in the Rename Diversion dialog then click OK. (Cancel will abort the rename process.)
- An "are you sure" warning message will appear asking you to confirm that you really want to rename the diversion.
- Select Yes to complete the rename process
- Select No to abort the rename process
- Select Cancel to return to the Rename Diversion dialog so that you can revise the new name for the diversion.
Removing a Diversion from a Configuration
To remove a diversion from the current configuration:
- Using the Diversion or Pointer Tool, right-click on the diversion.
- Select Remove from Configuration from the context menu
The Confirm Removal dialog will appear ("Figure: Confirm Removal of Diversion"). Click Yes to remove the diversion from the active configuration.

Figure: Confirm Removal of Diversion
You can also remove a diversion from a configuration by opening the Configuration Editor and using the Project Selector to remove the diversion. To open the Project Selector, select Edit Project List… from the Project menu of the Configuration Editor.
Deleting a Diversion
To delete a Diversion from the watershed:
- Using the Diversion or Pointer Tool, right-click on the diversion.
From the context menu, select Delete Diversion. A Confirm Deletion dialog will open asking "Are you sure…?"

Figure: Confirm Deletion Dialog
Click Yes to delete the diversion and all data associated with the diversion from the watershed. Click No to cancel the delete.
Adding Configuration Notes for a Diversion
Although ResSim does not use Configuration Notes, other models that share the watershed may. To open the Configuration Notes editor for a diversion:
- Using the Diversion or Pointer Tool, right-click on the diversion.
- From the diversion's context menu, select Configuration Notes.
In the Configuration Notes textbox of the Notes editor ("Figure: Configuration Notes for Diversion"), enter information about the selected diversion relevant to the current configuration.
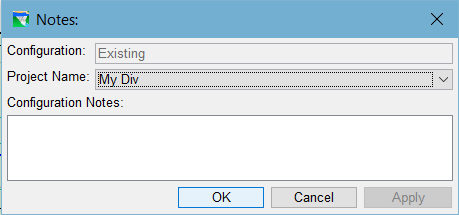
Figure: Configuration Notes for Diversion
You can also access the diversion's configuration Notes editor by selecting Notes… from Edit menu of the Diversion Properties Editor.