Download PDF
Download page Network Elements.
Network Elements
Once you have created a reservoir network and established its connectivity (as described in "Developing a Reservoir Network"), you will need to specify the properties of the elements in the network. To do so, you will use ResSim's specialized network element editors. This chapter explains the Junction, Reach, and Diversions Editors and how to enter and edit data for these network elements. "The Reservoir Editor", "Physical Properties of Reservoirs", "Reservoir Operations - The Basics", "Reservoir Operations - The Rules", and "Advanced Features" describe the Reservoir Editor and how to edit the physical and operational data for your reservoirs.
As explained in "Developing a Reservoir Network", the Reservoir Network module of ResSim is effectively the editor of a reservoir network. As such, the Reservoir Network module is where you will create your reservoir network and definite the data for its elements. However, when you begin to compute your alternatives in the Simulation module, you will learn that the same editors you used to define the elements of you network are accessible there as well.
There are two methods for accessing the element editors from the ResSim interface:
From the Edit menu—select the element type you want to edit. "Figure: Reservoir Network Module - Edit Menu" shows the Edit menu and its list of Editors that you can use to edit the elements of your network.
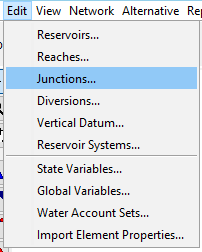
Figure: Reservoir Network Module - Edit Menu
- From the Map Display—Using either the Pointer Tool
 or the specific element's Tool
  , right-click on the element in the Map Display area and select Edit … Properties from the schematic element's context menu
All the reservoir network element editors (e.g., the Junction Editor, shown in "Figure: Element Editor - Common Features") share some common characteristics. These include:

Figure: Element Editor - Common Features
Beware of the Vertical Datum feature, which does not work. Screenshot shows older version. Currently the Vertical Datum details are hidden behind a "Edit Vertical Datum" button.
- Name Field—The Name field at the top of the editor displays the name of the element that you are currently editing. However, in addition to identifying the current element, the Name field has a second function—it is an element selector; it contains a list of all the elements (of this editor's type) in your network, allowing you to select any element in the list to edit without leaving the editor.
- Navigation Buttons—To the right of the Name field are a set of Navigation Buttons
 that allow you to move forward and backward through the list of elements for editing.
The leftmost button will take you to the first element in the list.
The rightmost button will take you to the last element in the list.
The middle two buttons, and
and  , will select the previous or next element, respectively, in the list.
The box in the middle of the navigation buttons displays the index of the current element and the total number of elements of that type in the currently open dataset (in this case, the network).
 Description Field—Below the Name field is the Description. If you provided a description when you named the network element (or its associated configuration element), that description will appear in this field. Almost all description fields throughout ResSim are editable, allowing you to change and add to them as you work on your model.

Description Fields accompany almost every namable object you will create in ResSim. They are included in the Name dialog when you first create an object and they are also included in all the editors where you define the data for the object. USE THEM!
You’ll find there’s nothing more helpful to you, other modelers, and reviewers than a well internally-documented model.
So, when you enter your descriptions, try to answer as many of the Who, What, Where, When, Why, and How questions as you can; describe what the object represents, the sources of the data or parameters, why you chose to represent the physical or operational element the way you did, and what result or behavior you were expecting.
- Thumbnail Plot—Wherever a table of data appears in a ResSim editor, a small plot called a thumbnail plot will accompany it, as illustrated in "Figure: Element Editor - Common Features". These plots are included to help you quickly notice bad data in the table. To get a full-size plot of the data, double-click on the thumbnail plot.
- Tab Panels —The Tabs provide access to various parameters for defining the current element.
Observed Data tab—The Observed Data tab ("Figure: Element Editor - Observed Data Tab") contains a table listing the computed parameters for the element. If you may want to associate an observed time series with one or more of the listed variables, place a checkmark in the checkbox to the right of the Variable(s) of interest by clicking anywhere in the checkbox's cell. For each Location and Variable that has a checkmark in the Observed box in the table, a corresponding entry will appear in the table on Observed Data tab of the Alternative Editor. See Chapter 14 for details on associating observed time series data in the Alternative Editor with the selected locations and variables from the element editors.
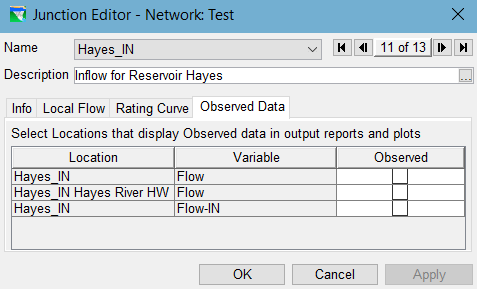
Figure: Element Editor - Observed Data Tab

Providing observed data is optional. ResSim uses observed data for comparison purposes only — and then, only in its standard element plots accessible from the active schematic in the Simulation module. ResSim does not use observed data in its computations.
- OK, Cancel, and Apply Buttons—Use these buttons to save or discard your changes and close the Editor:
- OK—will save your changes and close the Editor.
- Cancel—will discard your changes and close the Editor.
- Apply—will save your changes without closing the Editor. You should use the Apply button before changing tabs or navigating to another element in the Editor. Even if you Cancel after an Apply, your changes up to the last Apply action are saved.