Download PDF
Download page The Layers Tree.
The Layers Tree
The Layers Tree is a tree widget used in the Layer Selector for displaying the hierarchical organization of the map, schematic, and image layers in your watershed. The top level of the tree (or root node) is the Layers folder, which contains all of the layers in the watershed relevant to the current module. Beneath the Layers folder are the primary layers. Each primary layer represents one of the layer types and is drawn as a branch in the tree with a plus/minus box, followed by a checkbox, then the layer name. A primary layer may have one or more components layers which is why a primary layer is referred to as a branch. Each component layer is drawn below the primary layer's checkbox with a plus-minus box and checkbox of its own.
In the following sections you will learn how to interact with the layers in the Layer Selector by using the options menus and context menus, the plus/minus boxes, the checkboxes, and the properties editors.
Controlling the Layer Display
The plus/minus box ![]() in front of each primary and component layer implements the same functionality as the Expand and Collapse options in the View menu.
in front of each primary and component layer implements the same functionality as the Expand and Collapse options in the View menu.
- Expand/Plus Sign—Click on a plus sign to expand a tree branch to display component sub-layers; if no sub-layers exist, you will see a legend for the layer (if a legend exists).
- Collapse/Minus Sign—Click on a minus sign to collapse the tree branch or sub-branch below the minus sign.
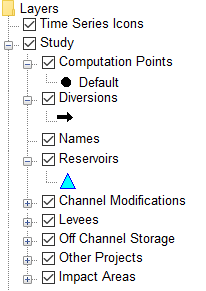
You can also expand and collapse layers by double-clicking on the layer name (but don't be surprised if the Properties editor for that layer opens too.) The figure below shows the Layer Selector with some of the Study Layer's sub-layers expanded.
The checkbox ![]() that follows the plus/minus box turns the display of the layer ON or OFF in the Map Display. When a primary layer is un-checked (OFF), neither the primary layer nor its components layers will display. When checked (ON), the primary layer and all its checked component layers will display.
that follows the plus/minus box turns the display of the layer ON or OFF in the Map Display. When a primary layer is un-checked (OFF), neither the primary layer nor its components layers will display. When checked (ON), the primary layer and all its checked component layers will display.
Viewing a Layer’s Legend
When you click on the plus symbol ![]() to the left of a layer (or sub-layer) with no components or sub-layers of its own, the component's legend will be drawn below the component in the tree. The legend is the icon or drawing style of the component as it will appear in the Map Display.
to the left of a layer (or sub-layer) with no components or sub-layers of its own, the component's legend will be drawn below the component in the tree. The legend is the icon or drawing style of the component as it will appear in the Map Display.
The type of legend displayed is determined by the file formats or layer type. "Figure: Study Layer - Expanded" shows the legend for Computation Points, Diversions, and Reservoirs, which are elements of the Study (watershed configuration) layer.
Accessing a Layer’s Context Menu
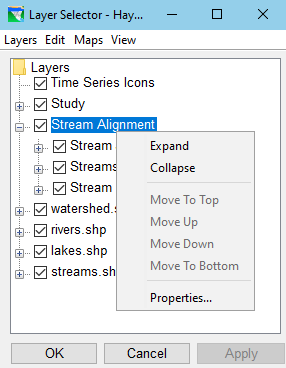
You can access a primary layer's context menu by right-clicking on the layer in the Layers tree of the Layer Selector. Context menus offer commonly used commands that are also available in the Layer Selector's Edit and View menus. "Figure: Layer Selector - Schematic Layer Context Menu" shows the context menu for the Stream Alignment layer.
If a command or option in a context menu is greyed-out, the option is unavailable either because you have not turned on Allow Layer Editing from the Edit menu or the option cannot be used for the currently selected layer in the tree.
The common commands available in a layer's context menu include:
- Expand—opens the branch of a layer to display its component (sub-)layers. Collapse closes layer's branch to show only the primary layer. If a layer does not have sub-layers, Expand will show the layer's legend.
- Move to Top,
Move Up,
Move Down, and
Move to Bottom—use these commands to rearrange the layers in the tree. The current position of an individual layer will determine which Move command are available. These options are described in detail in "Managing Layer Order". - Properties—opens a Properties editor for the layer, allowing you to change how the elements of that layer will be drawn in the Map Display area.
For map layers ("Figure: Layer Selector - Map Layer Context Menu"), there are several additional options available in the context menu:
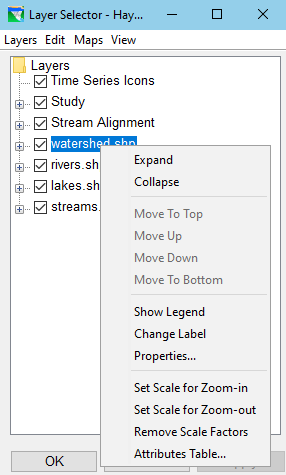
- Show Legend option expands the map layer tree to display the map legend. This option changes to Hide Legend when the layer is expanded, allowing you to close the branch view of legends.
- Change Label option allows you to change the name of the layer in the tree.
- Set Scale for Zoom-in,
Set Scale for Zoom-out, and
Remove Scale Factors—use these commands to describe how the layer should appear in the Map Display relative to the zoom level. - Attributes Table…—this option will open a dialog showing a table of the attributes and their values for the elements in the selected shapefile layer.
Managing Layer Order
The Layer Selector controls how layers are arranged in the Map Display Area. When you add map layers to the watershed, the map layer is added to the bottom of the list of maps in the Layers Tree of the Layer Selector.
Use the Layer Selector to rearrange the order of the primary layers:
- From the Edit menu, select Allow Layer Editing.
- Select the layer you would like to move.
- From the Edit menu or from the layer's context menu, select:
- Move to Top—to move the layer to the front of the map display and to move the layer to the top of the layers in Layers tree.
- Move Up—to move the layer towards the front of the map display and to move the layer up in the Layers tree.
- Move Down—to move the layer toward the back of the Map Display and to move the layer down in the Layers tree.
- Move to Bottom—to move the layer to the back of the Map Display and to move the layer to the bottom of the layers in Layers tree.
To see your changes, click Apply (to keep the Layer Selector open) or click OK to close the Layer Selector.