Download PDF
Download page The Options Editor.
The Options Editor
To access the Options Editor:
- Select Options… from the Tools menu of any ResSim module.
As shown in "Figure: ResSim Options Editor", the Options Editor is arranged in tabs. Some tabs are module dependent, such as the Simulation tab which only appears when the Options Editor is accessed from the Simulation module of ResSim.

Figure: ResSim Options Editor
Unless otherwise stated, any changes you make to settings in the Options editor are saved as global User Preferences and are retained until reset. In this context, global means: applies to All watersheds. ResSim's User Preferences are stored in the AppData folder of your Windows® user profile in a folder specific to the version of ResSim that you are currently working with. Since they are stored per version, each time you install a new version of ResSim, you will need to reset your preferences; they do not carry forward.
Shortcuts
A Watershed Location, or Shortcut, is the place on disk where you store your watersheds. You can have multiple watershed locations, although a single watershed cannot span multiple locations. Each watershed location is given an alias (or logical name) such as My Watersheds or Current Projects.
In prior versions of ResSim, you were required to create at least one watershed location before you could create a watershed. In version 3.3, that requirement has been removed; however there are still features in ResSim that expect your watershed to reside in a known watershed location so we recommend that you continue to create and use specified watershed locations (shortcuts) for storing your watersheds.
So, before you create or open a watershed, you should define at least one watershed location. To define a watershed location (a.k.a., a Shortcut):
From the Tools menu, select Options. The ResSim Options Editor will open See "Figure: ResSim Options Editor".
- Select the Shortcuts tab. The Name and Location of any watershed locations you have already defined will display in the Shortcuts list.
To add a new location to the list, click the Add Shortcut button. The Add Shortcut dialog will open ("Figure: Add Shortcut Dialog").
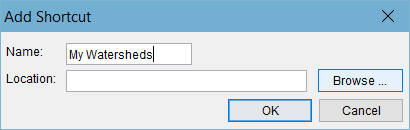
Figure: Add Shortcut Dialog
- Enter a Name (or alias) for the new shortcut, then click Browse…. A file browser window will open. Use it to select the folder on disk where you want to store your watershed(s).
- Click OK to close the Add Shortcut dialog. The new watershed location (shortcut) will now appear in the list of Shortcuts on the Shortcuts tab ("Figure: ResSim Options Editor").
Compute Display
When you compute a simulation in the Simulation Module, the ResSim Compute Window opens ("Figure: ResSim Compute Window").

Figure: ResSim Compute Window
The Compute Window reports on the progress of the currently computing alternative and displays messages generated by the ResSim compute engine.
The Compute Display tab of the Options Editor ("Figure: Options Editor - Compute Display Tab") allows you to specify the text colors for the messages that are displayed in the Compute Window and to determine the format of the Compute Log.
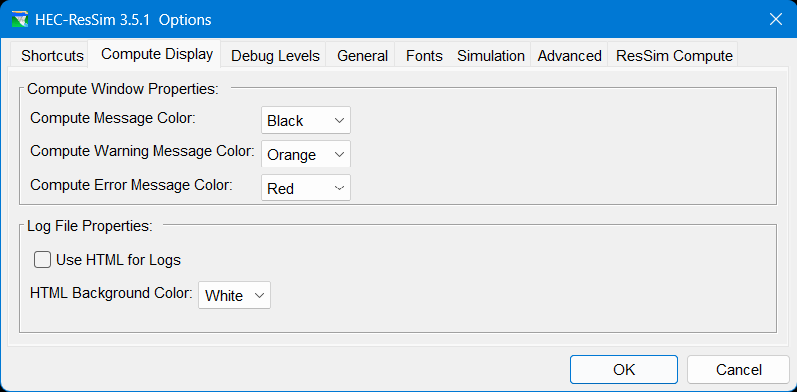
Figure: Options Editor - Compute Display Tab
Compute Window Properties—contains the options for setting the text Color for:
- General Messages
- Warning Messages
- Error Messages
Log File Properties—this section contains options for specifying the format of the Compute Log:
- Use HTML for Logs—By default, the log is written in simple ASCII text format (the default) but if you would prefer that it be written in HTML, place a checkmark in the Use HTML for Logs checkbox.
- HTML Background Color—If the Use HMTL… checkbox is checked, then you can select a background color for display of the HTML formatted log.
Debug Levels
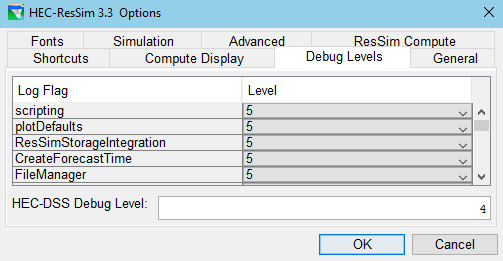
The Debug Levels tab ("Figure: Options Editor - Debug Levels Tab") lets you manage the level of diagnostic output (messaging) that ResSim will generate in the ResSim Console and Compute logs. The table on this tab lists Log Flags and their associated messaging Levels for various objects and features in ResSim that produce Level-controlled status messages. The default Level settings usually provide an adequate level of diagnostic output, but if you are having issues in a particular area, you may find it useful to increase the log Level (up to 10) for a relevant Log Flag to see if additional diagnostic information might be produced.
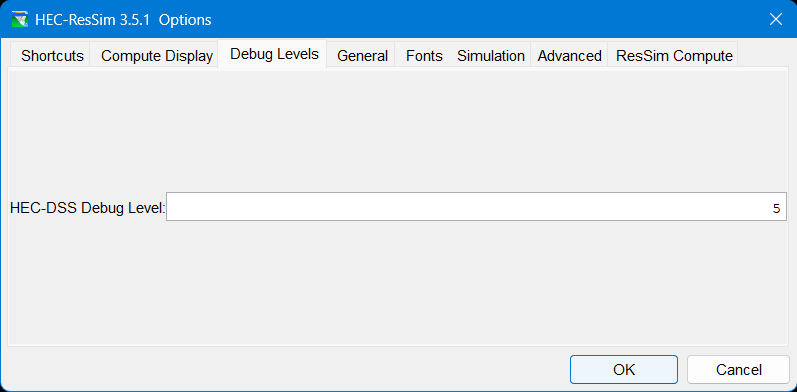
Figure: Options Editor - Debug Levels Tab
Note: Because ResSim uses source code that is shared with other HEC applications, there are Log Flags in the list of Debug Levels that are not applicable to ResSim. For example, the Log Flag GridUtil is used by GridUtil & CWMS, not ResSim.
UPDATED IN RESSIM 3.5Note: When ResSim is installed on a machine where the modeler requires administrative permissions to edit config files, these HEC Debug Level setting may not work. Contact HEC for assistance.
HEC-DSS Debug Level—This log level is used by HEC-DSS to control the types of messages it produces to its log. The default value is 4 which will produce limited messaging in the DSS log for all DSS reads and writes. You can reduce DSS logging by entering a value of 1 or 2. Or you can increase the log level all the way up to 10 to get the maximum diagnostic output from DSS.
General
The General tab ("Figure: Options Editor - General Tab") lets you manage settings that influence how ResSim behaves when opened or closed. These options are saved as user preferences for this version of ResSim and will remain as set until changed.
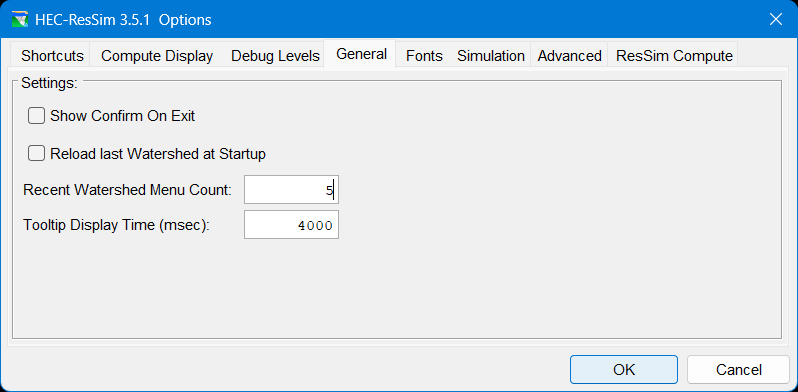
Figure: Options Editor - General Tab
Show Confirm on Exit—When you first start using ResSim, you will find this option is checked by default. If you find it annoying that ResSim prompts you ("Figure: Exiting Prompt") each time you try to close ResSim, then you can uncheck this option.

Figure: Exiting Prompt
Reload Last Watershed at Startup—If you will be working on the same watershed for a while, this option is handy. Upon starting ResSim, it will reload the watershed you were working on when you last closed ResSim. This option is unchecked by default.
Recent Watershed Menu Count—Allows you to adjust the number of recent watersheds that are displayed from the File Menu.
Tooltip Display Time—Tooltips appear when you pause your cursor over a user interface widget that has a tooltip defined for it. But they don't hang around long. This option lets you change how long a tooltip will be displayed before disappearing. The time is in milliseconds.
Fonts
The Fonts tab ("Figure: Options Editor - Fonts Tab") lets you specify the font that will be used for a variety of components (widgets) in the ResSim main user interface, windows, dialogs, and editors. These widgets include: Tabs, Labels, Descriptions for Radio Buttons and Checkboxes, Buttons, Lists and Text Fields.
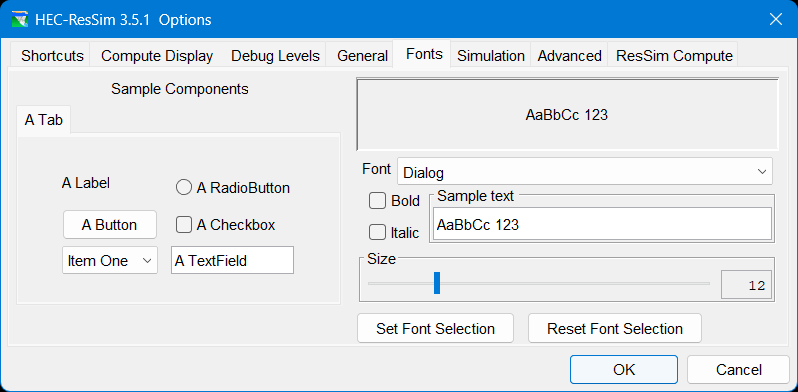
Figure: Options Editor - Fonts Tab
- Font—To change the font you see throughout ResSim, use the Font drop-down list to select your desired font. Use the fields below the Font selector to set the font Size and to make it Bold and/or Italic. You can even enter a different string of Sample Text to use to see how the font will look.
- Set Font Selection—After making your selections, click the Set Font Selection button to apply your changes to the various widgets shown on the left side of the panel. If you like what you see, click OK to apply your selections and close the Options Editor. As ResSim will tell you, your new font settings will not be applied until the next time you start ResSim. NOTE—you must click the Set Font Selection button before pressing OK, or your changes will not be applied.
- Reset Font Selection—If you don't like how your font settings appear on the Sample Components, click the Reset Font Selection button to start over (return to defaults) or press Cancel to discard your changes and close the Options Editor.
Simulation
The Simulation tab ("Figure: Options Editor - Simulation Tab") only appears in the Options Editor when accessed from the Simulation module with a watershed open. It provides some options that are reminiscent of those on the General tab but these options apply to the Simulation module.
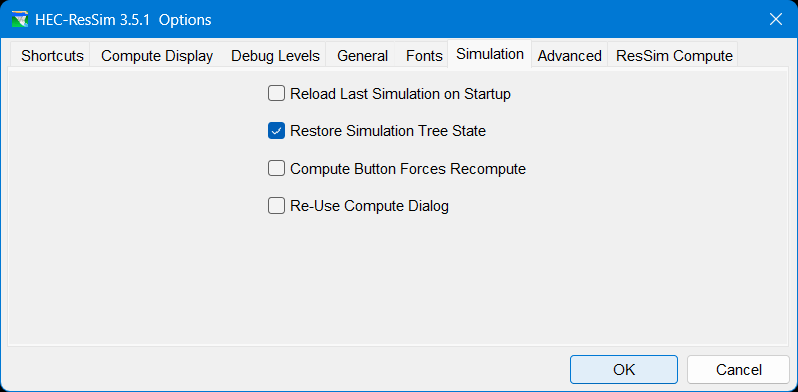
Figure: Options Editor - Simulation Tab
- Reload Last Simulation on Startup—If checked, this option will cause ResSim to load the simulation that you last had open in each watershed you open. This option will work even if you do not have Reload Last Watershed at Startup checked on the General tab.
- Restore Simulation Tree State—The simulation tree state reflects the current settings of the tree in the Simulation Control panel. These setting include the identity of the active alternative and the checked/unchecked state of the checkboxes for each alternative.
- Compute Button Forces Recompute—By default, this option is unchecked resulting in the following behavior:
- The Compute button on the Simulation Control panel and the Compute option in an alternative's context menu will start a compute, but if ResSim thinks that nothing about the alternative has changed since the last compute, it will not actually perform the compute; instead, it will report in the Compute Window that it is "Skipping" the alternative. While in this default state, you can force a re-compute by holding the Ctrl key on your keyboard while clicking the Compute button or menu option.
- By activating this option (placing a checkmark in the checkbox), no compute will be "skipped" even if no changes have been made.
- Re-Use Compute Dialog—By default, the Compute Window (or Dialog) must be closed before a subsequent compute can be performed. By activating this option, the current compute must finish before another can be started, but the window will not need to be closed first.
Advanced
The Advanced tab ("Figure: Options Editor - Advanced Tab") gives you access to a couple of settings related to scripted State Variables and Rules. Since you can only interact with the State Variable and Scripted Rule editors from the Network and Simulations modules, the Advanced tab only appears in the Options Editor when accessed from the Network or Simulation modules.
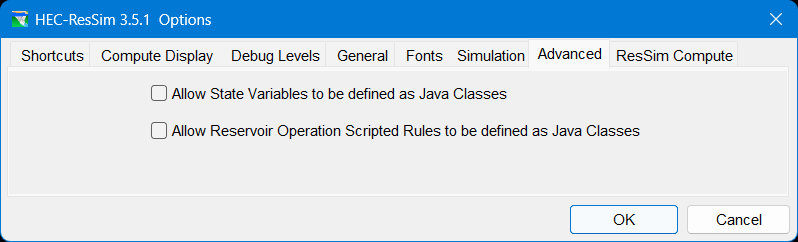
Figure: Options Editor - Advanced Tab
- Allow State Variables to be defined as Java Classes—by turning this option on, you active an option in the State Variable Editor that will allow you to identify a Java class file as the implementation of your state variable rather than the native Jython script. By writing your own Java class for your state variable you can improve compute time of your state variable by 20% or more. This option should be seriously considered for state variables scripts that are very long, complicated, and access a significant number of ResSim model objects and their methods.
- Allow Reservoir Operation Scripted Rules to be defined as Java Classes—this option is exactly the same as the one above for State Variables, but it applies to scripted rules.
Since these settings impact how you create your operations in the current watershed, the settings on the Advanced tab are stored in the watershed, not as User Preferences.
ResSim Compute
The ResSim Compute tab ("Figure: Options Editor - ResSim Compute Tab") gives you access to a number of settings that influence how ResSim performs its computations. Since you can only compute from the Simulation module in ResSim, the ResSim Compute tab only appears in the Options Editor when accessed from the Simulation module with a watershed open.
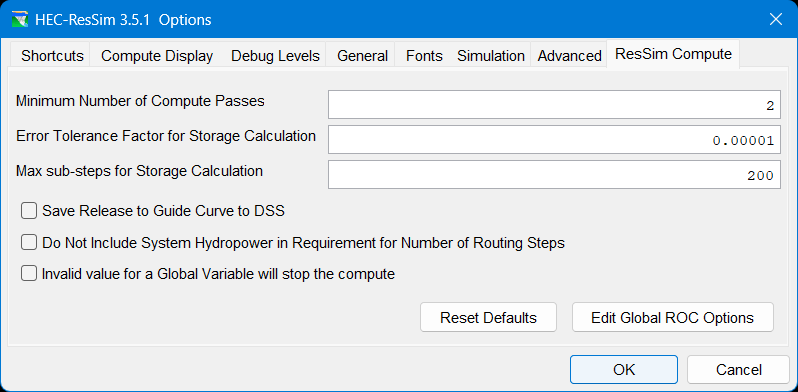
Figure: Options Editor - ResSim Compute Tab
- Minimum Number of Compute Passes—Each time ResSim computes through the time window is referred to as a "pass". Each time you tell ResSim to compute an alternative it will perform at least two passes—the idea is that it can use the results from a prior pass to improve the results of the current pass.
If the Minimum Number of Compute Passes is set to its default of 2, ResSim will perform two passes or more as mandated by the rule types being used in the alternative. During the first pass, ResSim evaluates only "at site" rules. It will ignore downstream and system rules, IF-Blocks, as well as any state variables and scripted rules. During the second pass, ResSim evaluates all active state variables and scripted rules, IF-Blocks, and it adds in the downstream control rules, if there are any. During the third pass, ResSim adds in system rules (like Tandem, Pump Schedule, and System Hydropower). If there are no downstream control or system rules, ResSim will stop after the second pass. If there are downstream rules but no other system rules, ResSim will stop after computing a third pass. If there are system rules, ResSim will compute a fourth pass, evaluating all the state variables, IF-Blocks, and rules, just as it did in the third pass.
The option to set the Minimum Number of Compute Passes is provided to let you determine if a greater number of passes should be computed than what ResSim will do by default. As such, ResSim will ignore any entry less than 2.
So, if you have downstream control rules in your model, an effective entry would be greater than 3. And, if you have system rules, an effective entry would be greater than 4. - Error Tolerance Factor for Storage Calculation—ResSim uses an estimate of the average pool elevation during a time step to determine release capacity of each outlet, so the longer the timestep, the more potentially inaccurate the estimate of average pool elevation could be, which would result in a potentially inaccurate estimate of the release capacity of each outlet. The computed releases from an uncontrolled outlet, like an overflow spillway, are often more affected by this potential inaccuracy than controlled outlets are; this is due to the fact that uncontrolled outlets always release at capacity, while controlled outlets often release at less than capacity.
To reduce the inaccuracies, a "storage integration" scheme was added to integrate storage over the timestep in an effort to better estimate the average elevation over the timestep. Unfortunately, this storage integration scheme can run into trouble converging if you have sharp inflection points in the storage-elevation data or in the outlet capacity curves, or if your reservoir storage is small compared to the release capacity. In addition, if/when the storage integration scheme has trouble converging, it can add a significant amount of time to the compute.
The Error Tolerance for Storage Calculation and Max Sub-steps for Storage Calculation parameters were added to give you control over the storage integration scheme.
This option, Error Tolerance for Storage Calculation, is the convergence criteria in units of storage (acre-feet or cubic meters) for the integration scheme. The default value is 0.00001. If you increase the tolerance (enter a larger value, like 0.001), the method will converge easier but may be slightly less accurate. - Max Sub-steps for Storage Calculation—This is the other parameter you can use to influence the storage integration computations. This value represents the maximum number of time slices the method can use for integration of storage over the timestep. The default value is 200. If your timestep is relatively short, ResSim should need fewer sub-steps to compute a valid estimate of average elevation. If you reduce the maximum number of sub-steps, the method occasionally may not converge which could result in slightly less accurate results.
Each model is different so you may need to run some tests to determine how sensitive your model is to these parameters. The storage integration scheme outputs warning messages to the console log and error messages to both the Compute Window (and log) and to the console log. - Save Release to Guide Curve to DSS—as part of the release decision process, each reservoir computes a "desired release to get to guide curve" for each timestep. But these flows are not, by default, written as part of the standard output to the DSS file. If you activate this option, you can find the desired guide curve release by filtering the pathnames in DSSVue to a C-part of FLOW-GC-RELEASE.
- Do Not Include System Hydropower in Requirements for Number of Routing Steps—because routing effects (lag and attenuation) can affect downstream control and system operations, ResSim attempts to estimate these affects at the start of the compute process. These estimates result in a routing window (or Number of Routing (time)Steps) over which ResSim iterates in an attempt to determine an appropriate release from each reservoir.
As a system rule, the routing between System Hydropower reservoirs can, by default, influence the size of the total routing window. But, since System Hydropower does not have a target location for the system reservoirs to operate for, the influence of routing between the system hydropower reservoirs may not be relevant (e.g., if all the reservoirs in the system were on parallel streams). Use this option to turn off the influence of the System Hydropower rules on the routing window. Reset Defaults
 —Press this button to reset the options listed above to their default values.
Note: Rate of Change Rules have more impact than you might think…
ResSim's decision logic tries to meet its objectives as fast as possible, usually within the current timestep. But rate-of-change constraints are in direct opposition to that tendency; their objective is to slow things down. To more fully address this objective, logic was added to the downstream control and guide curve methods to account for rate of change constrains. So, besides acting as normal release limit rules, Rate of Change rules also impact downstream control and guide curve by extending the time window over which the two methods try to meet their objectives. The options below are intended to give you some control over the impact of Rate of Change rules on Guide Curve operations. —Shortly after rate of change impacts were added to the guide curve logic, user control over those impacts was added. To access the options for controlling the impact of rate of change rules on the guide curve logic, click the Edit Global ROC Options button. The Global ROC Options Editor will open ("Figure: Global ROC Options Editor").
Figure: Global ROC Options Editor
- Consider Rate of Change in Guide Curve Release Computations—this checkbox acts as an ON/OFF switch for the application of Rate of Change rules upon the Guide Curve logic. By default, this option is ON by default. If you uncheck this option, all other parameters are deactivated.
- Minimum Look Ahead—this option is the minimum number of days that the ROC rules will add to the time window over which the Guide Curve logic will attempt to get the reservoir back to guide curve.
- Maximum Look Ahead—this option is the maximum number of days that the ROC rules can add to the time window over which the Guide Curve logic will try to get the reservoir back to guide curve.
- Allow Iterations for Variable ROC—Since rate of change rules can vary with inflow, outflow, or pool elevation, the impacts of the rate of change on the guide curve logic's time window can vary as a result of the decision that is currently being determined. This option allows you provide convergence criteria for evaluating the impact in this timestep. This feature is ON by default. The convergence parameters include:
- Maximum Iterations—this value limits how many attempts ResSim can make to determine the time window impact on the Guide Curve logic per timestep.
- Flow Tolerance—if the difference in flow between one iteration and another is less than this value, the iterations stop—the logic is considered to have reached "convergence".
- Storage Tolerance—if the difference in ending storage between one iteration and another is less than this value, the iterations stop.
 —If you have made changes to the Global ROC Options, you can return all the settings to the ResSim defaults by pressing this button.
Unlike most other settings in the Options Editor, the settings on the ResSim Compute tab are stored in the watershed, not as User Preferences.