Download PDF
Download page The Script Editor.
The Script Editor
The Script Editor option from the Script menu opens the Script Editor "Figure: Script Editor". The Script Editor contains a Menu Bar and three primary sections:
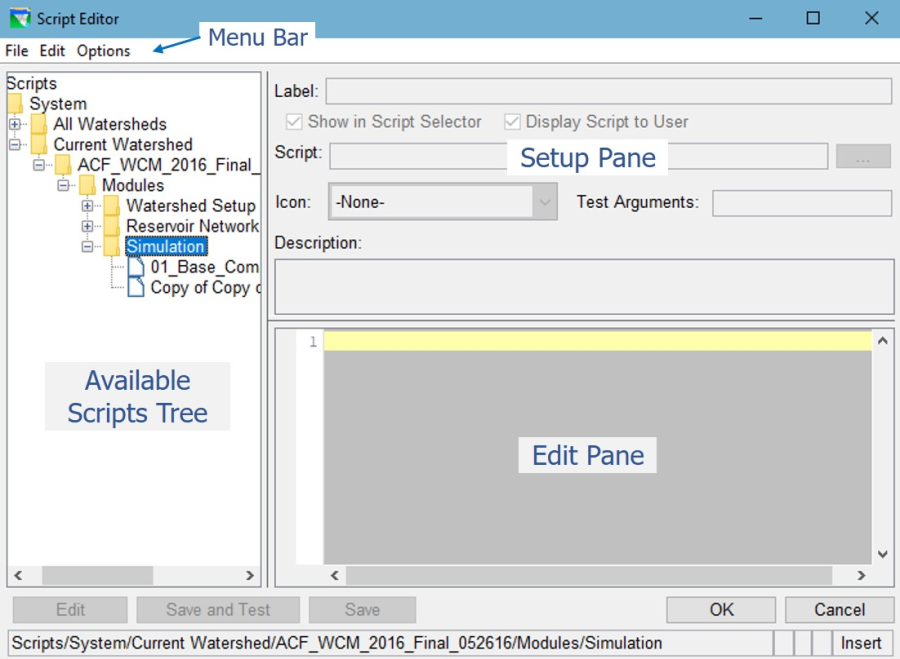
- Available Scripts Tree—This tree is similar to a file system tree, but it displays the logical organization of how your scripts are stored. You can use this tree (or the File menu) to create, open, or import scripts in your watershed.
- Setup Pane—This pane is for setting up a few properties of your script, including the label or icon that will be displayed on a script button, the name of the file containing the script, and a description of the script.
- Edit Pane—This pane is where you will edit the script. The text editor of this pane recognizes Python source code and will colorize the text of your script to reflect key elements it recognizes such as comments, strings, keywords, constants, and parentheses.
The menu bar on the Script Editor includes the following three menus:
File—contains most of the standard options you'd expect to find in a File menu ("Figure: Script Editor File Menu"). One interesting aspect of the File menu is that some of the options are inactive (greyed out) depending on what is selected in the Available Scripts Tree.
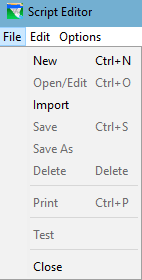 Figure: Script Editor File Menu
- New—Before creating a new script, be sure to select the module the script will belong to in the Active Scripts Tree. When New is selected, the Setup and Edit panes become active and a few import lines are added to your new script. Be sure to give your script a name in the Label field; when you do, the Script field will display the filename of and path to the script.
- Open/Edit—To open a script for editing, select an existing script from the Available Scripts Tree, then select Open/Edit from the File menu or click the Edit button below the tree. Or, you can just double-click on the script in the tree.
- Import—When Import is selected, a File Browser will open to allow you to navigate your file system to select a script to import.
- Save—Save the changes you have made to the script you have open in the Script Editor.
- Save As—Save the script you have open in the Script Editor to a new file with a new name or label.
- Delete—Delete the script you have selected in the Available Scripts Tree. If you do not have a script selected or open in the Script Editor, the Delete option will be unavailable.
- Print—Print the script
- Test—Run or execute the script you have selected in the Available Scripts Tree.
Close—Close the Script Editor. This action is also available through the OK and Cancel buttons at the bottom right of the Script Editor.

Note: Currently, ResSim does not edit or run utility scripts that are stored in the watershed folder. It stores them under the /users/ folder, which it creates in the AppData area of your profile on your computer. However, the most logical place to store your scripts IS in your watershed, so that if you move or share your watershed with a colleague, all necessary information is contained in the watershed.
Therefore, it is recommended that you maintain a utility script folder in your watershed directory. Before sharing the model with a new modeler, copy your current utility scripts from their location in the /users/ area* to a location in your watershed directory. The next modeler can then use the Import option to bring those scripts from their location in the watershed to the /users/ location, where ResSim will recognize them.- C:\UsersyourUsername\AppData\Roaming\HEC\HEC-ResSim\3.3\usersyourUsernameyourWatershedname\
Edit—contains two sets of functions ("Figure: Script Editor Edit Menu"). The first set of functions are the standard text editing functions you might expect. Each entry for these functions in the Edit menu is followed by the shortcut keystrokes that can be used to apply the function without accessing it from the menu. The second set of functions in the Edit menu apply to the script file as a whole and could be considered "edits" to the Available Scripts Tree. These functions do not have shortcut keys.
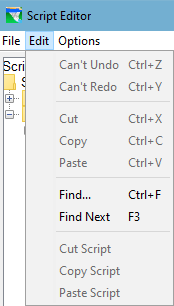 Figure: Script Editor Edit Menu
The text editing functions include:
- Undo —use this function to undo the last edit or edits to the text of your script. With each selection of this option, the last edit made to the text will be reversed and the text will be restored to its prior state. When there are no edits to undo, this menu entry displays in the menu as Can't Undo and is greyed-out.
- Redo—use this function to redo the last undo. With each selection of this option, the last text edit that was reversed will be reapplied. When there are no edits to redo, this menu entry displays in the menu as Can't Redo and is greyed-out.
- Cut—this function copies the selected text to the Windows Clipboard and deletes it from the script. If no text has been selected in the script edit panel, this function is greyed-out and cannot be selected from the menu and its shortcut keystrokes will perform no action.
- Copy—This function copies the selected text to the Windows Clipboard. If no text has been selected in the script edit panel, this function is greyed-out and cannot be selected from the menu and its shortcut keystrokes will perform no action.
- Paste—This function copies the text that was most recently placed on (copied to) the Windows Clipboard into the text of the current script at the current position of the text cursor.
Find—This option opens the Find dialog (as shown in "Figure: Script Editor - Edit Menu - Find Option"). Like most Find dialogs, you enter a string and select some options for how the find should operation. The options include the search direction (All, Up or Down), whether the entered string represents a word and not a substring of a word, and whether or not case matters to the find.
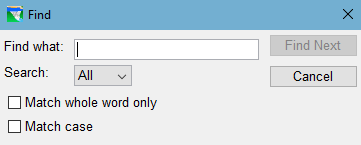 Figure: Script Editor - Edit Menu - Find Option
- Find Next—The Find Next function finds the next occurrence of the text that had been in the Find dialog the last time it was used. Find Next does not open the Find dialog, nor will it report failure if it doesn't find the string.
The Available Scripts Tree edit functions include: - Cut Script—This function deletes the currently selected script from the Available Scripts Tree and places it on the Clipboard. Because the script file is on the Clipboard, it can be pasted back into the current folder of the Tree or into another one.
- Copy Script—This function copies the current script file onto the Clipboard.
- Paste Script—This function copies the script file, if there is one, from the Clipboard into the current folder of the Available Scripts Tree.
The Cut Script, Copy Script, and Paste Script functions mimic the Delete, Save, and Save As functions from the File menu, but they do not function as properly or consistently, so their use is not recommended. Use the File menu functions.
Options—contains two features that influence how the tabs and spaces appear in the Edit pane ("Figure: Script Editor - Options Menu").
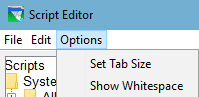 Figure: Script Editor - Options Menu
- Tab Size—to set how many spaces (blank characters) a tab represents.
- Show Whitespace—this is a toggle that turns illustration of "whitespace" characters ON and OFF. When ON, tabs are drawn with arrows and spaces are drawn with dots. When OFF, tabs and spaces are drawn as blank characters.
An example of using a Script might be to compute all the Alternatives contained within a Simulation (instead of running each Alternative one at a time). "Figure: Example Script to Run Multiple Alternatives" shows the contents of an example script to run all alternatives contained within a simulation. NOTE: as previously described in "Menu Bar" and indicated in "Figure: Simulation Menu", the capability to run all alternatives in the simulation is available from the Simulation Menu → Run Manager.
from hec.script import *
from hec.hecmath import *
from hec.heclib.dss import *
import time
import java.util.Vector
#
# The purpose of this script is to run all Alternatives in a ResSim Simulation.
# This script should be run from the Simulation module (==>Tools menu, Scripts..)
# There are two places where you will need to make revisions (search for REVISE)
# Have Fun and Good Luck!!!
#.................................... REVISE .................................
# the next line defines the name and location of this script's output log file
logFileName = "C:/Program Files/HEC/HEC-ResSim/v3.0BetaVII/users/CWMS/BaldEagleDemo/scripts/Modules/Simulation/ResSimScript_log.out"
logFile = open(logFileName, "w")
#==============================================================================
def log(str) :
	print str
	logFile.write("%s : %s\n" % (time.ctime(), str))
#==============================================================================
def runSimulation(simulationName, alternativeName=None) :
	#----------------------------------------------------------------#
	# Make sure we're in the correct module and open the simulation. #
	#----------------------------------------------------------------#
	module = ClientAppWrapper.getCurrentModule()
	if `module` != "Simulation" :
		title = "Incorrect Module"
		msg = "This script must be run from the Simulation module."
		MessageBox.showError(msg, title)
		log("\n\n%s : %s\n" % (title, msg))
		return Constants.FALSE

	if not module.openSimulation(simulationName) :
		title = "Simulation Not Found"
		msg = simulationName
		MessageBox.showError(msg, title)
		log("\n\n%s : %s\n" % (title, msg))
		return Constants.FALSE

	#-----------------------------#
	# Run all the alternative(s). #
	#-----------------------------#
	if not alternativeName :
		runs = module.getSimulationRuns()
	else :
		run = module.getSimulationRun(alternativeName)
		if not run :
			title = "Alternative Not Found"
			msg = alternativeName
			MessageBox.showError(msg, title)
			log("\n\n%s : %s\n" % (title, msg))
			return Constants.FALSE
		runs = [run]

	for run in runs :
		print
		log("===========================================")
		log("Computing %s" % run)
		log("===========================================")
		#module.setActiveRun(run)
	 	module.computeRun(run, 5, Constants.TRUE, Constants.TRUE)
		log("===========================================")
		log("%s done" % run)
		log("===========================================")

  	return Constants.TRUE
#==============================================================================

#--------------------------#
# run the simulation #
#--------------------------#
#....................................... REVISE ....................................
# the next line defines the name of the Simulation containing Alternatives to be run
runSimulation("1993.11.29-0700")
logFile.close()
Figure: Example Script to Run Multiple Alternatives