Download PDF
Download page The Watershed Setup Module.
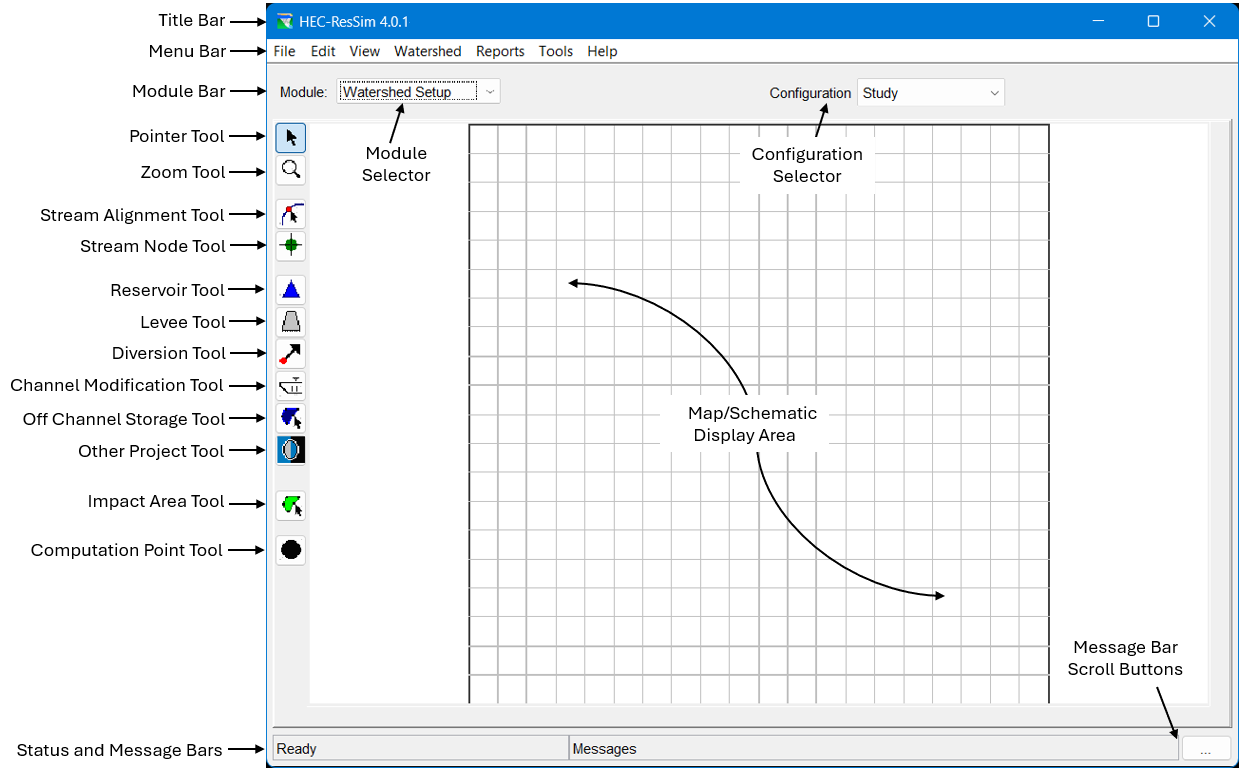
The Watershed Setup Module
The Watershed Setup Module provides tools for setting up your watershed's physical arrangement, including maps, coordinate system, stream alignment, schematic elements, geo-extents, and other geo-referenced data. "Figure: Watershed Setup Module - Main Window" shows the components of the Watershed Setup Module's main window. User interface components and options that are unique to this module are described in this section.
Watershed Setup Module - The Menu Bar
The following is an overview of the menus unique to the Watershed Setup Module. The options in these menus will be described in more detail in the context of specific tasks later in this and later chapters. Refer to "ResSim User Interface" for information about the File, View, Tools, and Help menus, which are common to all three modules.
The Edit Menu

Use the Edit menu ("Figure: Edit Menu") to access the following editors:
- Watershed Properties Editor,
- Impact Areas Editor,
- Projects Editor,
- Drawing Properties Editor, and
- Computation Point Layer Editor
The Watershed Menu

Using the Watershed menu ("Figure: Watershed Menu"), you can:
- Create and edit Configurations
- Update Computation Points
- Import Stream Alignments, Impact Areas, and Computation Points
- Export Stream Alignments and Configuration Elements
Save Configurations.
The Reports Menu

The Reports menu ("Figure: Reports Menu") gives you access to reports for your watershed. Reports include the List of Streams, List of Impact Areas, List of All Configurations, List of Computation Points, and Projects listings by project type.
The Configuration Selector
The map display can only display one watershed schematic at a time. That schematic is contained in a watershed configuration. You can use the Configuration Selector (drop-down box) to select the configuration you want displayed in the Map Display area. Once you select a Configuration, all project elements you add to the schematic will be included in that Configuration. The default configuration, Study, contains the entire set of all projects defined in the watershed, whether or not it is the active configuration.
Map Tools
The Tool Bar is located to the left of the map display area and contains a column of buttons. Each of these buttons changes the functionality (behavior) of your mouse cursor in the map display area, effectively changing your mouse into different map tools. Each tool button (a.k.a, tool) displays an icon to illustrate its purpose.
The first three tools on the Tool Bar and their functionality are common to all three modules. These Common tools are:
![]() Pointer/Selector Tool—use the pointer tool to select any schematic element in the map display. Left click will select the element your cursor is "pointing at". Right-click will open a context menu for the element you are pointing at.
Pointer/Selector Tool—use the pointer tool to select any schematic element in the map display. Left click will select the element your cursor is "pointing at". Right-click will open a context menu for the element you are pointing at.
![]() Zoom Tool—use the Zoom Tool to zoom the map display area in and out. To zoom in, hold the left mouse button down to draw a box around the area you want to zoom in on. To zoom out, right-click in the display area; the display will zoom out in program-defined increments.
Zoom Tool—use the Zoom Tool to zoom the map display area in and out. To zoom in, hold the left mouse button down to draw a box around the area you want to zoom in on. To zoom out, right-click in the display area; the display will zoom out in program-defined increments.
In the Watershed Setup Module, the map tools that appear below the Common tools are the Schematic Element tools. These tools allow you to create, edit, and manage the schematic objects in your watershed configuration(s). These tools also act as Pointer/Selector tools, but they will only interact with objects of their specific type. The schematic element tools are separated into fours groups: the Stream Alignment tools, the Project tools, the Impact Area tool, and the Computation Point tool.
The Stream Alignment Tools
The stream alignment represents the river system of your watershed. The tools for creating and managing the stream alignment include the Stream Alignment tool and the Stream Node tool. Working with the stream alignment is described in detail in "Watershed Schematic Elements".
![]() Stream Alignment Tool—use the Stream Alignment Tool to draw and edit the multi-segmented lines that define a stream in the Stream Alignment.
Stream Alignment Tool—use the Stream Alignment Tool to draw and edit the multi-segmented lines that define a stream in the Stream Alignment.
![]() Stream Node Tool—the Stream Node Tool allows you to create and edit stream nodes and stream junctions (confluences), two of the primary components of a Stream Alignment.
Stream Node Tool—the Stream Node Tool allows you to create and edit stream nodes and stream junctions (confluences), two of the primary components of a Stream Alignment.
The Project Tools
The project tools include the Reservoir Tool, Levee Tool, Diversion Tool, Channel Modification Tool, Off Channel Storage Tool, and the Other Project Tool. Creating and editing the project elements is described in detail in "Developing a Reservoir Network".
![]() Reservoir Tool—use the Reservoir Tool to create and edit reservoir projects in the map display. The Reservoir Tool is the first of the Project tools in the toolbar. Creating and editing project schematic elements are described in detail in "Developing a Reservoir Network".
Reservoir Tool—use the Reservoir Tool to create and edit reservoir projects in the map display. The Reservoir Tool is the first of the Project tools in the toolbar. Creating and editing project schematic elements are described in detail in "Developing a Reservoir Network".
![]() Levee Tool—use the Levee Tool to create and edit levee projects in the map display.
Levee Tool—use the Levee Tool to create and edit levee projects in the map display.
![]() Diversion Tool—use the Diversion Tool to create and edit diversions in the map display.
Diversion Tool—use the Diversion Tool to create and edit diversions in the map display.
![]() Channel Modification Tool—use the Channel Modification Tool to select and add channel modifications (such as channel straightening, concrete walls, dredging, and widening) to the map display and access editors for Diversions.
Channel Modification Tool—use the Channel Modification Tool to select and add channel modifications (such as channel straightening, concrete walls, dredging, and widening) to the map display and access editors for Diversions.
![]() Off Channel Storage Tool—use the Off-Channel Storage Areas Tool to select and create Off-Channel Storage Area polygons in the map display and edit their properties.
Off Channel Storage Tool—use the Off-Channel Storage Areas Tool to select and create Off-Channel Storage Area polygons in the map display and edit their properties.
![]() Other Project Tool—use the Other Projects Tool to place an icon that represents a project that cannot be classified as one of the defined project types, such as pump stations and gages, etc.
Other Project Tool—use the Other Projects Tool to place an icon that represents a project that cannot be classified as one of the defined project types, such as pump stations and gages, etc.
The Impact Area and Computation Point Tools
Creating and editing impact areas and computation points are described in detail in "Developing a Reservoir Network".
![]() Impact Area Tool—use the Impact Area Tool to create and edit impact areas representing regions in the watershed where flood damages will be evaluated.
Impact Area Tool—use the Impact Area Tool to create and edit impact areas representing regions in the watershed where flood damages will be evaluated.
![]() Computation Point Tool—use the Computation Point Tool to create and edit Computation Points. Computation Points are locations in the watershed where individual models will share information. Typically, one model will produce results at a Computation Point that another model will use as input.
Computation Point Tool—use the Computation Point Tool to create and edit Computation Points. Computation Points are locations in the watershed where individual models will share information. Typically, one model will produce results at a Computation Point that another model will use as input.
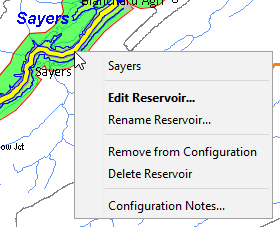
Using Context Menus
Context menus are accessed by right-clicking on a schematic element in the map area. The options in a context menu vary according to the schematic elements with which they are associated. "Figure: Reservoir Context Menu" shows the context menu that appears if you right-click on a reservoir element in the Map Display area in the Watershed Setup Module.