Extract Editor
After you have completed the model linking you will need to configure extracts that are required by model alternatives. Configuring an extract is completed using the Extract Editor (Figure 1).

The Extract Editor allows you to connect required model alternative input data from multiple sources to the forecast.dss file that provides input data to model alternatives during the compute process. The required input data is classified into extract groups that link the source data information to the required input records. To access the Extract Editor, from the HEC-RTS main window, click on the Setup tab, from the Models menu, click Edit Extract, the Extract Editor will open (Figure 1).
The Extract Editor is comprised of two sections: Required Input and Extract Linking (Figure 2). The Required Input section contains a table that lists the required input records for each model alternatives. The Extract Linking section contains information on defined extract groups, and contains a table, which lists the input records and source records assigned to an extract group.

Required Input Section
The Required Input section (Figure 3) provides a list of the time series that needs to be mapped to a source record to provide input data for the forecast compute.

The Required Input section provides information on the following:
Model this column lists which software application is requesting the required input record.
Alternative this column lists the name of the model alternative that is requesting the input record.
Location this column displays the name of the model location that is associated with the input record.
Parameter this column displays the parameter associated with the input record.
Type this data column specifies if the record is times series data or gridded data. Types include: GRID or TIME_SERIES. GRID represents DSS gridded data. TIME_SERIES represents time series data.
Destination this column displays the actual input record pathname that the model requires. This is the pathname that will be written to the forecast.dss file and used by the model during the compute.
Index Each required destination pathname is assigned an Index number when it is loaded into the Extract Editor. This number has no real usage except keeping the initial filtered list set. There can be multiple indices for a single DSS pathname.
This information does not display by default in the Required Input table, you will need to set up the table view, see Model Linking.
Extract Linking Section
The Extract Linking section (Figure 4), displays information on the extract groups. Extract groups link similar typed data (gridded or time series) to a single data source. The source can be a DSS file, a CWMS database, or a WISKI database (WISKI Extract and Post). The source records will be mapped to the required input records in the extract group. During the creation of a forecast, the source records will be copied into the required input pathnames when are created in the forecast.dss file.

The Extract Linking section provides information on the following:
From <data_source>this column lists the source data pathnames that will fill the DSS record displayed in the To forecast.dss column (Figure 4).
Model this column lists which software application is requesting the required input record.
Alternativethis column lists the model alternative that is requesting the input record.
Location this column displays the location that is associated with the input record.
Parameter this column displays the parameter associated with the input record's data.
To forecast.dss this column displays the actual input record pathname that the model requires. This is the pathname that will be written to the forecast.dss file and used by the model during the compute.
Index each required destination pathname is assigned an index number (Figure 4) when it is loaded into the Extract Editor. This number has no real usage except keeping the initial filtered list set. There can be multiple indices for a single DSS pathname.
This information does not display by default in the Extract Linking table, you will need to set up the table view, see Model Linking.
Table View Options
You can change the amount of information displayed in the tables in both the Required Input and the Extract Linking sections. Clicking on the magnifying glass icon (![]() ) at the top right-hand corner of the tables in each section. The Pathname Filters for Extract dialog (Figure 5) opens.
) at the top right-hand corner of the tables in each section. The Pathname Filters for Extract dialog (Figure 5) opens.
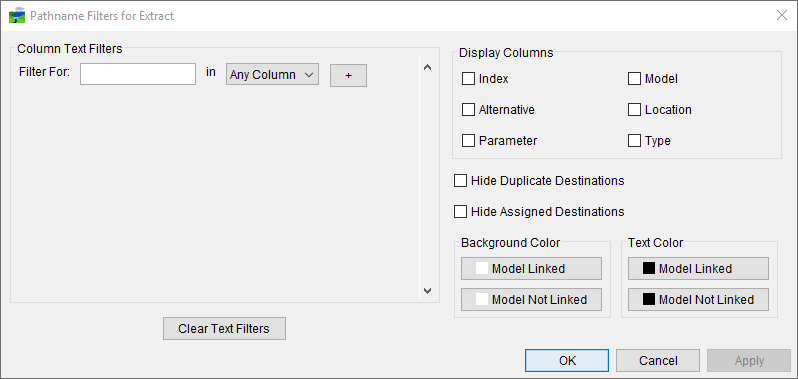
From the Column Text Filters box (Figure 5) you can filter the records to display only records that contain a certain phrase or string of text. Filtering can be done by Column, Index, Model, Alternative, Location, Parameter, Type, or Destination. You can filter for multiple requirements by clicking +. Below are examples of several different ways that you can filter:
- Filters can be used to retrieve only records that are an exact match. You can do this by typing a string of text in the Filter For: box.
- Filters can be used to retrieve records that start, end, or contain a specific string. To do this, use an asterisk (*) after, before, or inserted into the string of text you want to filter for.
From the Display Columns box (Figure 5) you can select which columns in the table to view. For the examples in this chapter, Index, Model, Alternative, Location, Parameters, and Type have been selected for the tables in each section of the Extract Editor.
You can condense records that have the same destination to one row, selecting Hide Duplicate Destinations (Figure 5). To remove a record from a table that has already been assigned to an extract group, select Hide Assigned Destinations (Figure 5). The Hide Assigned Destinations option is not available for the Extract Linking section. For the examples in this chapter, neither Hide Duplicate Destinations or Hide Assigned Destinations has been selected.
You can also color code the destination records listed in the Required Input section (Figure 3) depending on if the destination record is linked to a source record. You can color code by background or text. For example, to add a background color to a record that is not linked, from the Background Color box (Figure 5), click Model Not Linked, a Color Chooser dialog will open (Using the Color Chooser). Select a color, click OK, the Color Chooser will close, and from the Destination column of the Required Input table, any record that has not been linked will be highlighted in the selected color (Figure 1).
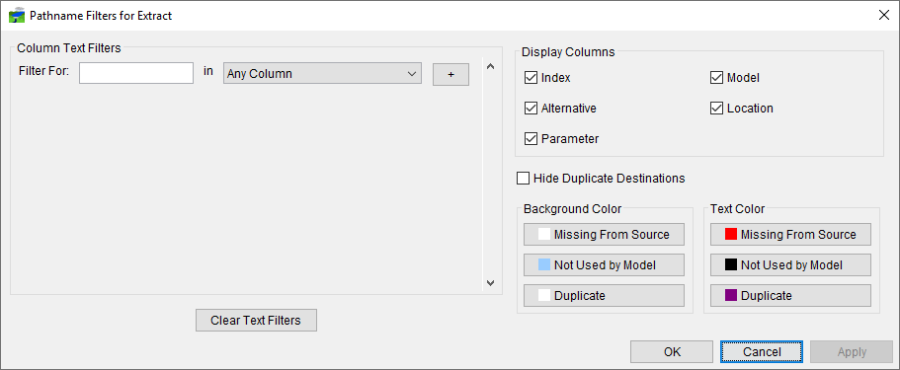
You can also color code the records listed in the Extract Linking section (Figure 6) depending on if the destination record is missing from a source, not used by a model, or is a duplication. You can color code by background or text. For example, in Figure 6, to add a background color to a record that is not used by a model, from the Background Color box (Figure 6), click Not Used by Model, a Color Chooser dialog will open (Using the Color Chooser). Select a color, click OK, the Color Chooser will close, and from the Extract Linking table, any record that has not been used by a model will be highlighted in the selected color (Figure 1).