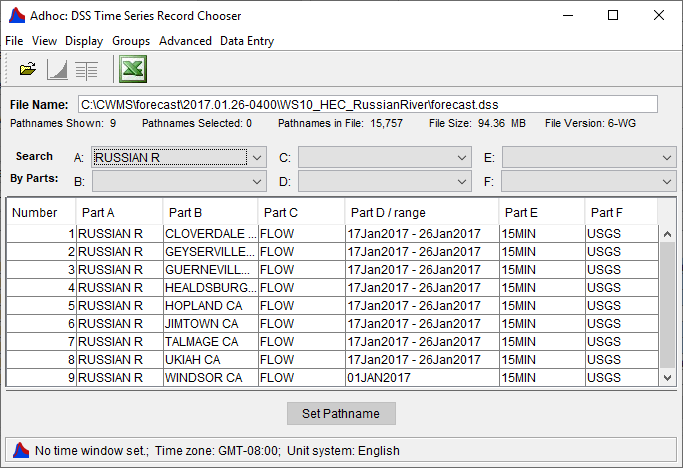
Extract Groups
Extract groups define the type of data and the source data that will be copied when an extract is running. Extract groups can be created for the following data sources:
- Local DSS time series file
- Remote DSS time series file
- Local DSS gridded data file
- Remote DSS gridded data file
- CWMS database
- WISKI database (KiWIS Write Extension)
From the Extract Editor, from the Extract Linking section, the Extract Groups box (Figure 1), lists the defined extract groups for a watershed. From the Extract Groups box, you can create an extract group; delete an extract group; rename an extract group; make a copy of an extract group; select which extract groups will run by default in a forecast compute; and, determine the order in which extract groups will run in a forecast compute. In addition, you can color code the extract groups that will run by default.
Create an Extract Group
To create an extract group:
- From the HEC-RTS main window, click on the Setup tab, from the Models menu, click Edit Extract, the Extract Editor will open.
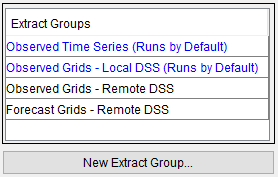
- From the Extract Linking section, from the Extract Groups box (Figure 1), click New Extract Group, the New Extract Group dialog will open (Figure 2).
- In the Name box (Figure 2), enter a name for your extract group.
- From the Type list (Figure 2) select the type of data (i.e., Time Series, Gridded Data) being extracted and mapped.
- If you selected Time Series as your Type, from the Source list select either DSS if using a DSS file, or KIWIS if selecting data from a WISKI database. If you selected Gridded Data for the Type, DSS is the only option (DSS file).
The KiWIS option is detailed in Appendix K and will not be discussed in this chapter.
 For Time Series or Gridded Data types, from the File box (Figure 2), click . An Open browser will open, browse to the location of the appropriate file, click on the filename, click Open. The Open browser will close, and you will be returned to the New Extract Group dialog (Figure 2).
- If you want your extract group to run automatically when a forecast is made, select Run by Default (Figure 2).
- Specify the Time Window to extract the data from the Start and End lists; available options are: Extract Start, Start of Simulation, Forecast Time, End of Simulation. Offsets for the start and end times can also be included, available options are hours, minutes, or seconds. In the Offset box, you will enter the offset increment. This time window is relative to the forecast time window that you defined when you created the forecast.
- When you are done, click OK, the New Extract Group dialog will close (Figure 2). The new extract group will display at the bottom of the Extract Groups box, and the information about the extract group will display.
Note: Extract groups are run in the order they are displayed in the Extract Groups box. If you run more than one extract group during the extract process and there are records that are mapped in more than one of the selected extract groups, the last extract group mapping will replace all previous mappings.
Adding Required Input Data to Extract Groups
Once an extract group is created, you can select what required input data you want to map to the selected source data. To include required input data with an extract group:
- Select an extract group from the Extract Groups box (Figure 1).
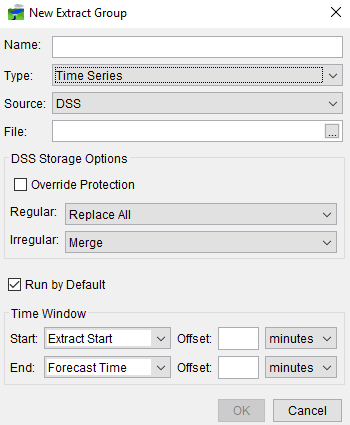
- In the Required Input section, select all the records you want to add to the extract group. You can select multiple records by selecting a record, then pressing the CTRL key, click any additional records you want to add (Figure 3).
- After selecting the required input records, click Add to Group (Figure 4).

- The records selected will be displayed in the Extract Linking section in the table (Figure 5).
- Select how much information you want to view in the Extract Linking table by clicking the magnifying glass icon (
 ). Refer to Extract Editor for further details on formatting the Extract Linking table. Note: If you have the Hide Assigned Destinations selected, the selected records will not display in the Required Input list.
Selecting Source Records
When records are added to an extract group, the records display the name of the record under the From <data_source> column in the Extract Linking table. HEC-RTS does its best to match the From <data_source> side record names to the To forecast.dss side record names, but sometimes HEC-RTS needs some help.
To select records for the From <data_source> record:
- Double-click the row in the From <data_source> column you would like to set the time series record for.
- Click
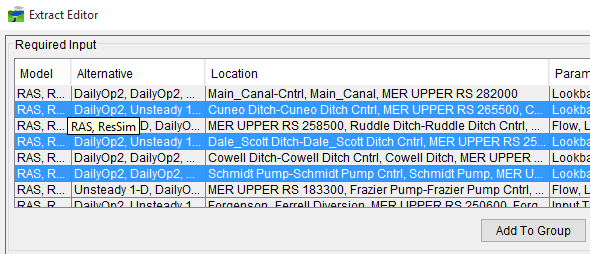
 , which appears in the right section of the cell with the From <data_source> name. The DSS Time Series Record Chooser will open (Figure 6).
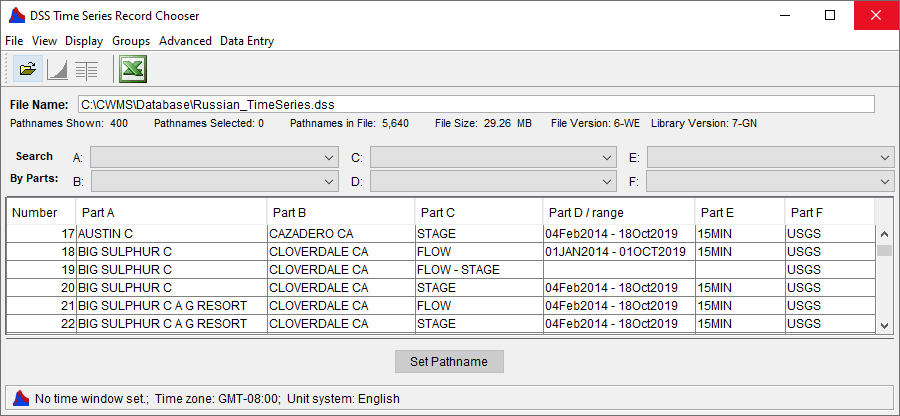
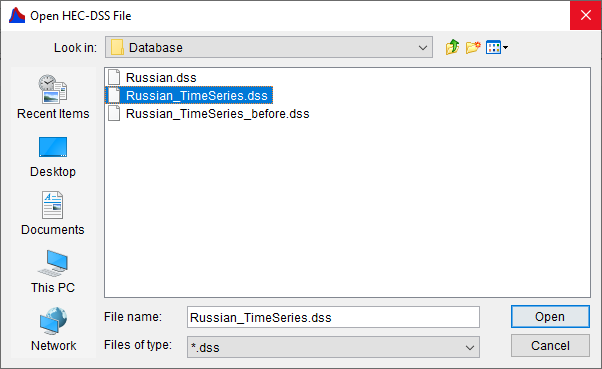
- From the File menu, click Open, an Open HEC-DSS File browser will open (Figure 7). Browse to the location of the DSS file that contains the records needed, click on filename, click Open. The Open HEC-DSS File browser will close, and the DSS Time Series Record Chooser will display its time series records.
- From the Search By Parts area (Figure 6), use the various filter lists to locate the desired time series record.
- To select a time series record to replace the one displayed in the selected row in the Extract Linking table, click the time series record row in the DSS Time Series Record Chooser (Figure 6), click Set Pathnames.
- The time series record you selected will display back on the Extract Linking table in the row you original selected.
- To set another time series record, click on the next row in the Extract Linking table where you would like to replace the record. From the DSS Time Series Record Chooser (Figure 6), click on the time series record you want, click Set Pathname.
- When all the time series records have been set in the Extract Linking table, from the DSS Time Series Record Chooser, from the File menu, click Close.
Ad-Hoc Records
Additional input data not listed in the Required Extract table may be required for a forecast compute. You can add additional time series records using the Ad-Hoc Record feature. An Ad-Hoc record allows you to add time series records to a DSS time series record in the forecast.dss file.
To add an Ad-Hoc record:
- From the Extract Editor, click Add Extract Data Set, the Adhoc: DSS Time Series Record Chooser will open (Figure 8).
- From the Search By Parts area (Figure 8), use the various filter lists to locate the desired time series record.
- Select the pathname row for the record, click Set Pathname.
- Once you have selected all the pathnames for all the necessary time series records, from the File menu, click Close. The Adhoc: DSS Time Series Record Chooser will close (Figure 8).
