Tabular Data Area
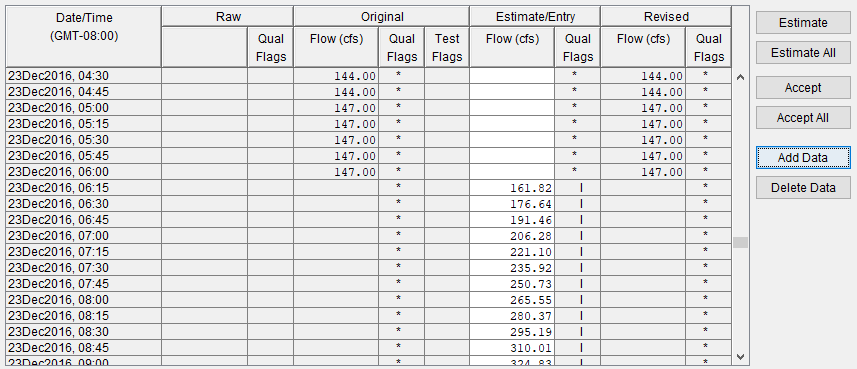
The tabular data area (Figure 1) is a table that allows you to do text-entry data editing. The following is a description of the columns available from the table:

- The Date/Time column (Figure 1) specifies the time zone for the data and lists the specific date and time for each data point.
- The Raw column (Figure 1) will display the data that was originally entered into a DSS file(s), along with any quality flags.
- The Original column (Figure 1) contains the validated data that you are reviewing, again along with any quality flags.
- The Estimate/Entry column (Figure 1) allows you to modify data values. When cells in this column are white, you may edit the data. When cells in this column are gray, the rows are protected as being acceptable, having passed validation testing. To allow editing, select Edit Acceptable Data or select Edit Acceptable Data from the Options menu.
- The Revised column (Figure 1) displays the values you have accepted. The corrected values appear in the Revised column, along with quality flags.
Table 1 Quality Flags for Data Validation
Quality | |
* | no quality (data has not been validated) |
Q | Questionable |
P | Protected |
K | keyboard entry |
E | estimate (graphical) |
I | interpolated estimate |
NI | negative incremental (rate of change) |
R | Rejected |
M | set to missing |
A | explicit form of blank for manual entry of quality |
+ | inserted value |
blank; indicates value passed all tests |
Inserting/Deleting Values
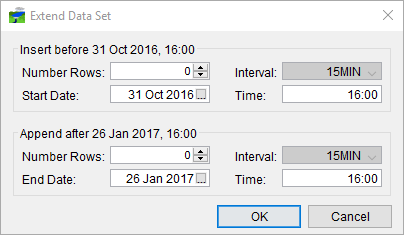
To add or delete data values in the tabular data area, from the Data Validation Editor, first from the Options menu, select Edit All Data. When selected the Add Data and Delete Data buttons become visible (Figure 1). To insert a data value, click Add Data (Figure 1). The Extend Data Set dialog (Figure 2) will open.

Through the Extend Data Set dialog (Figure 2) you can insert data into the time window before the time window dates or append data to the time window.
Insert BeforeIn the Insert Before DD MMM YYYY, HH:MM and DD MMM YYYY, HH:MM section (Figure 2) of the Extend Data Set dialog, select the number of rows you would like to insert using the Number Rows selector. The Start Date and Time fields will adjust their values according to the number of rows you select to enter. Click OK, the Extend Data Set dialog closes (Figure 2) and your new rows will be generated and added to the beginning of the table. You may then enter values in the table for the added time periods.
Append AfterIn the Append After DD MMM YYYY, HH:MM section (Figure 2) of the Extend Data Set dialog, select the number of rows you would like to append after the time window end date using the Number Rows selector. The End Date and Time fields will adjust their values according to the number of rows you select to enter. Click OK, the Extend Data Set dialog closes (Figure 2) and your new rows will be generated and added to the end of the table.
You may then enter values in the table for the added time periods.
If you wish to delete a data value, select a row from the table, click Delete Data (Figure 1), the row will no longer appear in the table. When deleting you will not be warned, so be sure you know that you want to delete the data value before clicking Delete Data.
For selected rows, Accept (Figure 1), will accept the changes for those selected rows and copy the information to the Revised column (Figure 1) of the tabular data area. Your changes are stored in memory and are not yet saved to DSS file(s). Additionally, you can use the Accept All (Figure 1) to save and accept all applicable data within the table.
Other Editing Commands
Estimate (Figure 1) will automatically compute a data value for selected rows based on acceptable surrounding data in the Original column (Figure 1). You can also multi-select rows (tabular editing) or data values (graphical editing) for estimation, provided that the selected rows are bracketed by acceptable values. Additionally, you can use the Estimate All (Figure 1) to apply the estimate to all applicable data within the table.